Quick Tip: User Sortable Lists with Flexbox and jQuery

In this article, we’ll learn, step-by-step, how to build a simple jQuery plugin which sorts elements based on the values of their custom data attributes.
If you’re curious about the end result, have a look at the corresponding CodePen demo:
See the Pen Simple jQuery Plugin for Sorting Elements by SitePoint (@SitePoint) on CodePen.

Note: This article assumes you have a basic understanding of flexbox, as well as how to develop jQuery plugins. If you aren’t familiar with these topics, be sure to check out the links.
Accessibility Concerns
To build our plugin, we’ll take advantage of flexbox’s power.
By default, flex items are laid out according to their source order. But, by using the order property, we’re able to change their order inside the parent flex container. Items with lower order values appear first. See an example below:
See the Pen Flexbox’s “order” Property by SitePoint (@SitePoint) on CodePen.
If there are more than one items with same order values, the order for these items depends on their source order.
Although the order property allows us to easily reorder elements, it comes with an accessibility limitation: it creates a disconnection between the source order and the visual order. To better understand the problem, take a look at this article (especially at the “Source Order vs. Visual Order” section).
So, before moving on to examine how to build our plugin, please note that it won’t be accessible.
The Markup
To begin with, we define an unordered list with twelve list items:
<ul class="boxes">
  <li>
    <a href="#">
      Box1
      <div class="details">
        <span class="length">13M</span>
        <span class="price">670€</span>
      </div>
    </a>
  </li>

  <!-- more list items here -->

</ul>
Notice that inside each of our list items there is the .details element, which displays some information about the corresponding item. As we’ll see in a moment, we’ll also add custom HTML attributes to store this information.
Note: The
.detailselement isn’t really necessary. We only use it so as to have a better understanding of how the target elements are being sorted.
Next, we identify the attributes we want to sort by. In our project, these are the price and length attributes. With that in mind, we use their names to apply custom attributes (data-price and data-length) to our list items. The values of these attributes match the text values (only the numbers) of the .length and .price elements which are part of the .details element.
For example, here are the attributes for the first list item:
<li data-length="13" data-price="670">
  <a href="#">
    Box1
    <div class="details">
      <span class="length">13M</span>
      <span class="price">670€</span>
    </div>
  </a>
</li>
At this point, we specify the elements that will be responsible for sorting the list items. We use a <select> element to do this:
<select class="b-select">
  <option disabled selected>Sort By</option>
  <option data-sort="price:asc">Price Ascending</option>
  <option data-sort="price:desc">Price Descending</option>
  <option data-sort="length:asc">Length Ascending</option>
  <option data-sort="length:desc">Length Descending</option>
</select>
As you can see, all <option> elements (except for the first one) contain the data-sort attribute. The value of this attribute uses the following convention:
<option data-sort="price:asc">
So, as the value we have the attribute we want to sort by, followed by a colon along with either the “asc” or “desc” indicator.
CSS Styles
With the markup ready, let’s add a few basic styles to our page. Specifically, we define the unordered list as a flex container and give list items width: 25%. Here are the associated CSS rules:
.boxes {
  display: flex;
  flex-wrap: wrap;
}

.boxes li {
  width: 25%;
}
Building the Plugin
We’ll call our plugin numericFlexboxSorting. Before showing the process we’ll follow to build it, let’s start with the end in mind and explain how we can initialize it.
Initializing the plugin
In general, the plugin should be initialized as follows:
$("your-select-tag").numericFlexboxSorting();
For example, in our case:
$(".b-select").numericFlexboxSorting();
By default, the plugin will sort the elements with the class of .boxes li. We can override this behavior by changing the value of the elToSort configuration property:
$(".b-select").numericFlexboxSorting({
  elToSort: "the-elements-you-want-to-sort"
});
Steps Breakdown
Now we’re ready to describe the development process!
As a first step, we extend jQuery’s prototype ($.fn) object by adding the numericFlexboxSorting method to it:
$.fn.numericFlexboxSorting = function() {
  const $select = this;

  // do stuff here

  return $select;
};
Within that method, the this keyword refers to our <select> element. As soon as we create the plugin, we have to return this element. If we don’t, method chaining won’t work.
Consider this code, for example:
$(".b-select").numericFlexboxSorting().css("background", "red");
Here, unless we return the target element the css method won’t do anything.
As we’ve already mentioned, the plugin will sort the elements with the class of .boxes li by default. However, we should be able to override this behavior if we want. To accomplish this, we take advantage of jQuery’s extend method:
$.fn.numericFlexboxSorting = function(options) {
  const settings = $.extend({
    elToSort: ".boxes li"
  }, options);

  // do stuff here
};
The plugin will sort numbers in either ascending or descending order. With that in mind, we define the corresponding variables which we’ll use later:
$.fn.numericFlexboxSorting = function(options) {
  const ascOrder = (a, b) => a - b;
  const descOrder = (a, b) => b - a;

  // do stuff here
};
As soon as a user selects an option (except for the first one) from the drop-down list, we should retrieve and evaluate its value. To do this, we use the change event:
$.fn.numericFlexboxSorting = function(options) {
  const $select = this;

  $select.on("change", () => {
    const selectedOption = $select.find("option:selected").attr("data-sort");
    sortColumns(settings.elToSort, selectedOption);
  });

  // do stuff here
};
Inside the event handler, we do two things:
- Retrieve the value of the
data-sortattribute for the selected option (e.g.price:asc). - Call the
sortColumnsfunction.
The sortColumns function accepts two parameters:
- The elements we want to sort.
- The value of the
data-sortattribute for the selected option.
Here’s the body of this function:
function sortColumns(el, opt) {
  const attr = "data-" + opt.split(":")[0];
  const sortMethod = (opt.includes("asc")) ? ascOrder : descOrder;
  const sign = (opt.includes("asc")) ? "" : "-";

  // 1
  const sortArray = $(el).map((i, el) => $(el).attr(attr)).sort(sortMethod);

  // 2
  for (let i = 0; i < sortArray.length; i++) {
    $(el).filter(`[${attr}="${sortArray[i]}"]`).css("order", sign + sortArray[i]);
  }
}
Let’s explain what happens inside it:
-
Depending on the attribute the user wants to sort by (i.e.
priceorlength), we get the value of the relateddata-* attributefor each one of the target elements and store it in an array. Plus, depending on how the user wants to sort the target elements, we sort the array in either ascending or descending order. -
We loop through the array, find the related elements and assign them an
orderproperty value (positive or negative) which is determined by the value of their correspondingdata-* attribute.
So, for instance, if the user selects theprice:ascoption, the element withdata-price: 315receivesorder: 315.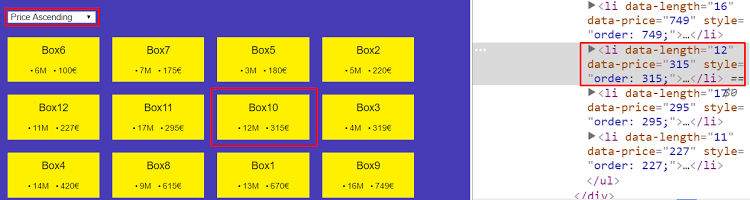
On the other hand, if the user selects the
price:descoption, it receivesorder: -315.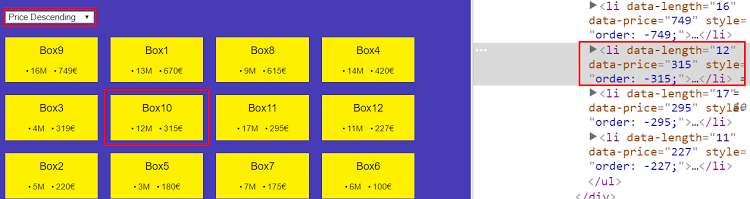
Lastly, to prevent possible conflicts with other libraries which use the $ variable, we wrap our code in an immediately invoked function expression, like this:
(function($) {
  $.fn.numericFlexboxSorting = function(options) {
    // do stuff here
  };
})(jQuery);
Our plugin is ready. You can see it live in the following Codepen demo:
See the Pen Simple jQuery Plugin for Sorting Elements by SitePoint (@SitePoint) on CodePen.
Plugin Limitations
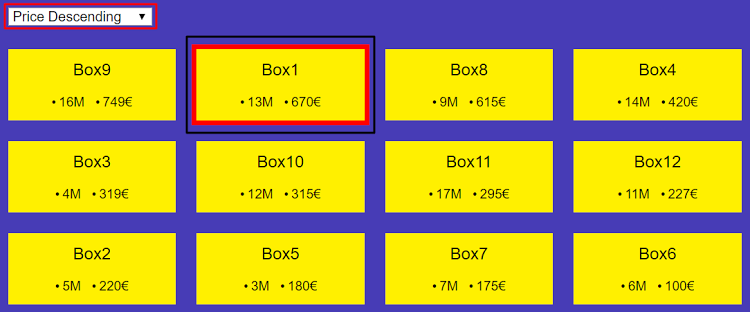
At this point, we have to recall that our plugin comes with one big limitation: it’s not accessible. To prove it, select an option from the drop-down list and then use the keyboard (click the pen and hit the “Tab” key) to navigate through the links. Notice that the elements get focused according to their DOM order and not their CSS order.
Another thing to note is that the plugin provides just a basic functionality, and thus it’ll only work under specific conditions. For example, the attribute value string should only contain numeric values. Remember this value specifies the order (expects a number) for the target elements.
Obviously, for sorting and filtering elements, there are more reliable and powerful libraries out there, like the ones below:
Especially for MixItUp, there’s a SitePoint article which covers the basics of it.
Browser Support
The plugin depends on flexbox, so its support is determined by the browser’s flexbox’s support. Happily, these days flexbox has excellent browser support.
Next Steps
If you like a challenge and want to enrich the functionality of this plugin, here are a few things you could do:
-
Add support for random sorting.
-
Give users the option to select whether the sort control will be a
<select>element, a number of<button>elements, or even another control type. For this scenario, you might want to provide additional settings, like this:$(".b-select").numericFlexboxSorting({ elToSort: "the-elements-you-want-to-sort", controls: { select: true, // fires change event button: false // fires click event } });
Conclusion
In this article, we went through the process of creating a jQuery plugin. This plugin takes advantage of flexbox’s capabilities to sort elements based on the values of their custom data attributes.
What do you think: is this something you might use in the future? Have you thought of other ways to combine JavaScript and flexbox? Let me know in the comments.