A Comprehensive Introduction to Less: Mixins

Mix… what?
With Less, we can define so-called "mixins", which have some similarities to functions in programming languages. In Less, they’re used to group CSS instructions in handy, reusable classes. Mixins allow you to embed all the properties of a class into another class by simply including the class name as one of its properties. It’s just like variables, but for whole classes. Any CSS class or id ruleset can be mixed-in that way:
.round-borders {
  border-radius: 5px;
  -moz-border-radius: 5px;
  -webkit-border-radius: 5px;
}

#menu {
  color: gray;
  .round-borders;
}

// Output
.round-borders {
  border-radius: 5px;
  -moz-border-radius: 5px;
  -webkit-border-radius: 5px;
}

#menu {
  color: gray;
  border-radius: 5px;
  -moz-border-radius: 5px;
  -webkit-border-radius: 5px;
}
As you can see, this output is the mixin itself and the CSS ruleset. If you don’t want mixins to appear in your compiled .css file just add empty parenthesis after the mixin name. you may wonder why I’m using a capitalized letter for the mixin names. This is because CSS class selectors also use the dot symbol and there is no way to differentiate it from a Less mixin name. That’s why I usually use capitalized letters, as in object oriented programming, which uses capitalized letters for classes.
Enter Your Arguments, Please
Mixins can be made parametric, meaning they can take arguments to enhance their utility. A parametric mixin all by itself is not output when compiled. Its properties will only appear when mixed into another block. The canonical example is to create a rounded corners mixin that works across browsers:
.round-borders (@radius) {
  border-radius: @radius;
  -moz-border-radius: @radius;
  -webkit-border-radius: @radius;
}
And here’s how we can mix it into various rulesets:
header {
  .round-borders(4px);
}

.button {
  .round-borders(6px);
}
Parametric mixins can also have default values for their parameters:
.round-borders (@radius: 5px) {
  border-radius: @radius;
  -moz-border-radius: @radius;
  -webkit-border-radius: @radius;
}
Now we can invoke it like this:
header {
  .round-borders;
}
And it will include a 5px border-radius.
If you have a mixin that doesn’t have any arguments, but you don’t want it to show up in the final output, give it a blank argument list:
.hiddenMixin() {
  color: black;
}
p {
.hiddenMixin()
}Which would output:
p {
  color: black;
}
Within a mixin there is a special variable named @arguments that contain all the arguments passed to the mixin, along with any remaining arguments that have default values. The value of the variable has all the values separated by spaces. This is useful for quickly assigning all the arguments:
.box-shadow(@x: 0, @y: 0, @blur: 1px, @color: #000) {
  box-shadow: @arguments;
  -moz-box-shadow: @arguments;
  -webkit-box-shadow: @arguments;
}

.box-shadow(2px, 5px);
Which results in:
box-shadow: 2px 5px 1px #000;
-moz-box-shadow: 2px 5px 1px #000;
-webkit-box-shadow: 2px 5px 1px #000;
A Little Matchmaking :)
When you mix in a mixin, all the available mixins of that name, in the current scope, are checked to see if they match according to what was passed to the mixin and how it was declared.
The simplest case is matching on arity (the number of arguments that the mixin takes). Only the mixins that match the number of arguments passed in are used, with the exception of zero-argument mixins, which are always included. Here’s an example:
.mixin() { // this is always included
  background-color: white;
}

.mixin(@a)  {
  color: @a;
}

.mixin(@a, @b) {
  color: fade(@a, @b);
}
Now if we call .mixin with a single argument, we will get the output of the first definition, but if we call it with two arguments, we will get the second definition, namely @a faded to @b.
Another way of controlling whether a mixin matches, is by specifying a value in place of an argument name when declaring the mixin:
.mixin (dark, @color) {
  color: darken(@color, 10%);
}

.mixin (light, @color) {
  color: lighten(@color, 10%);
}

.mixin (@_, @color) { // this is always included
  display: block;
}

@switch: light;

.class {
  .mixin(@switch, #888);
}
We will get the following CSS:
.class {
  color: #a2a2a2;
  display: block;
}
Where the color passed to .mixin was lightened. If the value of @switch was dark, the result would be a darker color. Only mixin definitions that matched were used. Variables match and bind to any value, and anything other than a variable matches only with a value equal to itself.
Guards
Another way of restricting when a mixin is mixed in, is by using guards. A guard is a special expression that is associated with a mixin declaration that is evaluated during the mixin process. It must evaluate to true before the mixin can be used. Guards are useful when you want to match on expressions, as opposed to simple values or arity.
We use the when keyword to begin describing a list of guard expressions.
.mixin (@a) when (lightness(@a) >= 50%) {
  background-color: black;
}

.mixin (@a) when (lightness(@a) < 50%) {
  background-color: white;
}

.mixin (@a) { // this is always included
  color: @a;
}

.class1 {
  .mixin(#ddd);
} // this matches the first mixin

.class2 {
  .mixin(#555);
} // this matches the second mixin
Here’s what we’ll get:
.class1 {
  background-color: black;
  color: #ddd;
}

.class2 {
  background-color: white;
  color: #555;
}
The full list of comparison operators usable in guards are: >, >=, =, =<, <.
If you want to match mixins based on value type, you can use the is* functions. These are—iscolor, isnumber, isstring, iskeyword, and isurl. If you want to check if a value, in addition to being a number, is in a specific unit, you may use one of these—ispixel, ispercentage, isem. Here is a quick example:
.mixin (@a) when (iscolor(@a)) {
  color: @a;
}

.mixin (@a) when (ispixel(@a)) {
  width: @a;
}

body {
  .mixin(black);
}

div {
  .mixin(960px);
}

// Output
body {
  color: #000000;
}

div {
  width: 960px;
}
Guards can be separated with a comma—if any of the guards evaluates to true, it’s considered a match:
.mixin (@a) when (@a > 10), (@a < -10) { ... }Instead of a comma, we can use the and keyword so that all of the guards must match in order to trigger the mixin:
.mixin (@a) when (isnumber(@a)) and (@a > 0) { ... }Finally, you can use the not keyword to negate conditions:
.mixin (@b) when not (@b > 0) { ... }Think Math is Bad? Think Again.
Are some elements in your stylesheet proportional to other elements? Operations let you add, subtract, divide, and multiply property values and colors, giving you the power to create complex relationships between properties. Rather than add more variables, you can perform operations on existing values with Less. You can build expressions with any number, color, or variable.
@sidebarWidth: 400px;
@sidebarColor: #FFCC00;
#sidebar {
  color: @sidebarColor + #FFDD00;
  width: @sidebarWidth / 2;
  margin: @sidebarWidth / 2 * 0.05;
}

// Output
#sidebar {
  color: #FFFF00; // color is brighter
  width: 200px;   // width is reduced to 200px
  margin: 10px;   // margin is set to 5% of the width
}
Parentheses can be used to control the order of evaluation. They are required in compound values:
border: (@width * 2) solid black;Less also provides you with a couple of handy math functions. These are:
round(1.67); // returns 2
ceil(2.4);   // returns 3
floor(2.6);  // returns 2
And, if you need to turn a value into a percentage, you can do so with the percentage function:
percentage(0.5); // returns 50%Here I will show you a little secret trick: how to use the golden ratio in your design. You don’t need any calculator at all. Check this out:
@baseWidth: 960px;
@mainWidth: round(@baseWidth / 1.618);
@sidebarWidth: round(@baseWidth * 0.382);

#main {
  width: @mainWidth;
}

#sidebar {
  width: @sidebarWidth;
}
And the answer is:
#main {
  width: 593px;
}

#sidebar {
  width: 367px;
}
Et voila! You have your layout divided properly with the golden ratio. Do you still think math is bad?! I don’t think so :)
Color Alchemy
Less provides a variety of functions that transform colors. Colors are first converted to the HSL color-space, and then manipulated at the channel level. All color operations take a color and a percentage as parameters, except spin, which uses integers between 0 and 255 instead of percentages to modify the hue, and mix, which takes two colors as parameters. Here is a quick reference for you:
lighten(@color, 10%);    // lightens color by percent and returns it
darken(@color, 10%);     // darkens color by percent and returns it
saturate(@color, 10%);   // saturates color by percent and returns it
desaturate(@color, 10%); // desaturates color by percent and returns it
fadein(@color, 10%);     // makes color less transparent by percent and returns it
fadeout(@color, 10%);    // makes color more transparent by percent and returns it
fade(@color, 50%);       // returns a color with the alpha set to amount

spin(@color, -10);       // returns a color with amount degrees added to hue
mix(@color1, @color2);   // return a mix of @color1 and @color2
You can also extract color information from hue, saturation, lightness, and alpha channels:
hue(@color);        // returns the 'hue' channel of @color
saturation(@color); // returns the 'saturation' channel of @color
lightness(@color);  // returns the 'lightness' channel of @color
alpha(@color);      // returns the 'alpha' channel of @color
This is useful if you want to create a new color based on another color’s channel, for example:
@new: hsl(hue(@old), 45%, 90%);If you’d like to explore color alchemy further, we’ve got a new guide on creating Less color schemes and palettes with more details!
Do You Love Hierarchy? Yes, I Do.
In CSS, we write out every ruleset separately, which often leads to long selectors that repeat parts over and over. Rather than constructing long selector names to specify inheritance, in Less you can simply nest selectors inside other selectors. This makes inheritance clear and stylesheets shorter:
header {}
header nav {}
header nav ul {}
header nav ul li {}
header nav ul li a {}
In Less you can write:
header {
  nav {
    ul {
      li {
        a {}
      }
    }
  }
}
As you can see, this gives you clean, well-structured code, represented by a strong visual hierarchy. Now you don’t have to repeat selectors over and over ever again. Simply nest the relevant ruleset inside another to indicate the hierarchy. The resulting code will be more concise, and mimics the structure of your DOM tree. If you want to give pseudo-classes this nesting structure, you can do so with the & operator. The & operator represents the parent’s selector. It’s used when you want a nested selector to be concatenated to its parent selector, instead of acting as a descendent.
For example, the following code:
header {
  color: black;
}

header nav {
  font-size: 12px;
}

header .logo {
  width: 300px;
}

header .logo:hover {
  text-decoration: none;
}
Can be written this way:
header {
  color: black;
  nav {
    font-size: 12px;
  }
  .logo {
    width: 300px;
    &:hover { text-decoration: none }
  }
}
Or this way:
header    { color: black;
  nav     { font-size: 12px }
  .logo   { width: 300px;
    &:hover { text-decoration: none }
  }
}
Name It, Use It, and Re-use It. Is It That Simple?
What if you want to group mixins into separate bundles for later re-use, or for distributing? Less gives you the ability to do that by nesting mixins inside a ruleset with an ID, like #namespace.
For example:
#fonts {
  .serif (@weight: normal, @size: 14px, @lineHeight: 20px) {
    font-family: Georgia, "Times New Roman", serif;
    font-weight: @weight;
    font-size: @size;
    line-height: @lineHeight;
  }
  .sans-serif (@weight: normal, @size: 14px, @lineHeight: 20px) {
    font-family: Arial, Helvetica, sans-serif;
    font-weight: @weight;
    font-size: @size;
    line-height: @lineHeight;
  }
  .monospace (@weight: normal, @size: 14px, @lineHeight: 20px) {
    font-family: "Lucida Console", Monaco, monospace
    font-weight: @weight;
    font-size: @size;
    line-height: @lineHeight;
  }
}
Then, to call a mixin from that particular group, you do this:
body {
  #fonts > .sans-serif;
}
And the output is:
body {
  font-family: Arial, Helvetica, sans-serif;
  font-weight: normal;
  font-size: 14px;
  line-height: 20px;
}
Remember to add empty parentheses when you define mixins, which don’t take parameters. This way the initial definition isn’t included in the rendered CSS, only in the code where the mixin is being used. This both shortens your output code and allows you to keep a library of definitions that don’t add to the weight of the output until they are actually used.
Some Special Cases
String Interpolation
String interpolation is a convenient way to insert the value of a variable right into a string literal. Variables can be embedded inside strings with the @{name} construct:
@baseURL: "http://example.com";
border-image: url("@{base-url}/images/border.png");
Escaping
Sometimes you might need to output a CSS value that is either invalid CSS syntax, or uses proprietary syntax, which Less doesn’t recognize. If this is the case, just place the value inside a string prefixed with the ~ operator, for example:
body {
  @size ~"20px/80px";
  font: @size sans-serif;
}
This is called an “escaped value”, which will result in:
body {
  font: 20px/80px sans-serif;
}
I’m Ready. Show Me the Magic, Please.
The idea behind Less is to speed up and simplify only the development step. This means what goes live on your final website should be plain, old CSS, not Less. Fortunately, this can be done extremely easy. All you need to do is to get a Less compiler, and let it do its job. I recommend WinLess (for Windows) and LESS.app (for OS X)
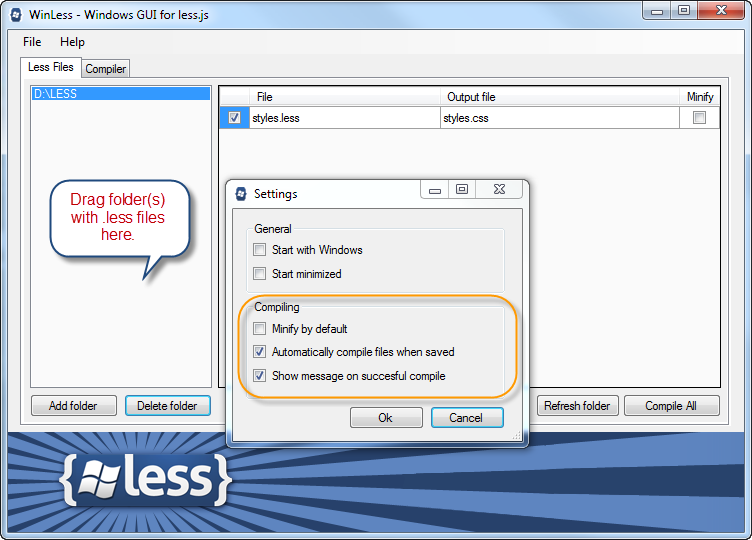
Here I will explain to you how to work with WinLess. First, download and install it. When you launch WinLess all you need to do is to drag a folder with .less files inside, and you are ready to go. To configure WinLess behavior, open File > Settings. I leave "Minify by default" unchecked because I want my file to be readable and minify my files only when I’m outputting for production. I check the other two options below because I don’t want to compile manually every single time I save a file, and because I want to know whether the compile is successful. By the way, for the training purpose you can use the WinLess Online Less Compiler—ideal if you want to quickly try out something.
For working with LESS.app, you can check the video tutorial on its website’s home page.
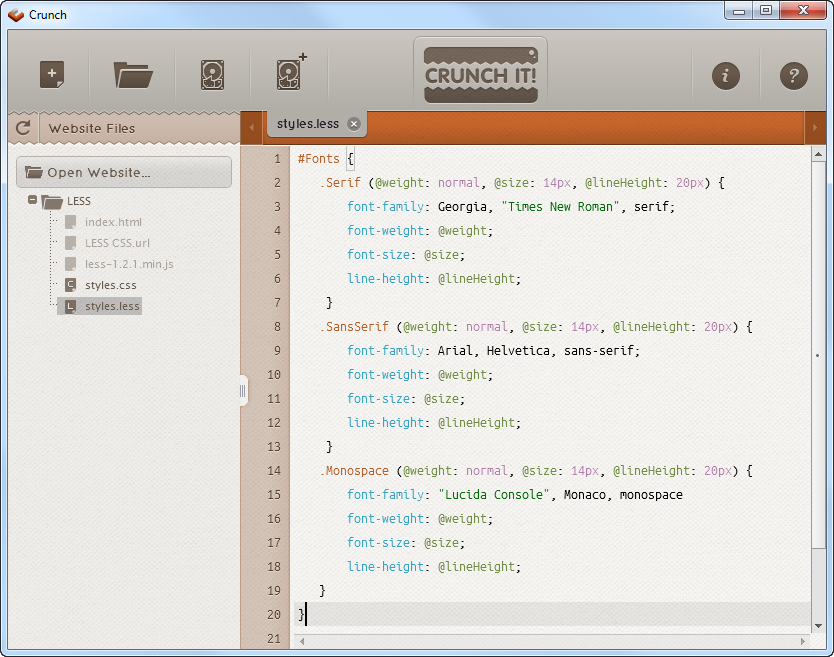
There is one more option for those of you who don’t use PC or Mac. You can get Crunch!, which is a cross-platform AIR application. Crunch is not only a Less compiler, but also a Less editor. This is cool, because Crunch is the only editor, to my knowledge, which gives you syntax highlighting for .less files. Try it to see what I mean. You know what? I’ll tell you my little secret. Actually, I’m using both of them—WinLess for compiling, and Crunch for editing. Sounds cool, huh?
OK. I’m Really Fascinated. Where do I Find More?
Here is a little bonus for you. This is a short list of Less resources, which can be used in your projects right away. There are some ready for use Less mixins and variables, plus a couple of projects which use Less as their base.
- Official Less documentation—OK. This can’t be used in your projects :) However, you should check it regularly for any updates and new features added to the language.
- Less Elements—a collection of useful Less mixins.
- Preboot.less—another collection of Less mixins and variables.
- Semantic Grid System—a simple and easy to use page layout tool. It supports Fixed, Fluid, and Responsive layouts. And, by the way, you can use it with Sass and Stylus too (if you still haven’t fallen in love with Less).
- Centage—if you need full fluidity and flexibility, you should definitely check this.
- perkins CSS3 Less Framework—a nice and rich Less framework, which uses HTML5 and CSS3.
If you want to find even more resources about Less, GitHub is the right place to go. As you will see, there are plenty of Less goodies there. So, what are you waiting for? Go and check them out.
A Few Final Words
In brief, Less is a fast, easy, and modern way of writing and crafting CSS code. So don’t be too conservative, and just give it a try. Spend some time with Less and you’ll be creating and tweaking complex stylesheets faster and easier than ever before. Wish you happy coding, and always remember—Less is more :)
And if you enjoyed reading this post, you’ll love Learnable; the place to learn fresh skills and techniques from the masters. Members get instant access to all of SitePoint’s ebooks and interactive online courses, like Launch into Less.
Comments on this article are closed. Have a question about Less? Why not ask it on our forums?