Build a Simple Tumblr Theme with Bootstrap

If you’ve ever looked at all the wonderful Tumblr themes and wondered what it takes to build a Tumblr theme from scratch, then this tutorial is for you. In this post, I’m going to show you how to use Bootstrap and Tumblr’s special operators to create a theme you can use for your Tumblr blog.
Here’s what you need to get started:
- a Tumblr account
- a basic understanding of Bootstrap, the popular front-end framework.
Our Basic HTML and Bootstrap Resources
A Tumblr theme is just an HTML file that uses Tumblr’s special operators. We’ll start off by creating a new file using our favorite text editor and adding the following boilerplate HTML code to it:
<!DOCTYPE html>
<html lang="en">
  <head>
    <meta charset="utf-8">
    <meta http-equiv="X-UA-Compatible" content="IE=edge">
    <meta name="viewport" content="width=device-width, initial-scale=1">
  </head>
  <body>
  </body>
</html>
Next, we’ll add the necessary Bootstrap resources. Bootstrap CDN makes it easy to add the files to your Tumblr theme. Just put the following in your theme’s head:
<!-- Bootstrap CSS -->
<link href="https://maxcdn.bootstrapcdn.com/bootstrap/4.0.0/css/bootstrap.min.css" rel="stylesheet">
Also add the following before the closing body tag:
<!-- Bootstrap JS -->
<script src="https://maxcdn.bootstrapcdn.com/bootstrap/4.0.0/js/bootstrap.min.js">
</script>
Adding Custom Styles
This Tumblr theme is going to have a narrow layout that will be 550px wide. It’s also going to have a 50px-tall, fixed-position header. Add the following to the theme’s head to handle these requirements:
<style type="text/css">
  body {
    padding-top: 60px;
  }

  .container {
    width: 550px;
  }
</style>
Creating the Tumblr Theme Header
We’ll use Bootstrap’s navbar to create a header for our Tumblr theme. This allows us to use our first Tumblr variable: {Title}. The {Title} variable refers to the title of the blog. The following code is added to the body of the theme:
<nav class="navbar fixed-top navbar-dark bg-dark">
  <a class="navbar-brand" href="#">{Title}</a>
</nav>
It’s a good idea to use the {Title} variable in the HTML <title> tag as well:
<title>{Title}</title>If you were to apply the theme to your Tumblr blog now, it would look like this, with just white space below it:

Creating a Container to Hold Posts
Next we’ll add a div that we can use as a container for all Tumblr posts. Add the following code below the nav element:
<div class="container">
</div>
As you might already know, Tumblr lets you add different types of posts to your blog. For the sake of simplicity, we’re going to handle the following post types:
- text
- photo
- quote
{block:Posts} is a Tumblr block that gives us a list of all the posts available on a blog.
Add the following code inside the posts container:
{block:Posts}
{/block:Posts}
Next, to determine the type of the current post, we’re going to use the following blocks:
{block:Text}{block:Photo}{block:Quote}
For any post, only one of these will be rendered.
Handling Text Posts
Text posts usually have a title and a body that can be accessed using the variables {Title} and {Body}, respectively. Add the following code inside the {block:Posts} tag.
{block:Text}
  <h2>{Title}</h2>
  <p>{Body}</p>
{/block:Text}
Handling Photo Posts
Photo posts have a caption and a photo. The caption can be accessed using the {Caption} variable. Accessing the photo is a little more complicated. To make it easier for you to use consistent image sizes all over your blog, Tumblr provides you with scaled versions of photos.
For example, to make sure your photo isn’t wider than 500px, you could use the variable {PhotoURL-500}. Similarly, if you want to make sure the photo isn’t wider than 100px, you could use the variable {PhotoURL-100}.
For this Tumblr theme, I’m going to use {PhotoURL-500}.
We can use a Bootstrap card to show the photo and its caption.
The code to handle photo posts would then look like this:
{block:Photo}
  <div class="card">
    <img class="card-img-top" src="{PhotoURL-500}" alt="Card image cap">
    <div class="card-body">
      <h5 class="card-title">{Caption}</h5>
    </div>
  </div>
{/block:Photo}
Handling Quote Posts
In this type of post, you’ll have to use the intuitively named variables {Quote} and {Source}. Bootstrap applies its own styles to the HTML <blockquote> element with the blockquote class and the blockquote-footer class, so we can use this directly in our theme:
{block:Quote}
<blockquote class="blockquote">
<p>{Quote}</p>
<footer class="blockquote-footer">{Source}</footer>
</blockquote>
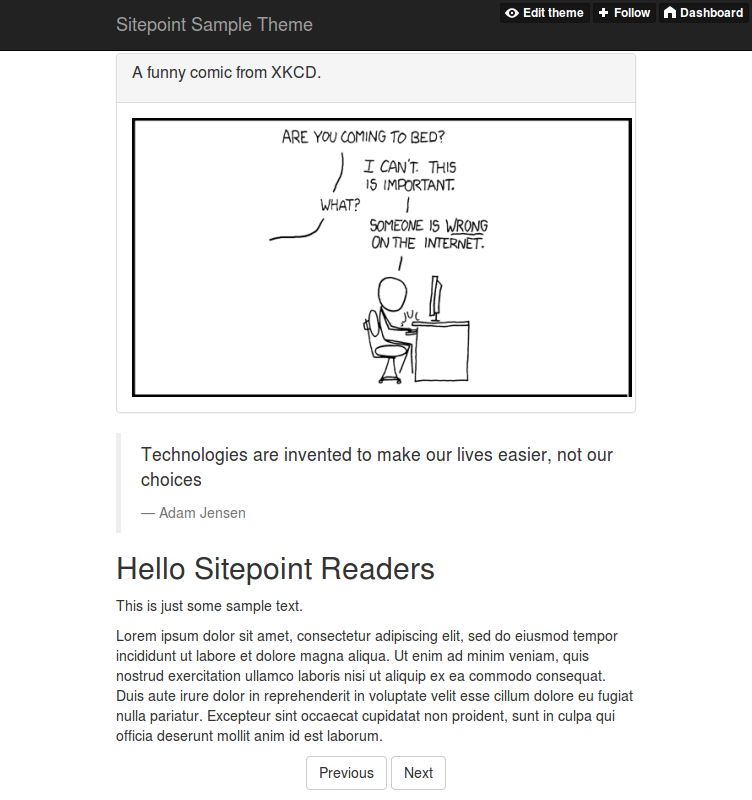
{/block:Quote}Handling Pagination
At this point, your Tumblr theme will look complete if you apply it to your blog. However, Tumblr only shows a fixed number of posts at a time.
You can change this number in the Advanced options page. As you can see in the screenshot, I’ve set the Posts per page value to 3:
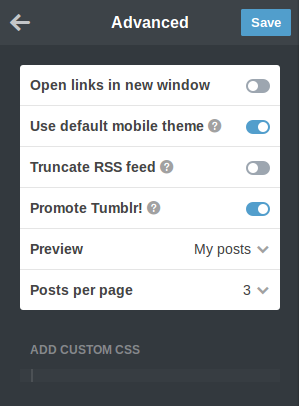
Currently, if you add too many posts to your blog, the oldest ones will no longer be accessible. Therefore, you have to handle pagination in your theme.
Tumblr has two variables to help with this: {PreviousPage} and {NextPage}. The values of these variables are links, so you’ll have to put them inside <a> tags. To make sure these links are shown only when there’s a valid previous or next page, we use the {PreviousPage} and {NextPage} variables inside the {block:PreviousPage} and {block:NextPage} blocks, respectively.
We can use Bootstrap’s button classes to style our pagination links.
The following code will be added after the {block:Posts} block:
<p class="text-center">
  {block:PreviousPage}
    <a href="{PreviousPage}" class="btn btn-secondary">Previous</a>
  {/block:PreviousPage}
  {block:NextPage}
    <a href="{NextPage}" class="btn btn-secondary">Next</a>
  {/block:NextPage}
</p>
Applying the Theme to Tumblr
Visit your Tumblr dashboard, select a blog, and click Customize. In the next screen, click the Edit HTML link. You’ll be presented with a text editor that will show the HTML contents of your current theme. Replace those contents with the code of the new Tumblr theme we just built. Press the Update Preview button first, then the Save button to apply the new theme.
Note: since we’re using external links for the Bootstrap files, the preview might not look right. However, after pressing the Save button, when you visit your blog you should see the Bootstrap styles applied correctly.
Conclusion
We now have a simple but complete Tumblr theme that uses the latest version of Bootstrap. You can always refer to Tumblr’s documentation to extend this theme.
If you’ve had any experience dealing with Tumblr themes with Bootstrap or another framework, let us know in the comments.
If you’ve got the basics of Bootstrap under your belt but are wondering how to take your Bootstrap skills to the next level, check out our Building Your First Website with Bootstrap 4 course for a quick and fun introduction to the power of Bootstrap.