How to Redesign the Django Admin with Bootstrap
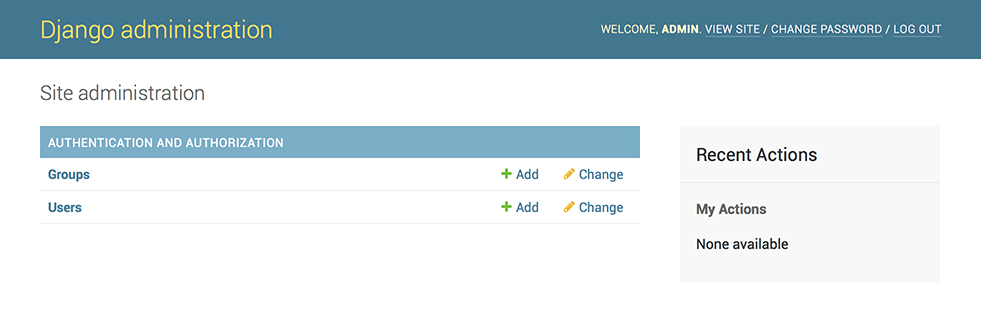
The Django administration site is great — fully-featured, easy to use, secure by design, rock solid … and somewhat ugly, which can be something of a downside when you want to integrate it with the look and feel of the rest of your website. Let’s sort that out.
If It Ain’t Broke …

Say you’ve just prototyped a web app with Django and Vue.js. For a wide array of cases, using Django’s admin for back office purposes as is, and even handling it over to your client after appropriately setting permissions, is just fine. After all, it works perfectly well and it can be heavily customized with the built-in tools to cover many situations.
So again, why bother?
Reasons to Hack the Look and Feel of the Admin
However, there are a number of valid reasons to take integration a step further:
- Branding: there’s nothing wrong in wanting the name and colors of your company instead of “Django administration” (and for the record, this is in compliance with Django’s BSD license).
- Seamless integration between main site and admin: you might want to be able to transition between back office functionality while navigating the site, and vice versa, by having a common navigation bar.
- Prettifying: while the admin looks okay, and it has even implemented responsive web design principles ever since v2 (it works well on both, mobile and desktop), there’s a lot a well-crafted style sheet can do to make it look better.
- Bypass functionality: you might also just want to create custom dropdown menus for the admin, displaying the options that you actually use and hiding from the user interface what you don’t really need, which could make for a better user experience.
A Practical Example
For this example, and not to repeat ourselves, we’ll resume the simple publishing web application we started for the Prototyping a Web App with Django and Vue.js article.
In a nutshell:
- a Django app with two models:
Articlewith fieldsnameauthor(linked),contentandslugAuthor: with fieldsnameandslug- A single view called
frontendthat queries all registries in both models. - A single template called
template. - Implementation of Vue.js with Vue Router and Vuex for a reactive scalable interface.
We won’t particularly care for the Vue.js integration in this installment, and we won’t modify it here.
The Basic Template

Django templates are very versatile and powerful, and can either be created at the app level (a component of the Django site) or at the site level, and can even override the templates that come with Django (which is what we’ll do here).

We created a basic template that links to Bootstrap‘s JavaScript and style sheet, and also its companion tools, jQuery and Popper.
Here’s the base template we’re using for the main site, not at all different from what we would normally use for any other Django site:
<!doctype html>
<html lang="en">
  <head>
    <!-- Required meta tags -->
    <meta charset="utf-8">
    <meta name="viewport" content="width=device-width, initial-scale=1, shrink-to-fit=no">

    <!-- Bootstrap CSS -->
    <link rel="stylesheet" href="https://stackpath.bootstrapcdn.com/bootstrap/4.4.1/css/bootstrap.min.css" integrity="sha384-Vkoo8x4CGsO3+Hhxv8T/Q5PaXtkKtu6ug5TOeNV6gBiFeWPGFN9MuhOf23Q9Ifjh" crossorigin="anonymous">

    <title>Django and Vue.js</title>
  </head>
  <body class="bg-light">
    <div class="bg-white container">
      <h1>Prototyping a Web App with Django and Vue.js</h1>

      <!-- Content -->
    </div>

    <!-- Vue.js -->
    <script src="https://unpkg.com/vue"></script>
    <script src="https://unpkg.com/vue-router"></script>

    <!-- jQuery first, then Popper.js, then Bootstrap JS -->
    <script src="https://code.jquery.com/jquery-3.4.1.slim.min.js" integrity="sha384-J6qa4849blE2+poT4WnyKhv5vZF5SrPo0iEjwBvKU7imGFAV0wwj1yYfoRSJoZ+n" crossorigin="anonymous"></script>
    <script src="https://cdn.jsdelivr.net/npm/popper.js@1.16.0/dist/umd/popper.min.js" integrity="sha384-Q6E9RHvbIyZFJoft+2mJbHaEWldlvI9IOYy5n3zV9zzTtmI3UksdQRVvoxMfooAo" crossorigin="anonymous"></script>
    <script src="https://stackpath.bootstrapcdn.com/bootstrap/4.4.1/js/bootstrap.min.js" integrity="sha384-wfSDF2E50Y2D1uUdj0O3uMBJnjuUD4Ih7YwaYd1iqfktj0Uod8GCExl3Og8ifwB6" crossorigin="anonymous"></script>
  </body>
</html>
Next, we’ll integrate this into the admin, and add a shared navigation bar across both ends — the main site and the back office!
Integrating the Main UI Template with the Admin
As mentioned, we can override templates, including those of the admin. However, because of Django’s design, and unsurprisingly, the main site and the back office are two different systems, each with its own templates, style sheets, and contrib packages. So even if they will be almost identical, we’ll need to maintain two different templates — one for the main UI, and one for the admin.
Enabling a Directory for Templates in General
First, we need to tell Django where we’ll store the hacked admin template in the base directory.
Se we’ll need to edit myproject/settings.py. firstly, find the TEMPLATES constant and this DIRS key:
'DIRS': [],
Change that code to this:
'DIRS': [os.path.join(BASE_DIR, 'templates')],
Wrapping the Admin Template (admin/base Hack)
If we just wanted to do cosmetic changes, like passing a custom style sheet to the admin, or removing/replacing its header, we could get along with that by just editing the admin/base_site template and skipping this current step altogether. However, if we want to go all the way and “wrap” the admin section as if it was contained within our main site, with the possibility to have a common header and footer, then keep reading.
We’ll need to copy Django’s admin/base.html to our templates directory in templates/admin/base.html, so that we can place our wrappers.
We’ll edit the code around the container section, so that it goes from this:
<!-- Container -->
<div id="container">
(...)
</div>
<!-- END Container -->
to this:
{% block bodyheader %}{% endblock %}

<!-- Container -->
<div id="container">
(...)
</div>
<!-- END Container -->

{% block bodyfooter %}{% endblock %}
And that’s all! We simply created bodyheader and bodyfooter block tags, so that we could inject the code that will wrap the admin on the next step.
Coding a Custom Admin Template (admin/base_site Hack)
Then, we’ll code the actual template in templates/admin/base_site.html (we’ll need to create the directories on the root of our project):
{% extends "admin/base_site.html" %}

{% block title %}Django with Bootstrap | Admin site{% endblock %}

{% block branding %}{% endblock %}
{% block breadcrumbs %}{% endblock %}

{% block bodyclass %}bg-light{% endblock %}

{% block extrastyle %}
    <link rel="stylesheet" href="https://stackpath.bootstrapcdn.com/bootstrap/4.4.1/css/bootstrap.min.css" integrity="sha384-Vkoo8x4CGsO3+Hhxv8T/Q5PaXtkKtu6ug5TOeNV6gBiFeWPGFN9MuhOf23Q9Ifjh" crossorigin="anonymous">
    <style>
      #header, .breadcrumbs { display: none; }

      /* Bootstrap issues with admin */
      * { box-sizing: unset; }
      div.module caption { caption-side: top !important; }
      .collapse { display: block !important; }
    </style>
{% endblock %}

{% block bodyheader %}
    <div class="bg-white container">

      <div class="jumbotron">
        <h1 class="display-4">Hacking the Django Admin with Bootstrap</h1>
        <p class="lead">
          The <a ref="https://docs.djangoproject.com/en/dev/ref/contrib/admin/">Django administration site</a> is great—full-featured, easy to use, secure by design, rock solid… and somewhat ugly, which can be something of a downside when you want to integrate it with the look-and-feel of the rest of the website. Let’s sort that out.
        </p>
      </div>
{% endblock %}

{% block bodyfooter %}
    </div>

    <!-- jQuery first, then Popper.js, then Bootstrap JS -->
    <script src="https://code.jquery.com/jquery-3.4.1.slim.min.js" integrity="sha384-J6qa4849blE2+poT4WnyKhv5vZF5SrPo0iEjwBvKU7imGFAV0wwj1yYfoRSJoZ+n" crossorigin="anonymous"></script>
    <script src="https://cdn.jsdelivr.net/npm/popper.js@1.16.0/dist/umd/popper.min.js" integrity="sha384-Q6E9RHvbIyZFJoft+2mJbHaEWldlvI9IOYy5n3zV9zzTtmI3UksdQRVvoxMfooAo" crossorigin="anonymous"></script>
    <script src="https://stackpath.bootstrapcdn.com/bootstrap/4.4.1/js/bootstrap.min.js" integrity="sha384-wfSDF2E50Y2D1uUdj0O3uMBJnjuUD4Ih7YwaYd1iqfktj0Uod8GCExl3Og8ifwB6" crossorigin="anonymous"></script>
{% endblock %}
Breakdown
Let’s try to explain what we’re doing here:
- We tell the template engine that we are “extending” the
admin/base_site.htmltemplate, to effectively override some of its definitions. - We make use of the
titleblock to customize a title for the admin page being browsed. - We empty the content of
brandingandbreadcrumbsblocks, as we don’t really need them. - We use the
bodyclassblock to set Bootstrap’sbg-light, as we did in thefrontendtemplate. - We use the
extrastyleblock to embed Bootstrap, and some CSS code.
a. Okay,#header, .breadcrumbs { display: none; }is something of a restatement of number 3; but it’s useful to know you can disable the branding and breadcrumbs sections both ways.
b. There can be some issues when overlapping Bootstrap with Django’s CSS in the admin, so these are some fixes. - Use the
bodyheaderandbodyfooterblocks to wrap the admin content.
Now that we have access to the admin template, we could further its style sheet, or just leave it at that with a shared style with the main UI.
Caveats
We’re maintaining two different templates (main UI and admin) to do essentially the same presentation. Admittedly, this isn’t ideal, as we’re explicitly breaking one of the maxims of software development: don’t repeat yourself (DRY).
As we commented, this is because the Django admin has been designed to be detached from the main UI. And there’s nothing wrong with that, just as there isn’t anything wrong with thinking out of the box. But yes, that forces us to use two templates with nearly the same content.
Actually, in principle we could design a template pattern that included that navbar and other common elements from the main UI and the admin, and reuse them from that single source; but at this point, and for the purpose of this article, that approach would be a little overkill. Anyway, I’ll leave the idea planted for you. 😉
Making a Shared Navigation Bar
Now that the main UI and the admin site look nearly the same, we can go further in our integration and make a common navigation experience … and even further, present some admin options right on the main menu!
Here’s the snippet for the navbar:
<nav class="navbar navbar-expand-lg navbar-light bg-light">
  <ul class="navbar-nav mr-auto">
    <li class="nav-item">
      <a
        class="nav-link text-primary"
        href="/author/"
      >
        Go to Authors
      </a>
    </li>
    <li class="nav-item">
      <a
        class="nav-link text-primary"
        href="/article/"
      >
        Go to Articles
      </a>
    </li>
    {% if user.is_authenticated %}
    <li class="nav-item dropdown">
      <a
        aria-expanded="false"
        aria-haspopup="true"
        class="font-weight-bold nav-link text-primary dropdown-toggle"
        data-toggle="dropdown"
        href="#"
        role="button"
      >
        Admin
      </a>
      <div class="dropdown-menu">
        <a class="dropdown-item" href="/admin/myapp/author/">
          Manage authors
        </a>
        <a class="dropdown-item" href="/admin/myapp/article/">
          Manage articles
        </a>
      </div>
    </li>
    {% endif %}
  </ul>
</nav>
Notice the dropdown-menu section, that will take care of presenting an admin menu (see Bootstrap’s Navbar component for more info).
We also do a conditional check with {% if user.is_authenticated %} /{% endif %}, to decide if we show the admin menu or not.
Lastly, remember that, since we’re now maintaining two different main templates, we’ll need to add the HTML code of the navbar to both, myapp/templates/myapp/tempalte.html and templates/admin/base_site.html.
Extra: the Admin Login Screen
The admin site has been taken care of, but there is still a loose end: the login screen.
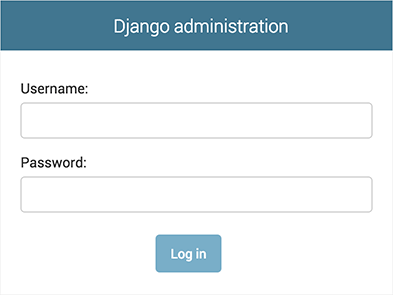
Now we could turn something like this:

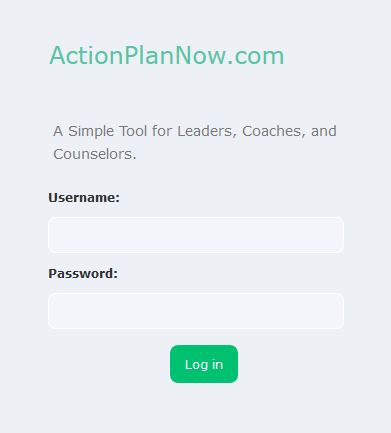
… into something like this:

We can accomplish something closer to that by creating the following template in templtes/admin/login.html:
{% extends "admin/login.html" %}

{% load i18n static %}

{% block extrastyle %}
{{ block.super }}
<style>
#header {
  background-color: transparent !important;
}
</style>
{% endblock %}

{% block branding %}
<h1>
  <span style="color: #57C5A5 !important">ActionPlanNow.com</span>
  <br />
  <small>{% block head_title %}{% endblock %}</small>
</h1>
{% endblock %}

{% block content_title %}
<p class="lead" style="font-size: larger">
A Simple Tool for Leaders, Coaches, and Counselors.
</p>
{% endblock %}
Breakdown
What we’re doing here:
- The
{{ block.super }}tag is there to tell the template engine that we’re not overriding the content ofextrastyle(that we defined in thetemplates/admin/base_site.htmltemplate) but that we’re simply appending content to it (see template inheritance for more info). - The
brandingblock allows us to change the “Django administration” header to something more interesting. - We get rid of the
head_titleblock by setting an empty definition. - We use the
content_titleblock to add some extra info.
Some Considerations

Just like Bootstrap, the Django admin site also ships its own bundle of jQuery, but fortunately the Django developers thought this through and to avoid conflicts with user-supplied scripts and libraries, Django’s jQuery is namespaced as django.jQuery. So we can include your own copy (as we have done) safely.
Be careful when going crazy with class definitions in your main style sheet, as that will also impact the admin site, affecting its functionality in unexpected ways. In that event, you can always see what’s going on with your browser debugging tools, such as Chrome DevTools, Firefox Developer Tools (particularly Page Inspector), or Safari Developer Tools.
Demo and Full Code
This implementation we discussed here will look like this:
You can navigate all of the project code in my GitHub repository, luzdealba / djangovuejs.
Wrap Up
While some might claim — quite reasonably — that there isn’t much need to alter Django’s admin appearance, it’s also true that smoothly integrating the different endpoints of a site is a fine hack for improved UX, as it can provide seamless transition between the two, and even a more controlled navigation of the admin.
And doing so isn’t all that difficult. What you need to pay attention to is how you wrap the admin, and also how you mix third-party libraries with your own JavaScript code and style sheets. Fortunately, you can very easily integrate some into the admin, some into the rest of the main site, and some into both.
Hopefully you’ve got some ideas about how you can further customize Django in ways that weren’t that evident!
If you need an excuse to build a web app just so you can play with the Django admin, check out last week’s tutorial on prototyping a web app with Django and Vue.js — it’s a tonne of fun. And if you want to take your Django skills further, the SitePoint Premium library has heaps of resources for you.
