How to Bundle a Simple Static Site Using Webpack

Webpack has established itself as an indispensable part of the JavaScript toolchain. It has over 55,000 stars on GitHub and is used by many of the big players in the JavaScript world, such as React and Angular.
However, you don’t need to be using a front-end framework, or be working on a large-scale project to take advantage of it. Webpack is primarily a bundler, and as such you can also use it to bundle just about any resource or asset you care to think of.
In this article, I’m going to show you how to install and configure webpack, then use it to create minified bundles for a simple static site with a handful of assets.
But Why Would You Want to Do That?
Good question. Glad you asked!
One of the reasons for doing this is to minimize the number of HTTP requests you make to the server. As the average web page grows, you’ll likely include jQuery (yes, it’s still popular in 2020), a couple of fonts, a few plugins, as well as various style sheets and some JavaScript of your own. If you’re making a network request for each of these assets, things soon add up and your page can become sluggish. Bundling your code can go some way to mitigating this problem.
Webpack also makes it easy to minify your code, further reducing its size, and it lets you write your assets in whatever flavor you desire. For example, in this article I’ll demonstrate how to have webpack transpile modern JavaScript to ES5. This means you can write JavaScript using the latest, most up-to-date syntax (although this might not be fully supported yet), then serve the browsers ES5 that will run almost everywhere.
And finally, it’s a fun learning exercise. Whether or not you employ any of these techniques in your own projects is down to you, but by following along you’ll get a firm understanding of what webpack does, how it does it and whether it’s a good fit for you.
Getting up and Running
The first thing you’ll need is to have Node and npm installed on your computer. If you haven’t got Node yet, you can either download it from the Node website, or you can download and install it with the aid of a version manager. Personally, I much prefer this second method, as it allows you to switch between multiple versions of Node and it negates a bunch of permissions errors, which might otherwise see you installing Node packages with admin rights.
We’ll also need a skeleton project to work with. Here’s one I made earlier. To get it running on your machine, you should clone the project from GitHub and install the dependencies:
git clone https://github.com/sitepoint-editors/webpack-static-site-example
cd webpack-static-site-example
npm install
This will install jQuery, plus Slick Slider and Lightbox2 — two plugins we’ll be using on the site — to a node_modules folder in the root of the project.
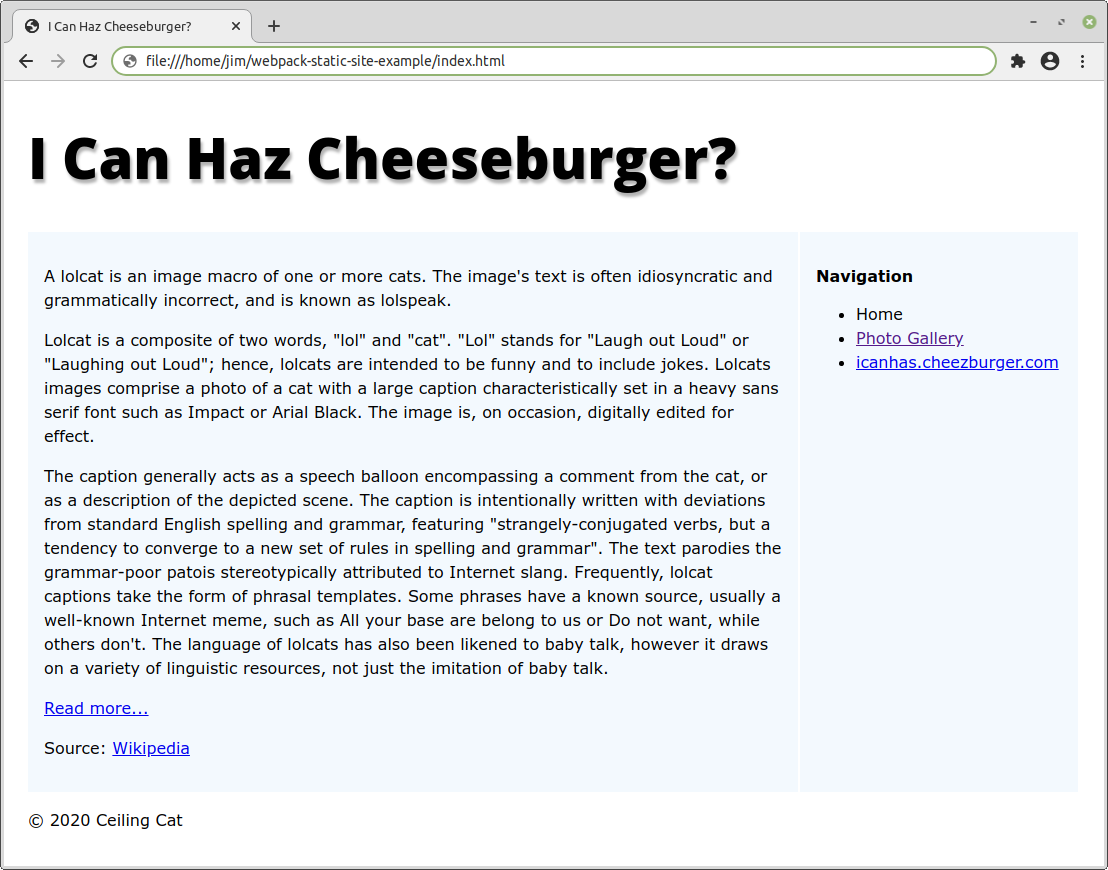
After that, you can open index.html in your browser and navigate the site. You should see something like this:
If you need help with any of the steps above, why not head over to our forums and post a question.
Introducing Webpack to the Project
The next thing we’ll need to do is to install webpack. We can do this with the following command:
npm install webpack webpack-cli --save-dev
This will install webpack and the webpack CLI and add them to the devDependency section of your package.json file:
"devDependencies": {
  "webpack": "^5.1.3",
  "webpack-cli": "^4.0.0"
}
Next, we’ll make a dist folder which will contain our bundled JavaScript:
mkdir dist
Now we can try and run webpack from the command line to see if it is set up correctly:
./node_modules/webpack/bin/webpack.js ./src/js/main.js --output-filename=bundle.js --mode=development
What we’re doing here is telling webpack to bundle the contents of src/js/main.js into dist/bundle.js. If everything is installed correctly, you should see something like this output to the command line:
asset bundle.js 1.04 KiB [emitted] (name: main)
./src/js/main.js 192 bytes [built] [code generated]
webpack 5.1.3 compiled successfully in 45 ms
And webpack will create a bundle.js file in the dist folder. If you have a look at that file in your text editor of choice, you’ll see a bunch of boilerplate and the contents of main.js at the bottom.
Automating Our Setup
If we had to type all of the above into the terminal every time we wanted to run webpack, that’d be quite annoying. So let’s create an npm script we can run instead.
In package.json, alter the scripts property to look like this:
"scripts": {
  "test": "echo \"Error: no test specified\" && exit 1",
  "build": "webpack ./src/js/main.js --output-filename=bundle.js --mode=development"
},
Notice how we can leave out the full path to the webpack module, as when run from a script, npm will automatically look for the module in the node_modules folder. Now when you run npm run build, the same thing should happen as before. Cool, eh?
Create a Webpack Configuration File
Notice how we’re passing the path of the file to bundle and the path of the output file as arguments to webpack? Well, we should probably change that and specify these in a configuration file instead. This will make our life easier when we come to use loaders later on.
Create a webpack.config.js file in the project root:
touch webpack.config.js
And add the following code:
module.exports = {
  entry: './src/js/main.js',
  mode: 'development',
  output: {
	path: `${__dirname}/dist`,
	filename: 'bundle.js',
  },
};
And change the npm script to the following:
"scripts": {
  ...
  "build": "webpack"
},
In webpack.config.js we’re exporting a configuration object, which specifies the entry point, the mode webpack should run in (more on that later), and the output location of the bundle. Run everything again and it should all still work as before.
Including the Bundle
Now that we have webpack generating a bundle for us, the next thing we need to do is to include it somewhere. But first, let’s create a different entry point, so that we can list the assets we want webpack to bundle for us. This will be a file named app.js in the src/js directory:
touch src/js/app.js
Add the following to app.js:
require('./main.js');
And change the webpack config thus:
entry: './src/js/app.js',
Run npm run build again to recreate the bundle. Everything should work as before.
Now, if you have a look at index.html you’ll notice that there’s not much going on JavaScript-wise. At the bottom of the file we are including jQuery and a file called main.js, which is responsible for showing more information when you click the Read more… link.
Let’s edit index.html to include the bundle instead of main.js. Look at the bottom of the file. You should see:
    <script src="./node_modules/jquery/dist/jquery.min.js"></script>
	<script src="./src/js/main.js"></script>
  </body>
</html>
Change this to:
    <script src="./node_modules/jquery/dist/jquery.min.js"></script>
	<script src="./dist/bundle.js"></script>
  </body>
</html>
Refresh the page in the browser and satisfy yourself that the Read more… link still works.
Bundling jQuery
Next, let’s add jQuery to the bundle. That will reduce the number of HTTP requests the page is making. To do this, we have to alter the app.js file like so:
window.$ = require('jquery');
require('./main.js');
Here we’re requiring jQuery, but as we installed this using npm, we don’t have to include the full path. We’re also adding its usual $ alias to the global window object, so that it’s accessible by other scripts. We’re requiring main.js after jQuery, as the former depends on the latter, and order is important.
Alter index.html to remove the jQuery script tag:
    <script src="./dist/bundle.js"></script>
  </body>
</html>
Run npm run build and once again, refresh the page in the browser to satisfy yourself that the Read more… link still works. It does? Good!
Measuring Our Progress
It’s all well and good to talk about performance, but it means very little if you don’t establish some kind of measurable metric. In our case, we’re attempting to reduce the number of HTTP requests the browser is making and we can view these from within the browser’s developer tools. I’ll use Chrome as an example of how to do this, but the principle is the same for any modern browser.
Press the F12 key to open the developer tools, then make sure the Network tab is selected. Then click and hold the reload symbol next to the address bar (the circle with an arrow) and select Empty Cache and Hard Reload. You should see something similar to the image below.
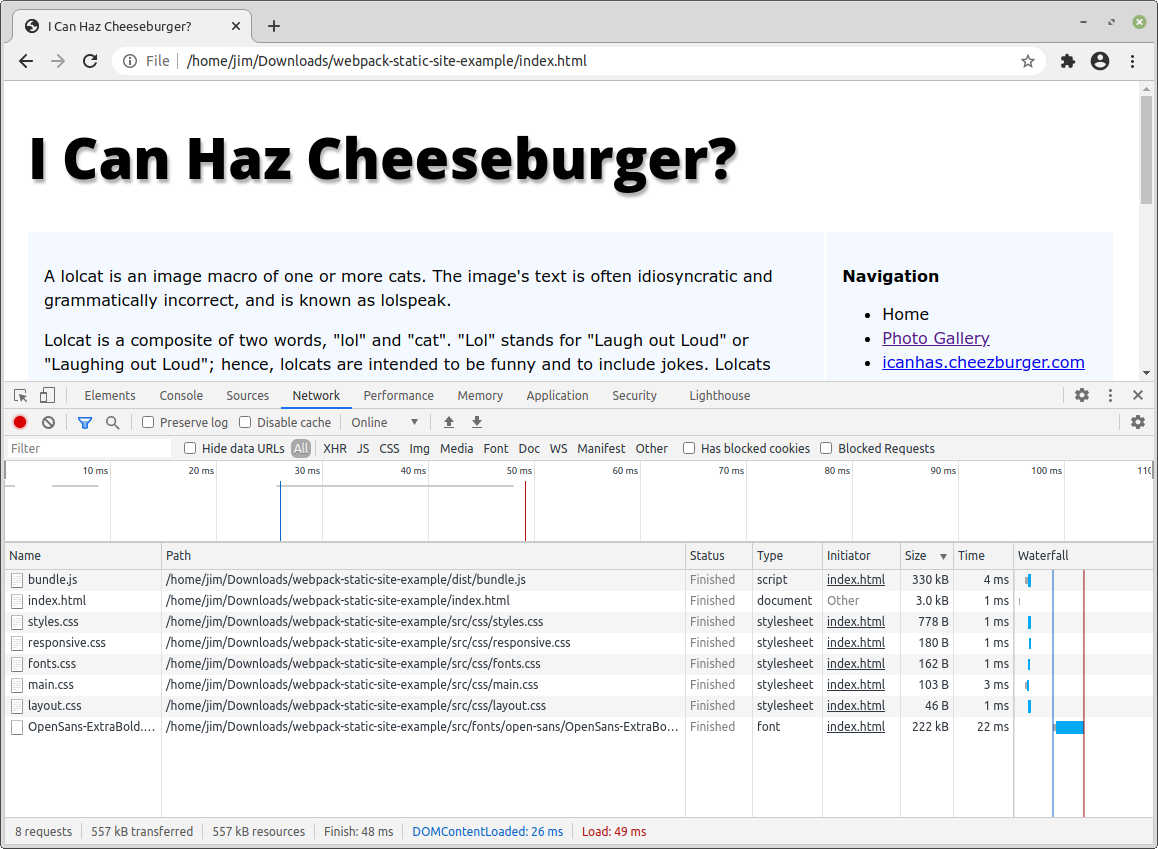
As you can see in the bar at the bottom of the window, eight requests are being made (we’ve already shaved one off by adding jQuery to our bundle) and a total of 557kB are being transferred across the wire.
Bundling the CSS
Looking at index.html, the only other thing we’re making a network request for is the CSS. As you can see, we’re including main.css at the top of the page, and this file is, in turn, importing another four CSS files.
Although in its standard configuration webpack can only deal with JavaScript, we can use something called a loader to have it bundle our CSS, too. From the webpack docs:
Loaders are transformations that are applied to the source code of a module. They allow you to pre-process files as you
importor “load” them. Thus, loaders are kind of like “tasks” in other build tools and provide a powerful way to handle front-end build steps. Loaders can transform files from a different language (like TypeScript) to JavaScript or load inline images as data URLs. Loaders even allow you to do things likeimportCSS files directly from your JavaScript modules!
So let’s alter app.js:
// CSS
require('../css/main.css');

// JavaScript
window.$ = require('jquery');
require('./main.js');
And we need to alter webpack.config.js to tell it which loader to run when it encounters a file ending in .css:
module.exports = {
  ...
  module: {
	rules: [
	  {
		test: /\.css$/,
		use: [
		  'style-loader',
		  'css-loader',
		],
	  },
	],
  },
};
As you can see, I’ve specified two loaders: css-loader and style-loader. Of the two, css-loader transforms CSS to a JavaScript module, and style-loader injects the CSS that’s exported by the JavaScript module into a <style> tag at runtime. Let’s install both:
npm install --save-dev css-loader style-loader
Now let’s run webpack again using npm run build and see what happens:
> Webpack-static-site-example@1.0.0 build /home/jim/Downloads/webpack-static-site-example
> webpack

asset bundle.js 349 KiB [emitted] (name: main)
runtime modules 931 bytes 4 modules
modules by path ./src/ 356 KiB
  modules by path ./src/css/*.css 3.96 KiB 6 modules
  modules by path ./src/js/*.js 294 bytes
	./src/js/app.js 102 bytes [built] [code generated]
	./src/js/main.js 192 bytes [built] [code generated]
  ./src/fonts/open-sans/OpenSans-ExtraBold.ttf 352 KiB [built] [code generated] [1 error]
modules by path ./node_modules/ 290 KiB
  modules by path ./node_modules/css-loader/dist/runtime/*.js 2.38 KiB
	./node_modules/css-loader/dist/runtime/api.js 1.57 KiB [built] [code generated]
	./node_modules/css-loader/dist/runtime/getUrl.js 830 bytes [built] [code generated]
  ./node_modules/jquery/dist/jquery.js 281 KiB [built] [code generated]
  ./node_modules/style-loader/dist/runtime/injectStylesIntoStyleTag.js 6.67 KiB [built] [code generated]

ERROR in ./src/fonts/open-sans/OpenSans-ExtraBold.ttf 1:0
Module parse failed: Unexpected character '' (1:0)
You may need an appropriate loader to handle this file type, currently no loaders are configured to process this file. See https://webpack.js.org/concepts#loaders
(Source code omitted for this binary file)
 @ ./node_modules/css-loader/dist/cjs.js!./src/css/fonts.css 4:0-86 6:73-102
 @ ./node_modules/css-loader/dist/cjs.js!./src/css/main.css 3:0-104 8:26-59
 @ ./src/css/main.css 2:12-89 9:17-24 13:15-29
 @ ./src/js/app.js 2:0-26

webpack 5.1.3 compiled with 1 error in 292 ms
Oh noes! It blew up. Examining the output, it seems that there was an error in src/css/fonts.css. If you open that file and look at line 5, you’ll see that we’re including a custom font (src/fonts/open-sans/OpenSans-ExtraBold.ttf) and webpack doesn’t know what to do with it.
But don’t worry, we’ve got that! We just need to use another loader. This time it’s url-loader, which can convert assets such as fonts and images into data URLs, which can then be added to the bundle:
module.exports = {
  ...
  module: {
	rules: [
	  {
		test: /\.css$/,
		use: [
		  'style-loader',
		  'css-loader',
		],
	  },
	  {
		test: /\.ttf$/,
		use: [
		  'url-loader',
		],
	  },
	],
  },
};
And of course, we need to install it:
npm install url-loader --save-dev
Now the build should run. Test things out by removing the CSS <link> tag from index.html, recreating the bundle and refreshing the page.
Bundling Third-party Libraries
Now let’s turn our attention to photos.html. There’s a bit more happening on this page, as we’re making use of two libraries — Slick Slider and Lightbox2 — both of which rely on jQuery. Luckily, we can apply the techniques we’ve learned to include these in the bundle.
Alter app.js like this:
// CSS
require('slick-carousel/slick/slick.css');
require('slick-carousel/slick/slick-theme.css');
require('lightbox2/dist/css/lightbox.min.css');
require('../css/main.css');

// JS
window.$ = require('jquery');
window.slick = require('slick-carousel');
window.lightbox = require('lightbox2');
require('./main.js');
Also remove the CSS include from the head of the document and the script includes from the footer. This should give us:
<!DOCTYPE html>
<html lang="en">
  <head>
	<meta charset="UTF-8">
	<title>I Can Haz Cheeseburger?</title>
  </head>
  <body>
	...

	<script src="dist/bundle.js"></script>
	<script>
	  $('.slick-slider').slick({
		dots: true,
		arrows: false,
		infinite: true,
		speed: 500,
		fade: true,
		cssEase: 'linear'
	  });
	</script>
  </body>
</html>
Although there would be nothing to stop us including the Slick initialization code in the bundle, I’m going to leave it on this page, as we only want to use it here.
Now let’s run webpack and see what happens:
...

ERROR in ./node_modules/slick-carousel/slick/ajax-loader.gif 1:7
Module parse failed: Unexpected character '' (1:7)
You may need an appropriate loader to handle this file type, currently no loaders are configured to process this file. See https://webpack.js.org/concepts#loaders
(Source code omitted for this binary file)
 @ ./node_modules/css-loader/dist/cjs.js!./node_modules/slick-carousel/slick/slick-theme.css 4:0-62 10:73-102
 @ ./node_modules/slick-carousel/slick/slick-theme.css 2:12-83 9:17-24 13:15-29
 @ ./src/js/app.js 3:0-47

....
Aw noes, lots more errors! This time there seems to be a problem with the slick-theme.css file, which is referencing an image in GIF format. Webpack doesn’t know what to do with the GIF, so it throws its arms up and stops working. But we know what to do, right?
Change the second rule in webpack.config.js to the following:
{
  test: /\.(svg|gif|png|eot|woff|ttf)$/,
  use: [
	'url-loader',
  ],
},
You’ll notice I’ve altered the regex to match several other file types. These are all required by Slick or by Lightbox2. Run webpack again and make sure it completes without errors.
Rerun the build command, refresh the page and assure yourself that everything is working.
Some Finishing Touches
We’re almost done, but there are a couple of things we can improve upon.
Handle the Flash of Unstyled Content
If you try this out on a server (just opening the file in your browser probably won’t work), you’ll notice a flash of unstyled content when the page loads. Let’s reproduce this locally.
First, install the http-server package globally on your system:
npm install -g http-server
Then navigate to the root of the project and issue the following command:
http-server
This will start up an HTTP server on your PC. Navigate to http://127.0.0.1:8080 and you’ll see the site as before. Next, hop into the Network tab of your browser’s dev tools and locate the menu for throttling your connection speed. Select a Fast 3G preset (or equivalent), then hard refresh the page. You’ll see how the HTML loads, then the CSS is applied a second or two after that. Obviously this is not optimal.
Note: simulating a slow connection should be possible in all modern browsers. Here are instructions on how to do so in Chrome, and here’s how to do so in Firefox.
One way this can be fixed is by taking advantage of the blocking nature of <script> tags and moving the include to the top of the file.
<!DOCTYPE html>
<html lang="en">
  <head>
	<meta charset="UTF-8">
	<title>I Can Haz Cheeseburger?</title>
	<script src="dist/bundle.js"></script>
  </head>
  <body>
	...
  </body>
</html>
This kinda works, but it now takes several seconds for the site to load, which also isn’t perfect.
Extract the CSS
We can improve this situation somewhat by extracting the CSS into its own bundle and loading that at the top of the page while the JavaScript bundle remains where it is at the bottom. We’ll need the mini-css-extract-plugin for this, so let’s install that first:
npm install --save-dev mini-css-extract-plugin
Then alter webpack.config.js like so:
const MiniCssExtractPlugin = require('mini-css-extract-plugin');

module.exports = {
  entry: './src/js/app.js',
  mode: 'development',
  output: {
	path: `${__dirname}/dist`,
	filename: 'bundle.js',
  },
  plugins: [new MiniCssExtractPlugin()],
  module: {
	rules: [
	  {
		test: /\.css$/,
		use: [
		  MiniCssExtractPlugin.loader,
		  'css-loader',
		],
	  },
	  {
		test: /\.(svg|gif|png|eot|woff|ttf)$/,
		use: [
		  'url-loader',
		],
	  },
	],
  },
};
Here, we’re requiring our new plugin at the top of the file and adding it to the plugins array, before replacing the style-loader with the MiniCssExtractPlugin’s loader. Now when you run npm run build, two bundles will be generated in the dist folder — bundle.js and main.css.
Alter index.html and photos.html to include them like so:
<!DOCTYPE html>
<html lang="en">
  <head>
	<meta charset="UTF-8">
	<title>I Can Haz Cheeseburger?</title>
	<link rel="stylesheet" href="./dist/main.css">
  </head>
  <body>
	...
	<script src="./dist/bundle.js"></script>
	<!-- Only photos.html -->
	<script>$('.slick-slider').slick({ ... });</script>
  </body>
</html>
Now we avoid the FOUC and the site loads a couple of seconds faster, which is certainly progress.
Different Bundles For Different Pages
You might have noticed that we’re including all of our assets in both our bundles and serving these bundles regardless of which page a user visits. Strictly speaking, if a user only visits the index page, they don’t need to download the styles and code for the slider on the photos page.
Depending how far you want to take this approach, it would be entirely possible to create separate bundles for the photos page and for the other pages on the site. To do this, you’d use the HtmlWebpackPlugin, which simplifies creation of HTML files to serve your webpack bundles.
Unfortunately, this technique is slightly outside the scope of this tutorial, but you can find an excellent guide on how to do this here.
Minify the Bundles
If you’re going with the one-bundle-for-everything approach, an easy win is to run webpack in production mode, which will see it output a smaller, minified bundle.
To do this, alter webpack.config.js like so:
module.exports = {
  entry: './src/js/app.js',
  mode: 'production',
  ...
};
Now when you run the build command, webpack will output a minified and optimized bundle. This brings the size of bundle.js down from 821.8kB to 485.9kB. Not bad, all things considered.
If you’ve decided to split your bundles into JavaScript and CSS, things get a bit more complicated. To optimize the CSS, we’ll need an extra plugin — optimize-css-assets-webpack-plugin. To use this, we’ll have to override webpack’s default minimizer, which in turn means we’ll need to specify a JavaScript minimizer, too. For this task, the terser-webpack-plugin is a good choice.
Let’s install both of these:
npm install --save-dev optimize-css-assets-webpack-plugin terser-webpack-plugin
Then alter webpack.config.js like so:
const MiniCssExtractPlugin = require('mini-css-extract-plugin');
const OptimizeCssAssetsPlugin = require('optimize-css-assets-webpack-plugin');
const TerserPlugin = require('terser-webpack-plugin');

module.exports = {
  entry: './src/js/app.js',
  mode: 'production',
  output: {
	path: `${__dirname}/dist`,
	filename: 'bundle.js',
  },
  plugins: [new MiniCssExtractPlugin()],
  module: {
	rules: [
	  {
		test: /\.css$/,
		use: [
		  MiniCssExtractPlugin.loader,
		  'css-loader',
		],
	  },
	  {
		test: /\.(svg|gif|png|eot|woff|ttf)$/,
		use: [
		  'url-loader',
		],
	  },
	],
  },
  optimization: {
	minimize: true,
	minimizer: [
	  new TerserPlugin({
		extractComments: false,
	  }),
	  new OptimizeCssAssetsPlugin(),
	],
  },
};
Looking at the code, you can see that we’re requiring our two new plugins at the top of the file and that we’ve added an optimization key to the exported configuration object. This allows us to specify Terser as a minimizer for the JavaScript and the Optimize CSS Assets plugin as a minimizer for the CSS. Now when you run npm run build, two minimized bundles should be output.
This reduces the bundle sizes from 446.6kB and 338.8kB to 144kB and 336kB respectively. Bundles totaling 480kB might seem a bit excessive for some CSS, JS and a few other assets, but bear in mind that 222kB of that is the font.
Transpile ES6 to ES5
You could also install the babel-loader and have webpack run JavaScript files through that, thus transpiling modern JavaScript to ES5:
npm install --save-dev @babel/core babel-loader @babel/preset-env
Then define a new rule for Javascript files in webpack.config.js:
{
  test: /\.js$/,
  exclude: /(node_modules|bower_components)/,
  use: {
	loader: 'babel-loader',
	options: {
	  presets: ['@babel/preset-env'],
	},
  },
},
Now when you run npm run build, JavaScript files will be piped through Babel and thus converted into ES5 syntax which will run in almost any browser.
Of course, you could swap out Babel for almost any other compile-to-JavaScript language you fancy. For example, here’s a TypeScript loader which would enable you to add TypeScript to your projects.
Conclusion
So there you have it. In this article, I’ve demonstrated how to use webpack to bundle a simple static site — a process that reduces the amount of HTTP requests made, thereby making the site potentially snappier and more responsive. I’ve also demonstrated how to have webpack minify the resultant bundles, thus reducing the file size, and how to transpile modern JavaScript to ES5 using the babel-loader.
But before I sign off, let’s compare our original configuration to what we ended up with. Taking index.html as an example, the page originally made nine requests and had a payload of 319kB. Using the Fast 3G preset in Chrome, the page took 4.14s to load. In contrast, using the two-bundle setup, the page makes two requests, has a payload of 472kB, and takes 4.34s to load.
Hmmm … that might leave you wondering why you’d bother with any of this after all. However, don’t forget that both bundles are cached by the browser, so when you then visit the photos page, the original setup has to fetch all of the slider code from the server and needs 6.5 seconds to fully load. The bundled setup already has much of what it needs and is ready in 3.32 seconds.
Even if this strategy isn’t for everyone, hopefully by following along you’ve gained an insight into what webpack does and how it does it. And for those that wish to explore webpack further, I recommend “A Beginner’s Guide to Webpack”, which goes considerably more in-depth on some important concepts, such as the webpack dev server, which will introduce you to the wonderful world of hot module reloading.