Combining CoffeeScript with ASP.NET
Everyone knows how cool CoffeeScript is. If not, then here’s the elevator speech. CoffeeScript is a small language that compiles into JavaScript. Whether you’re just beginning JavaScript, or you’re a seasoned veteran, CoffeeScript will make your life easier. You still need to know how to work with CSS, but CoffeeScript allows you to write CSS once and use it in multiple places. This is something I’ve wanted for a long time and now it’s here.
Prerequisites
This article isn’t a complete tutorial on how to code CoffeeScript, but it will focus on how to use CoffeeScript with ASP.NET. First, you’ll need CoffeeScript and Visual Studio 2010. There are a couple of ways to get CoffeeScript installed and running on your machine. One way is to install CoffeeScript as a Node.js utility. However, installing Node.js is beyond the scope of this article as I’ll be focusing on running CoffeeScript inside Visual Studio.
Before running CoffeeScript inside Visual Studio, it’s important to know that you can run it as a standalone web page. All you need to do is reference the CoffeeScript JavaScript file. A simple CoffeeScript example is shown below. The results of the example can be seen with this jsFiddle.
<!doctype html>
<html>
<head>
  <title>Coffee in Browser</title>
  <script type="text/javascript" src="https://ajax.googleapis.com/ajax/libs/jquery/1.4.4/jquery.min.js"></script>
  <script type="text/coffeescript"> $ -> $('body').css 'background-color', '#ff0000' </script>
  <script type="text/javascript" src="http://cdnjs.cloudflare.com/ajax/libs/coffee-script/1.1.2/coffee-script.min.js"></script>
</head>
<body>
  <h1>Hello from CoffeeScript!!</h1>
</body>
</html>
Using CoffeeScript Inside Visual Studio
Thanks to NuGet there are some excellent packages to make integrating CoffeeScript with Visual Studio painless. Taking CoffeeScript development to the next level, there’s a great New Zealand company called Mindscape, and they have a product called Web Workbench. Web Workbench integrates into Visual Studio and it gives you compile time error checking as well as intellisense when you’re working with CoffeeScript files. There’s a free version and a pro version, which carries a one time fee. The pro version minifies the JavaScript whenever you save the file you’re working on.
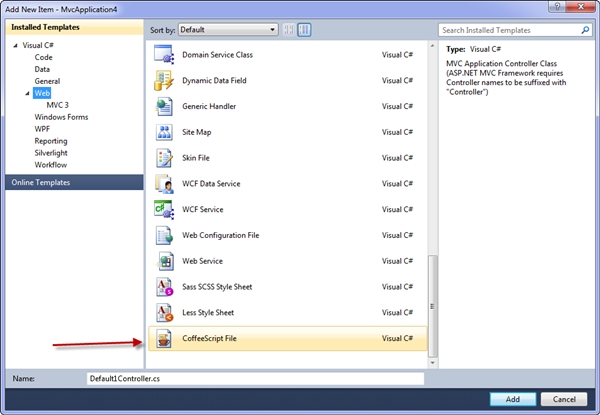
Once you’ve installed Web Workbench, open Visual Studio and start a new web site project. Opening the New File Dialog, will show you the new CoffeeScript templates, seen below.

Add a .coffee file named coffeedemo.coffee. Once the file is added, insert the following code, which displays a message when the page loads. Don’t worry about the syntax right now. I’ll cover that in an upcoming series.
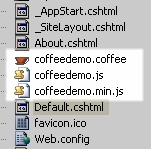
display = -> alert 'I am running from CoffeeScript!' window.onload = display()Next, save the file. You will see two new JavaScript files, coffeedemo.js and coffeedemo.min.js, added to your project, as shown in the following figure. Every time you save your CoffeeScript files, Web Workbench will compile and create these minified and beautified versions.

The final step is to add a reference to the JavaScript file in your web page. To do this, add the following script tag. If you run the project now, you’ll see a dialog box saying “I am running from CoffeeScript!”
<script type="text/javascript" src="scripts/coffeedemo.min.js"></script>Conclusion
CoffeeScript is a great language to learn. It’s refreshing to learn a new language that compiles into JavaScript that, in all honestly, is probably better than the JavaScript I produce. I’ll focus some upcoming articles on CoffeeScript syntax in the coming weeks.