Build Your Own Custom SlackBot with Node.js
This article was peer reviewed by Dan Prince and Matthew Wilkin. Thanks to all of SitePoint’s peer reviewers for making SitePoint content the best it can be!
Slack has a certain appeal and huge fan following in both developer and non-developer tech communities. Its slick user-interface, concept of teams and channels to keep communication separate and relevant, tons of integrations for productivity (Dropbox, Box, Google Calendar, Hangouts etc) and things like giphy and reminders, make it fun to use. Also, their APIs help developers extend the functionality and build a custom experience for their team.
If you’re thinking “no way that’s unique to Slack, HipChat (or your favorite app) has all that too!”, you might wanna take a look at this: http://slackvshipchat.com/
Goal of the Tutorial
This tutorial aims to help you get up and running with a simple node app that turns your Slack channel into a custom command-line terminal. We’ll use a helper module called slack-terminalize (disclaimer: I developed it), that abstracts away the initial processing of messages. It uses Slack’s Real-Time API Node client and prepares a bot to listen and respond to your requests.
Note that we won’t be using Slash Commands here, but instead we’ll interpret regular messages as commands. So if you were looking to learn about Slash Commands, this might not be the appropriate tutorial.
Before Getting Started
My assumption is that you have a working knowledge of JavaScript and NodeJS and that you’re familiar with Slack jargon: teams, channels, bots and integrations. You’ll need node and npm installed; You can follow this wonderful SitePoint introduction to npm, to set up your development environment.
Motivation to Develop slack-terminalize
While there are many fancy hubot scripts that respond to natural language queries, a lot can be achieved with short commands and minimal keystrokes, as any Linux fan would agree. Simple commands especially make sense in a mobile device, helping you type less, do more. If you think about a command-line system, most of the times what the shell is doing is the grunt work of fetching, parsing, tokenizing and dispatching the commands (a gross oversimplification, I know).
With that in mind, I felt the need for a module which could do exactly that. A shell for Slack channels, if you will. With a process-and-dispatch approach and a plugin-like architecture to add custom commands, slack-terminalize abstracts things so you can focus more on defining the behavior of the app instead.
Enough Talk, Let’s Get Started
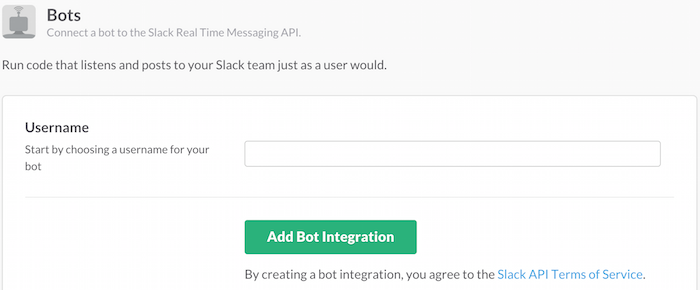
First, let’s create a new bot user for your team, that can take your orders! Go to https://<your-team-name>.slack.com/services/new/bot, choose a username for it, and hit Add Bot Integration.

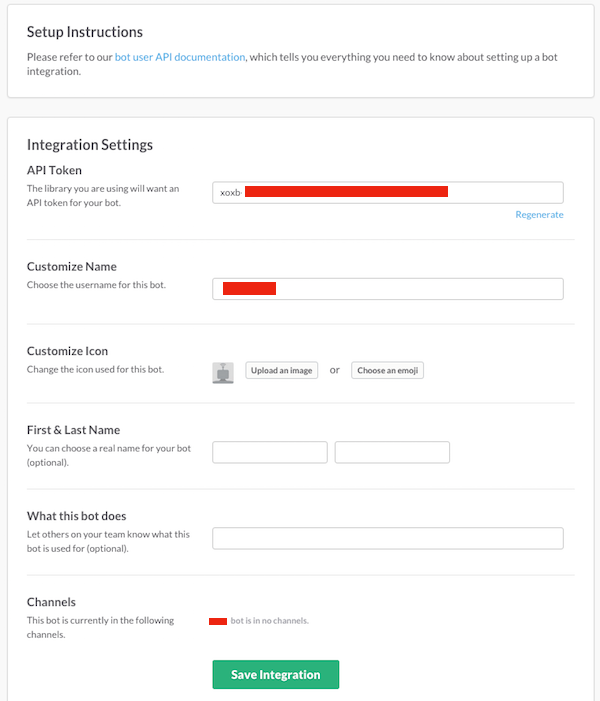
Copy the API token shown to you, as this is required for your bot to be able to interact with the channels. Configure the other details of the bot, its profile image and real name, and hit Save Integration.

Now, let’s clone the sample app and install the dependencies:
git clone https://github.com/ggauravr/slack-sample-cli.git
cd slack-sample-cli
npm install
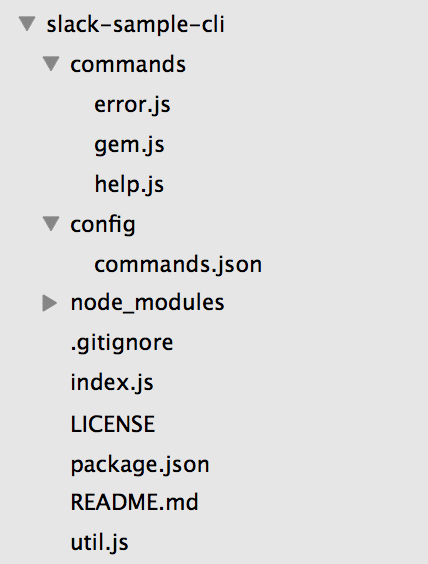
Project Structure Walkthrough
From the list of dependencies in package.json, the only required dependency is slack-terminalize, but since the sample app has an example to show how to handle asynchronous commands, the request module is used to make REST calls.

config/
All the JSON files you might need for your app can go here. And I say ‘can’ because it’s fairly flexible and you can change it to work with a different directory via the configuration parameters (more on that later). This is just one of the many ways you can structure your app, but if you’re new to Slack integrations, I suggest you stick with this.
commands.json
This is what makes adding custom commands a piece of cake. Each command is represented by a key-value pair: with the key being the command name (I’ll call it the primary name), and the value being an object with custom key-value pairs that you would want to use for the command.
Here I use the following custom fields for each command:
-
alias– these are the aliases (let’s call them secondary names) for the command, which can be used in the slack channel to invoke the command as well. It’s best to keep the smallest name as the primary name and more meaningful, longer names as aliases. -
description– a short readable description of what the command does -
help– a help message, to do something likeman <command-name>orhelp <command-name> -
exclude– a flag to indicate if this command should be shown in the list of commands available to the user. Some commands might just be for development purposes and/or helpers that need not be exposed to the user (e.g. the error command above). -
endpoint– REST endpoint that the command should talk to, in case it depends on any external services to perform its task
Of the above, alias is the only key that is looked up to map user-typed commands to its primary name. The rest of them are optional and you’re free to use any fields inside the command object as you see fit.
commands/
This is where the magic happens, the place where you define the command behavior. Each command specified in config/commands.json should have its matching implementation here, with the filename matching the key (primary name) used in that JSON. That is how the dispatcher invokes the correct handler. Yes, a bit opinionated I agree, but useful and customizable nonetheless.
{
    "help": {
        "alias": [ "halp" ],
        "endpoint": "#",
        "help": "help [command](optional)",
        "description": "To get help on all supported commands, or a specified command"
    },

    "gem": {
        "alias": [],
        "endpoint": "https://rubygems.org/api/v1/gems/{gem}.json",
        "help": "gem [gem-name]",
        "description": "Fetches details of the specified Ruby gem"
    },

    "error": {
        "exclude": true
    }
}
Notice again, that the key names in this file are same as the file names in commands/ directory.
Code Walkthrough
Replace the value for SLACK_TOKEN in index.js with the one for your bot. CONFIG_DIR and COMMAND_DIR are to tell slack-terminalize where to look for config and command implementations respectively.
var slackTerminal = require('slack-terminalize');

slackTerminal.init('xoxb-your-token-here', {
    // slack client options here
    }, {
    CONFIG_DIR: __dirname + '/config',
    COMMAND_DIR: __dirname + '/commands'
});
Next, start the app with the following command:
node .
Log in to your Slack team, either on web or app. The bot is added to #general channel by default, but you can invite the bot to any of the channels, even private ones, with the Slash Command: /invite @<your-bot-name>. As soon as you type /invite @, Slack should automatically suggest you the usernames. If you don’t see your bot listed there, go back and check that you have integrated the bot correctly.

Type help or halp (the alias, remember?) in the channel and ‘voila!’, the bot should respond to your request. Go ahead and play around with commands/help.js to change what you see in the response. As you can see from the implementation, this command just loads the command details from config/commands.json file to respond, so it’s synchronous. Sometimes, you might need to do asynchronous tasks, like querying a database or calling a REST endpoint, to fetch the response. Let’s see how to go about that.
As I mentioned before, I use request module to make REST calls and the following code snippet (the gem command) searches for the gem name that user types in Slack. Take a peek at commands/gem.js and you’ll see that it remembers the channel that the message was posted in (using a closure) and posts back the response into the same channel!
var request = require('request'),
    util    = require('../util');

module.exports = function (param) {
    var channel  = param.channel,
        endpoint = param.commandConfig.endpoint.replace('{gem}', param.args[0]);

    request(endpoint, function (err, response, body) {
        var info = [];

        if (!err && response.statusCode === 200) {
            body = JSON.parse(body);

            info.push('Gem: ' + body.name + ' - ' + body.info);
            info.push('Authors: ' + body.authors);
            info.push('Project URI: ' + body.project_uri);
        }
        else {
            info = ['No such gem found!'];
        }

        util.postMessage(channel, info.join('\n\n'));
    });

};
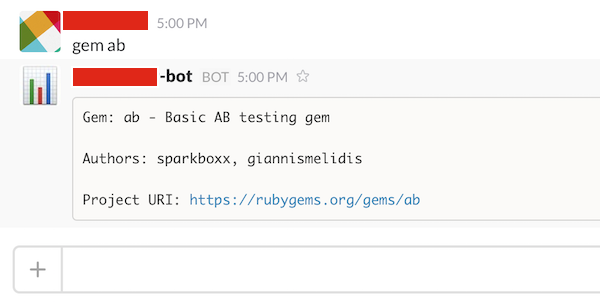
Try typing gem ab in your Slack channel and you should see something like this:

Again, try playing around with the formatting of the response in commands/gem.js to get the hang of it. Now we have a bot listening on invited channels and responding to our requests. Let’s see how we can add custom commands.
Adding Custom Command Implementations
Add your new command in config/commands.json. As mentioned before, the key will be the primary command name. Aliases for the command go in as an array of values in alias, as shown below.
{
    "your-new-command": {
        "alias": [ "command-alias", "another-alias", "yet-another-alias" ],
        "help": "A short help message for the awesome new command",
        "description": "Brief description of what the command does"
    }
}
Currently, command names with space in them are not supported. Create a file with the same name as the primary name of your command above (in this case, your-command-name.js) in commands/ directory. Assign module.exports to the command implementation function, as shown below.
var util = require('../util');

module.exports = function (param) {
    // param object contains the following keys:
    // 1. command - the primary command name
    // 2. args - an array of strings, which is user's message posted in the channel, separated by space
    // 3. user - Slack client user id
    // 4. channel - Slack client channel id
    // 5. commandConfig - the json object for this command from config/commands.json

    // implement your logic here..
    // ..

    // send back the response
    // more on this method here: https://api.slack.com/methods/chat.postMessage
    util.postMessage(param.channel, '<your-message-to-be-posted-back-in-the-channel>');
};
Refer to the documentation of the node-slack-client, for more on the User and Channel objects.
Program your new command, restart the app and that’s it! You should have your new command working. Type in the command and see if you get the expected response back.
Customizing Behavior with Configurations
The slack-terminalize module takes two parameters, an options object and a config object.
var slackTerminal = require('slack-terminalize');

slackTerminal.init({
    autoReconnect: true // or false, indicates if it should re-connect after error response from Slack
    // other supported options can be seen here: https://github.com/slackhq/node-slack-client/blob/master/lib/clients/rtm/client.js
}, {
    CONFIG_DIR: __dirname + '/config',
    COMMAND_DIR: __dirname + '/commands',
    ERROR_COMMAND: "error" // The filename it looks for in COMMAND_DIR, in case the user entered command is invalid
})
For more on the parameters, you can check the documentation here.
What Next?
- Go define some cool commands for your team: have fun and increase productivity.
- Fork the project slack-terminalize and its sample app. Play around, contribute and help improve it. If you spot any bugs, create an issue on the repo!
- Comment below on how you’re using Slack for productivity, or if you have any suggestions on how this can be improved. I’m all ears to learn the creative applications of the power bestowed upon developers by the Slack API
Links and Resources
- Slack Bot Users
- Slack APIs
- Hubot
- Hubot Slack
- Node Slack Client
- Introduction to WebSockets
- REST vs WebSockets
- How to create and publish your first Node module
- Checklist for your new Open Source JS project