How to Secure Your WordPress Site from the DDoS Attack Onslaught

This article was sponsored by Incapsula. Thank you for supporting the partners who make SitePoint possible.
Distributed denial of service (DDoS) attacks are rapidly ramping in scale. They’ve been on the radar since at least 2000, and 2017 may be the year they become your biggest security concern. If you don’t have a DDoS strategy in place, it’s time to choose one.
Based on current trends, industry experts predict that this may be a crisis year. That’s reflected in recent headlines like these:
- DDoS in 2017: Strap yourself in for a bumpy ride, The Register.
- DDoS attacks up 380% in Q1 2017, CIO Dive
- The 2017 DDoS tsunami will cost companies millions, TechRepublic
- Hackers take no holidays: 2017 DDoS attacks rise fivefold, SiliconANGLE
- Expect an increase in ransomware and DDoS attack combos in 2017, Enterprise Innovation
- 2017 may be crisis year for DDoS attacks, ComputerWeekly.
The more popular a platform is, the more likely it will become a target for attacks, and WordPress is the most popular platform on the internet. In a previous post we outlined 48 ways to keep your WordPress site secure. By all means keep your WordPress patched and updated, but that won’t protect you from the zombie hoards. You need a targeted DDoS solution you can trust.
How do DDoS attacks work? And what is the most effective way to guard your WordPress site?
The Rapid Growth of the DDoS Threat
DDoS attacks use your site’s bandwidth limitations against you. How many visitors can it handle at once? Too many, and it will become overwhelmed and unresponsive, just like when hundreds of customers walk into a physical shop at the same time. A DDoS attack simulates exactly that.
A DDoS attack is equivalent to hundreds of thousands of fake customers converging on a traditional shop at the same time. The shop quickly becomes overwhelmed. The genuine customers cannot get in and the shop is unable to trade as it cannot serve them. (Deloitte Predictions 2017)
For an online store or website, those fake visitors are often members of a botnet—a network of hundreds of thousands of compromised devices that are being controlled by a third party. Those devices may include:
- older PCs running less secure, unpatched operating systems like Windows XP
- compromised smartphones and other mobile, internet-connected devices
- smart devices such as thermostats, TVs, refrigerators, cameras and even light bulbs—commonly referred to as IoT (“the internet of things”)
- and fake IP addresses spoofed by compromised servers.
Combined, these devices can send gigabits of garbage data to your server each second, and right now the scale of the onslaught is exploding. Late last year The Hacker News site reported the first 1 Tbps DDoS attack powered by 150,000 hacked IoT devices, and Deloitte predicts there will be ten similar attacks this year.
Why is 2017 such a turning point? Several trends are converging to create the perfect storm:
- There are more IoT devices than ever, and they’re easy to incorporate into botnets.
- There is more bandwidth available than ever, and it can be used to spew junk data at your website.
- New DDoS strategies cause more damage with less bandwidth by hitting web applications, and there’s more of them than ever.
- Malware tools, like Mirai, are easier to use than ever, and DDoS-for-hire services are more accessible than ever, costing as little as $5.
DDoS-for-hire is going to ramp up. The IoT botnets, combined with an easy money-making opportunity, will bring more of this kind of thing in 2017. Sceptical? Well, there’s already a 400,000 strong IoT zombie army for rent, using the Mirai malware. (The Register)
How can you protect your site from a massive attack of unwanted visitors? Take a lesson from the nightclubs, and call in a bouncer. The key is to deal with the threat before it reaches your door.
The Best Defence Against DDoS Attacks
How do you stop the impact of a DDoS attack before it hits your site? Use a reverse proxy. Send all of your traffic to someone who can weed out any threats before they get in, and forward only genuine visitors to your site. Like a bouncer, they need to be bigger and stronger than you are. They need to be able to stand up to the attacker without being knocked over.
So choose a solution that uses:
- a global network of high-powered servers that are able to dedicate more resources when an attack ramps up, ensuring that legitimate traffic can still get through; and
- a WAF that can intelligently profile incoming traffic in real-time, ensuring all threats are blocked.
Where can you find such a solution? Incapsula can do all of that and more. You can use it on any website with its own domain, whether it uses WordPress or some other platform.
Incapsula enhances the security and performance of your WordPress site by blocking threats from incoming traffic and accelerating outgoing traffic to optimize your site’s load time. Its global network is able to thwart DDoS attacks of hundreds of thousands of gigabytes per second. And that protection won’t cost you any speed—in fact, its global CDN will actually make your site load even faster.
How to Protect Your Site with Incapsula
Setting up Incapsula isn’t hard—it’s normally just three steps, with no software to install. They take a few minutes to work through, and possibly a couple of days to come into effect.
1. Sign Up and Choose a Plan
Incapsula offer a range of plans, each starting with a free trial. To get a web application firewall, you need the $59/month Pro plan, and for full DDoS protection you need the $299/month Business plan. Once you choose the plan that makes sense for your site, you open an account and submit your credit card information.
2. Submit Your Domain URL
Incapsula will ask for the domain URL of the website you want to protect, and then provide you with instructions of how to make the changes needed for the next step. If your website supports secure HTTPS traffic, you’ll be led through a few additional steps to activate SSL support. SSL support is available for Pro, Business and Enterprise accounts.
The preferred option is to add your domain to one of Incapsula’s Globalsign shared certificates. This can be done either by email or DNS:
- Email: You (the domain owner) will receive two emails from Globalsign. Reply to each with “yes” in the body of the email.
- DNS: Create a TXT record with a provided string.
This will request approval for both the naked and the wildcard of the site’s domain, which simplifies the process. If you’d like to only approve the specific site name, you’ll need to send a support ticket. Read more on the Incapsula blog.
3. Change Your DNS Settings
Your DNS settings normally direct visitors directly to your website. You need to change them to direct traffic to Incapsula’s servers instead.
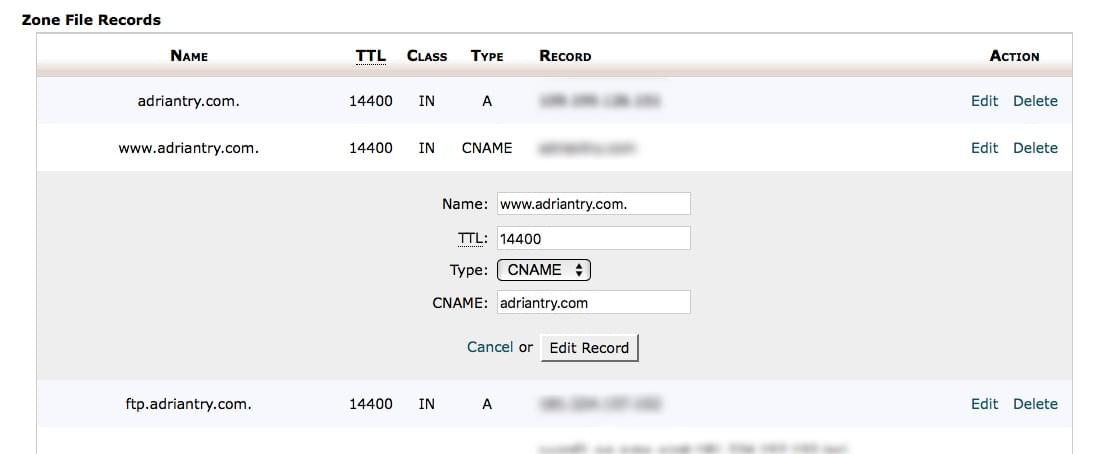
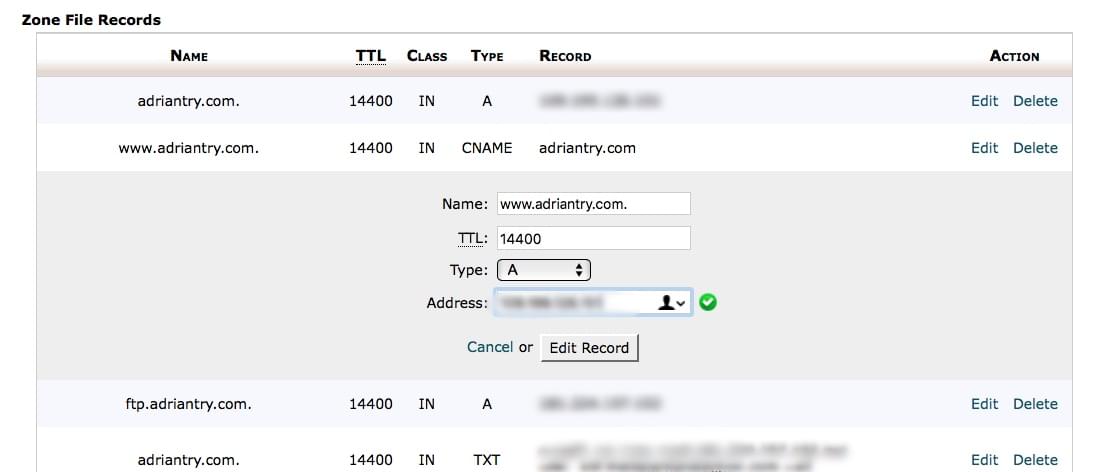
That involves making the following changes in your cPanel’s Advanced DNS Zone Editor:

- Change your A record to point to Incapsula’s IP address
- Add a second A record to point to another Incapsula IP address
- Update (or create) a www CNAME record to also point to Incapsula.

The specific changes needed will be given to you, along with a link to a tutorial.
DNS changes may take 48 hours to propagate, but your website will stay live during the changeover. After that your website’s traffic will be routed through Incapsula’s network, and you’ll be protected from DDoS attacks.
Further Steps
Are there any other considerations when setting up Incapsula? Probably not, though some users found they had to also make sure their email wasn’t directed through Incapsula, otherwise it would time out. This may happen if you’re using your hosting provider’s email solution. If you’re using a third-party option like G Suite or Exchange, you shouldn’t have any problems.
Your email may end up in a black hole if your mail.domain.com record is a CNAME pointing back to domain.com (which is being redirected to Incapsula). Instead, change it to an A record pointing to the IP address of your hosting account.
Here are some screenshots of how I would make the changes from my SiteGround cPanel’s Advanced DNS Zone Editor. You’ll find more detailed instructions here.


Don’t Wait Until It’s Too Late
Until now, perhaps you haven’t given DDoS attacks a second thought. It’s time for that attitude to change.
Protecting your WordPress site from brute force attacks is not something you can do yourself. You need outside help—a solution that can deal with the threat before it reaches your site. Your hosting provider may offer a solution, and that’s worth looking into.
But if it’s just not an option for your site to be forced down, hire the best bouncer you can afford. Incapsula is a great choice. It’s easy to set up, copes with large attacks, and dynamically weeds out threats. With free trials of every plan, you have nothing to lose.
