SEO Guide for Magento Ecommerce Sites
Magento is only five years old but is already the most popular open-source eCommerce platform on the net, boasting a community of over 150,000 online retailers.
Similar to other off-the-shelf CMS solutions, like WordPress, it promises to democratize the tools of the designer and programmer, by bringing web development to the masses. However, unlike designing and launching your new WordPress blog, running a web-based retail business is a huge undertaking.
You need a solution which can not only automate the shopping cart and checkout process, but keep a check on your inventory, run promotions, handle customer service, deal with shipment and logistics, as well as allow you to design and manage the store front.
Running an eCommerce site on Magento means that you will still have to create your store from the ground up and get your hands dirty with more than a bit of code. Most of this can be figured out by reading the guides for any themes and extensions you use, but there are also parts of Magento that allow for much deeper customization which aren’t that obvious.
Search Engine Optimization (SEO), for example, is an essential component of running a web-based business and probably the most important form of marketing online. It involves making your site visible to search engines so they can rank you properly—high on the front page.
Magento makes SEO easy by allowing you to manage the way it writes URLs, creates images and handles links so that your site can easily be indexed in search engines.
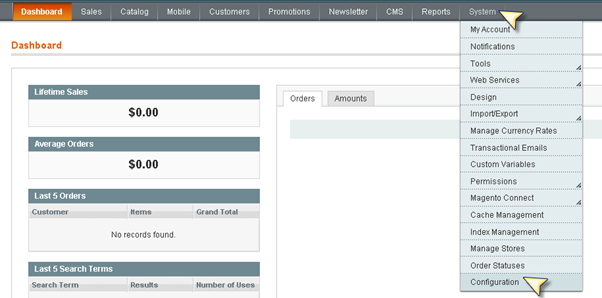
Once you’ve installed Magento and set up your store, you can start optimizing your site for search engines from the web configuration menu by going to System>Configuration in your site’s Magento admin area.
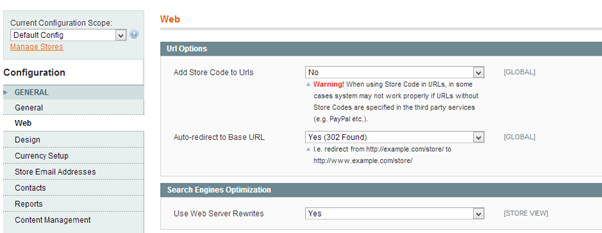
The first thing to do is to set “Add Store Code to URLs” to “No”. This will make your product URLs easier to read by search engines and humans alike, and is more compatible with third-party services such as PayPal. Also set the “Auto-redirect to Base URL” option to “Yes” to make sure all traffic goes to the same base URL (i.e. http://quietnightbeds.co.uk and not http://www.quietnightbeds.co.uk). Finally in this section, change “Use Web Server Rewrites” to “Yes”. This will remove “index.php” from your URLs, which makes them much more search engine friendly.
The next selection in the web configuration menu allows you to choose your base URL preference—essentially allowing you to pick between the “www” or “non-www” versions of your domain. This preference should have been chosen when you registered your domain but you can also set your preference here.
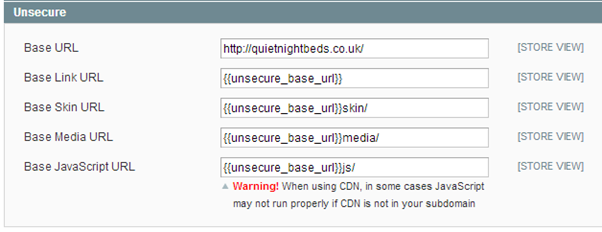
You should note that this doesn’t create a redirect to your base URL, as this was set in the previous menu. However, this does set your preferred URL and will be used by default by Magento throughout.
Once you’ve set up your URLs to be more search engine friendly, you can now work on your on-page optimization—starting with the heading for your site.
By default, Magento will set your header to “Magento Commerce” or “Home page” depending on the version. You can change this by going to System>Configuration, and then go into the “Design” menu of the “General” section.
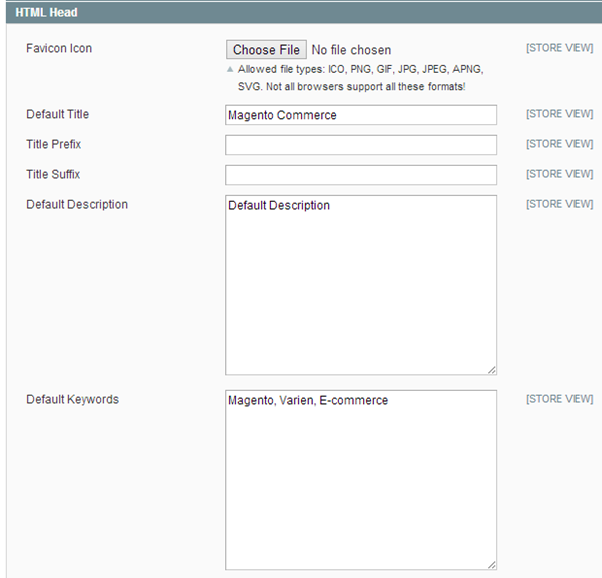
Change the default header to something suitable—making note of the keywords you are trying to rank your website for as well as the fact that search engines tend to put greater importance on keywords that appear at the start.
You also have an option here to add your keywords to the title prefix and suffix. This will automatically add them to the beginning (or end) of the headers of every page you create, which might not be something you want to do.
Similarly the “Default Description” and “Default Keywords” (which works just like Meta Description and Meta Keywords for your site) will allow you to add your keywords in these sections.
Just below the “Default Keywords” section, you’ll also find the “Default Robots” drop-down menu, allowing you to optimize your site further. If you want search engine bots to index and crawl your site (and you probably do), then set this to “INDEX” and “FOLLOW”.
When you’re done, click “Save Config”.
This isn’t the end of setting the header and Meta Descriptions of your site. Depending on the theme you’ve installed, most of the default pages, such as the “Home”, “About Us” and “Contacts” pages, will already be named and set individually, overriding your setting in the Configuration menu.
These pages are stored in the “CMS” section of the top menu. CMS pages are a unique way Magento deals with front end design, and can be quite complicated for the uninitiated.
To set these pages to be more SEO-friendly, go to CMS>Pages in the Magento admin area.
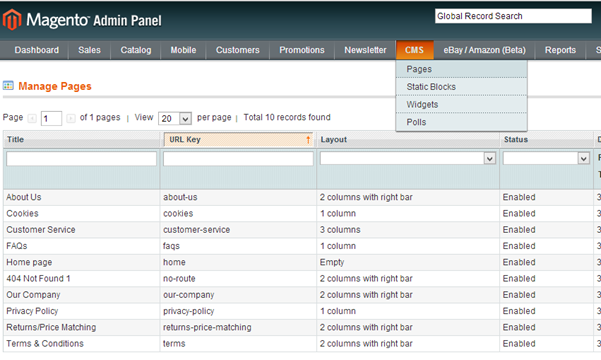
You then need to individually optimize your pages. Pay particular attention to pages like your “Home page”, as these are the ones that will give you most bang for your buck in search engines.
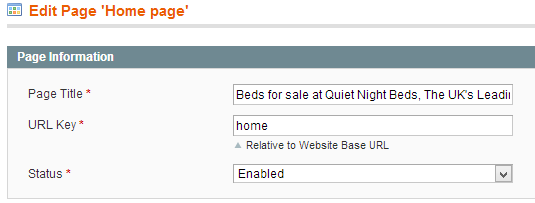
In the “Page Title”, change the words to something more SEO-friendly, using your keywords correctly at the beginning. Then, below that in the “Meta Data” options, add your keywords and description as you did in the previous step. When you’re done, click “Save Page”.
When running an eCommerce site, your potential customers can land at your store from almost anywhere on the web. Once you’ve set up your site as described above, you can go much deeper in making sure search engine’s keep you ahead of the competition.
That includes making your individual product titles more descriptive and adding alt text to your images. This is often overlooked, but image alt texts are important for the visually impaired and those viewing your site on e-readers. They can also redirect visitors to your site via image search results.
