Getting Started with Augmented Reality and Meta
Meta have been in the news recently after a much anticipated TED talk last week showcasing their next augmented reality headset, the Meta 2. This was fantastic timing for my first article on developing for the Meta augmented reality headset in Unity! If you have one of the original Meta headsets and you’ve been putting off building AR apps — now is a good time to dust that headset off and do some development!
In this tutorial, we will look at creating an augmented reality butterfly experience. We will be starting from the basics and will finish with a simple butterfly we can grab and move around our scene.
What You’ll Need
In order to follow along with this tutorial, you will need the following:
- A Meta 1 Developer Kit – These are sold out, so if you aren’t lucky enough to have one, you’ll need to find a friend who owns one or wait for the Meta 2!
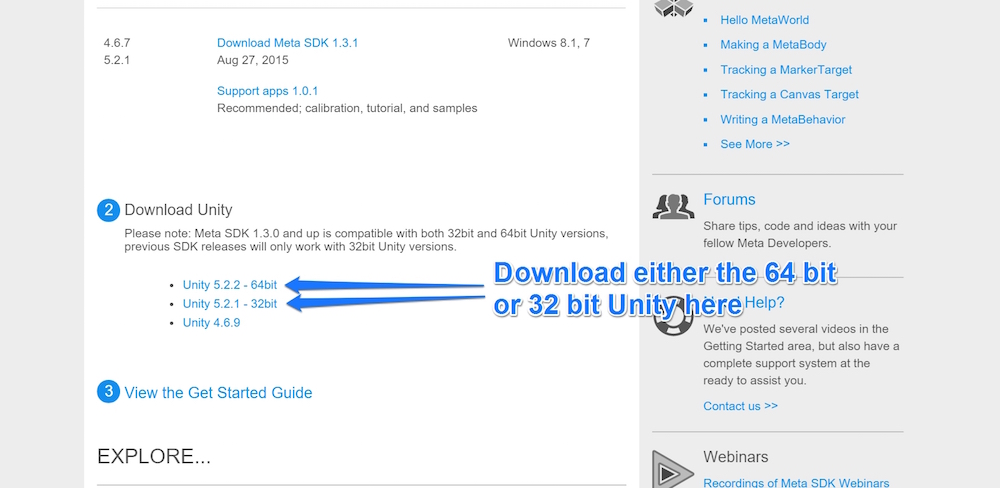
- Unity 5.2.1 (32 bit) or Unity 5.2.2 (64 bit) – Meta support for Unity 4 is ending soon, so it is best to get up to Unity 5 by this point! I’d recommend downloading via Meta’s links which we’ll cover below.
- Windows 8.1 or Windows 10 – Sadly Mac OSX isn’t supported and Windows 7 support is being phased out.
Downloading Unity and the Meta SDK
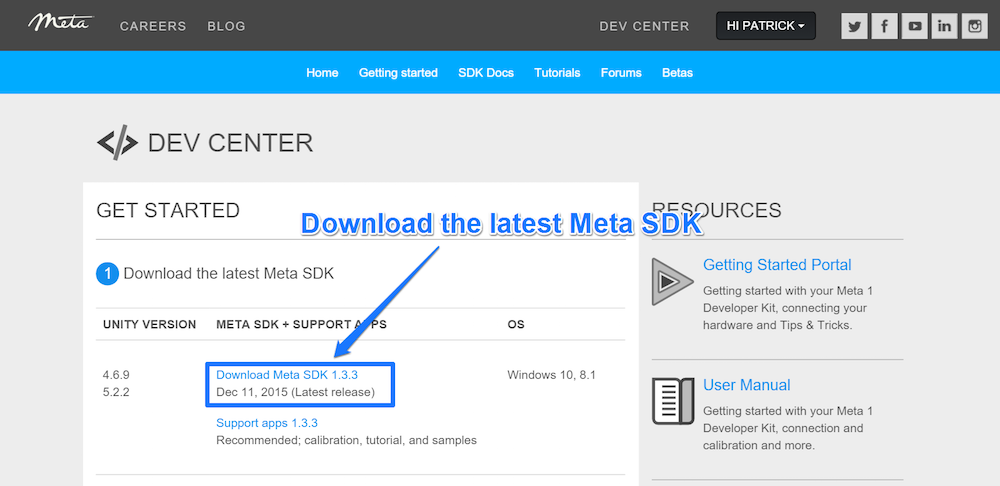
The safest way to get the right versions of both Unity and the Meta SDK is to head to the Meta Dev Center. From here, you can download the latest Meta SDK:
Once that has downloaded (or do this simultaneously if you’ve got much faster Internet than I do!), scroll down to download either the 64 bit or 32 bit Unity depending on your operating system:
Once Unity has downloaded, run through the install process for both the Meta SDK and Unity. Both are pretty straightforward, so I won’t waste time discussing them here! Once both have installed, open up Unity and we will get started!
Creating Our First Project
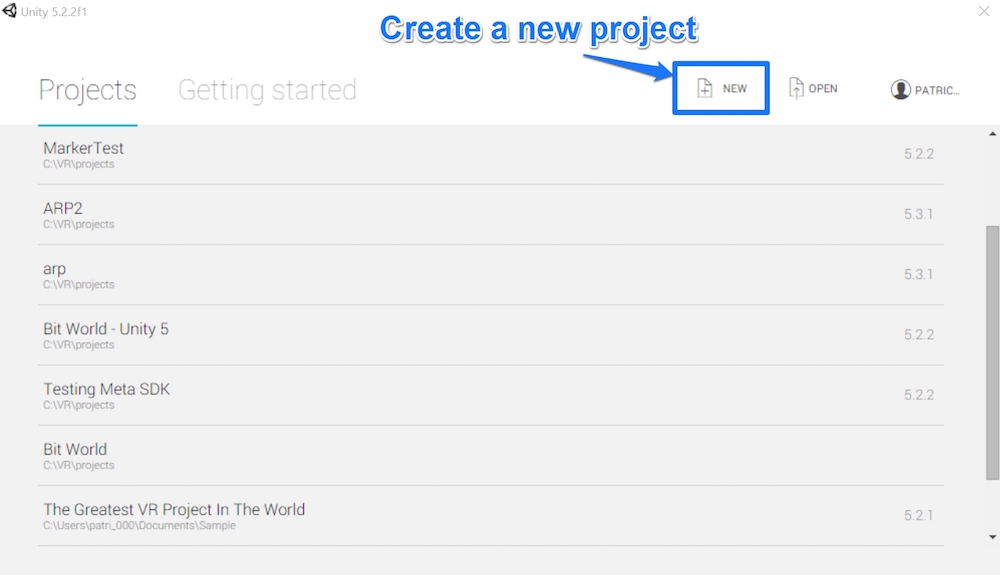
When we first open up Unity, the welcome screen has an option for starting a new project in the top right. Click “New” to start a new project:
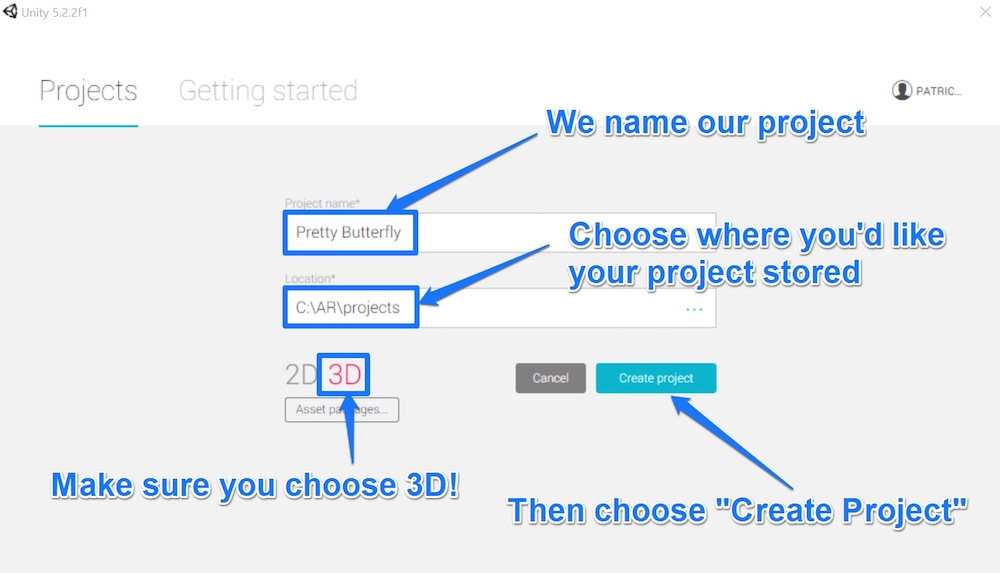
Then, we name our project (you can call yours whatever you’d prefer, we’ve gone with “Pretty Butterfly”) and choose where you’d like it saved on your computer. Make sure you have 3D chosen on the bottom left! When ready, click “Create Project”:
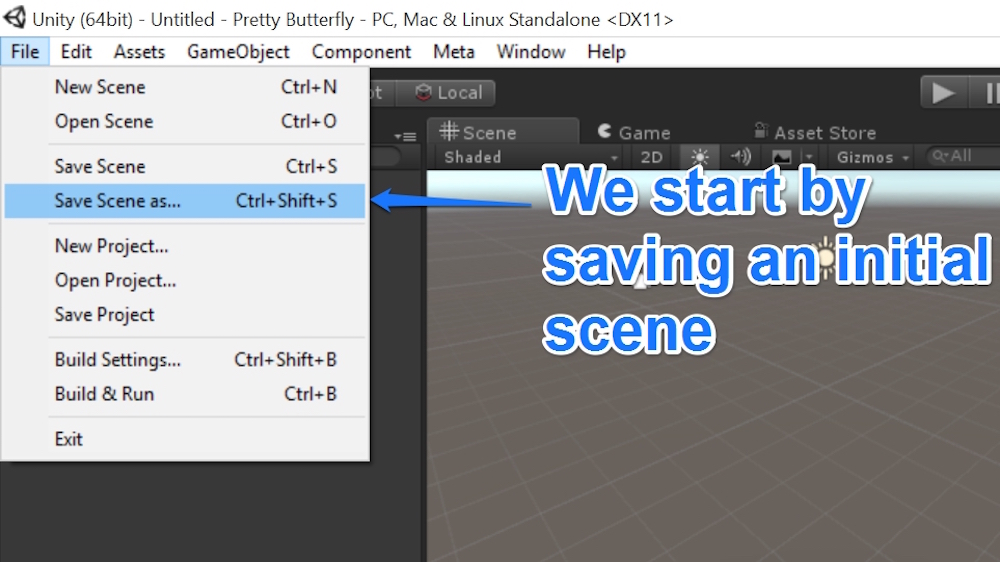
Before doing anything else, it can be a good idea to have your initial scene named and saved. To do so, go to File > Save Scene as….
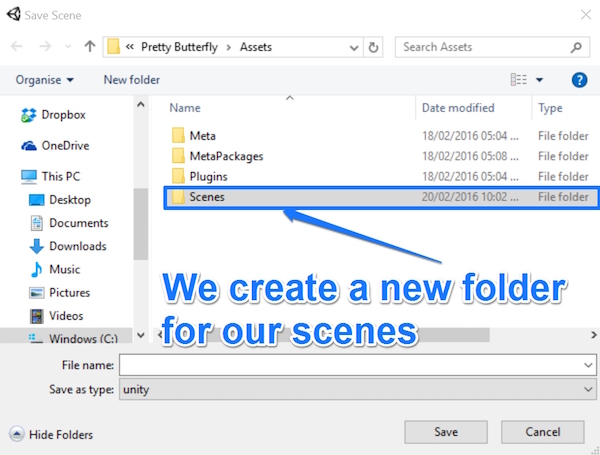
We add a new folder for our scenes within the project’s “Assets” folder called “Scenes”:
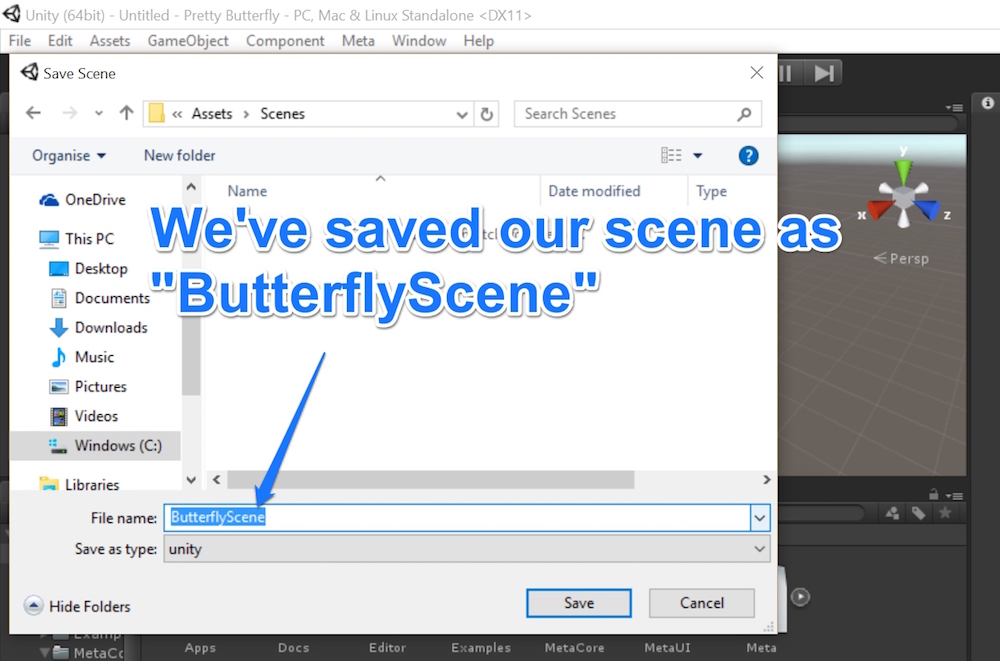
Then name our scene “ButterflyScene” — you can name yours whatever you’d like!
Importing the Meta SDK
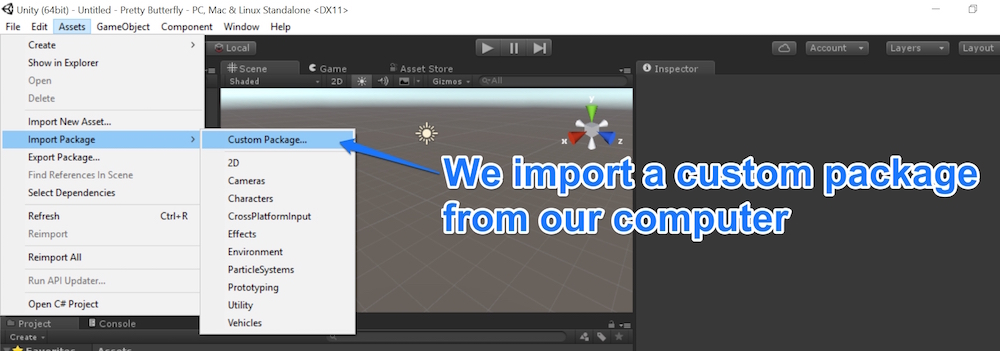
Now that we have a scene saved and ready, it is time to import in the Meta SDK we downloaded earlier. To do this, we click Assets > Import Package > Custom Package…:
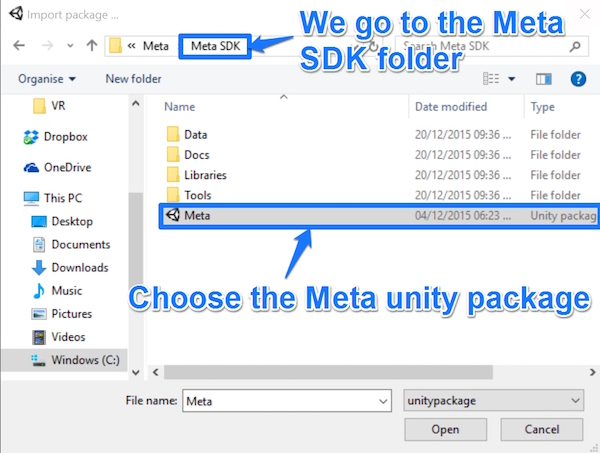
Navigate through your filesystem to the Meta SDK. For me, this was in C:/Program Files (x86)/Meta/Meta SDK. In this folder, we choose the “Meta” Unity package:
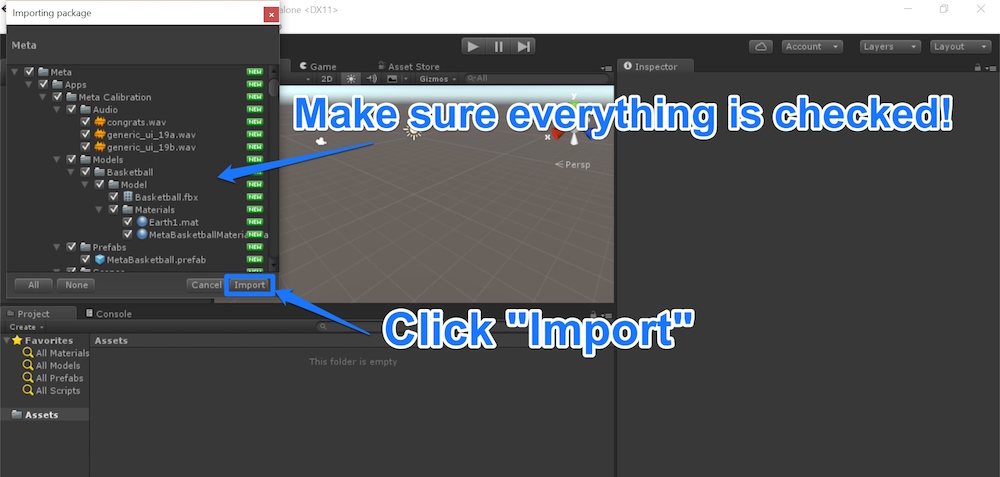
After a bit of loading time, a window with all of the Meta SDK assets found will appear. Ensure everything is checked and click “Import”:
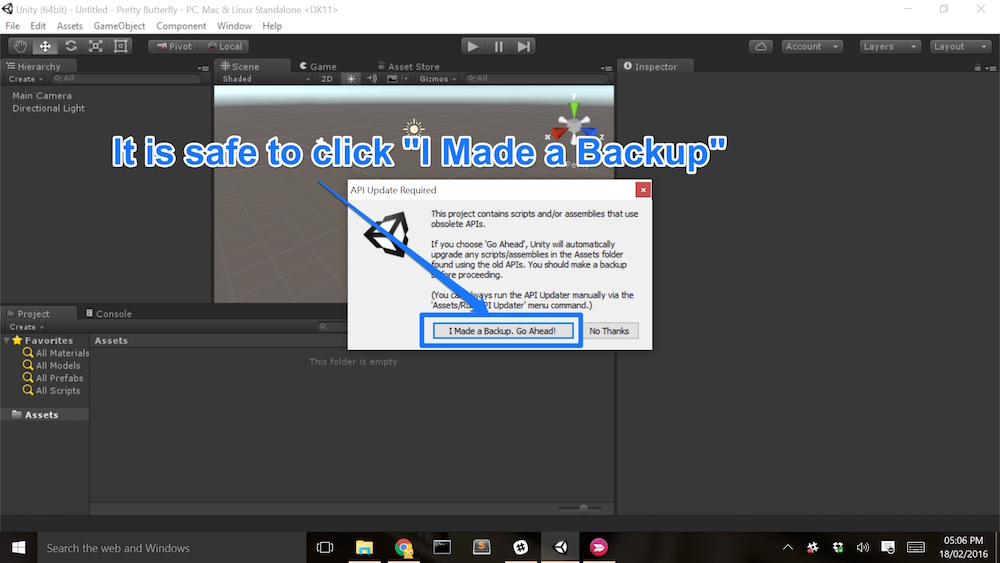
If Unity pops up saying “This project contains scripts and/or assemblies that use obsolete APIs”, that’s okay. Just click “I Made a Backup. Go Ahead!”
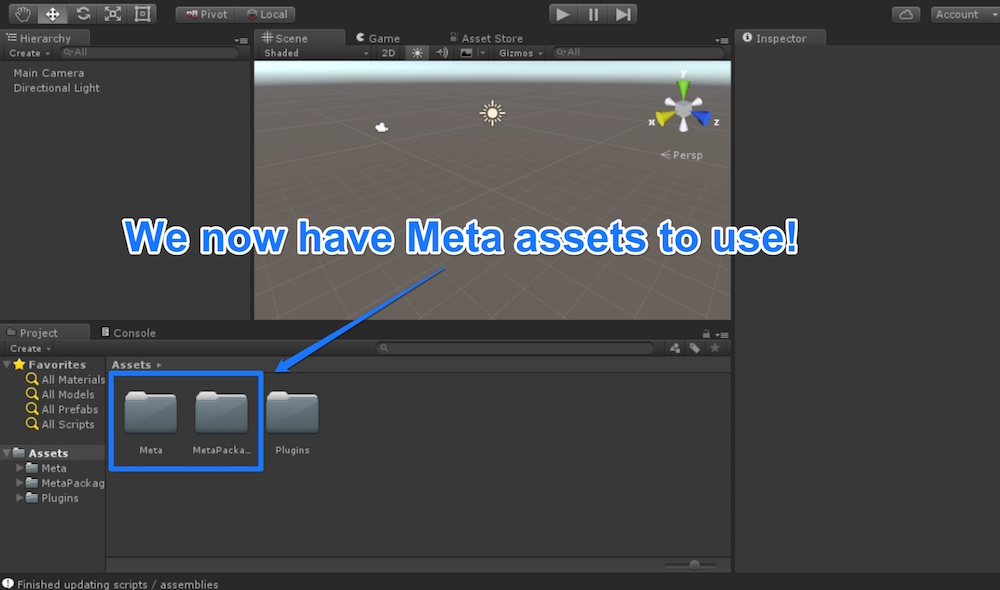
We should now see two new folders, “Meta” and “MetaPackage”, within our project:
Adding MetaWorld Into Our Project
Within our new assets, we have our “MetaWorld” Prefab that will give us all of the Meta camera and interaction functionality we need. If you are new to Unity — Prefabs are basically like template objects that can be reused in multiple projects and scenes to share functionality.
The easiest way to add this into our scene is to search within the “Project” window. Type in “MetaWorld” and it should filter our assets to show us what we want. Drag the “MetaWorld” prefab into your project hierarchy (where you’ve currently got a “Main Camera” and “Directional Light”):
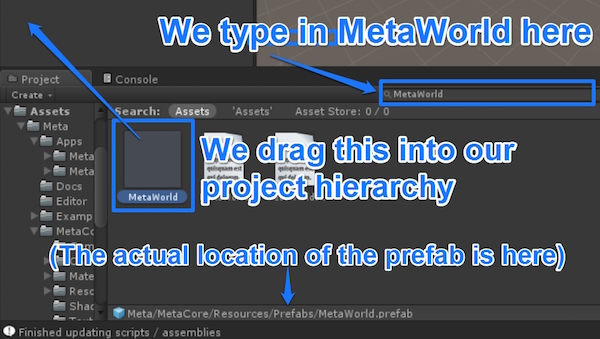
The actual location of the “MetaWorld” prefab for those wondering is Meta/MetaCore/Resources/Prefabs/MetaWorld.prefab.
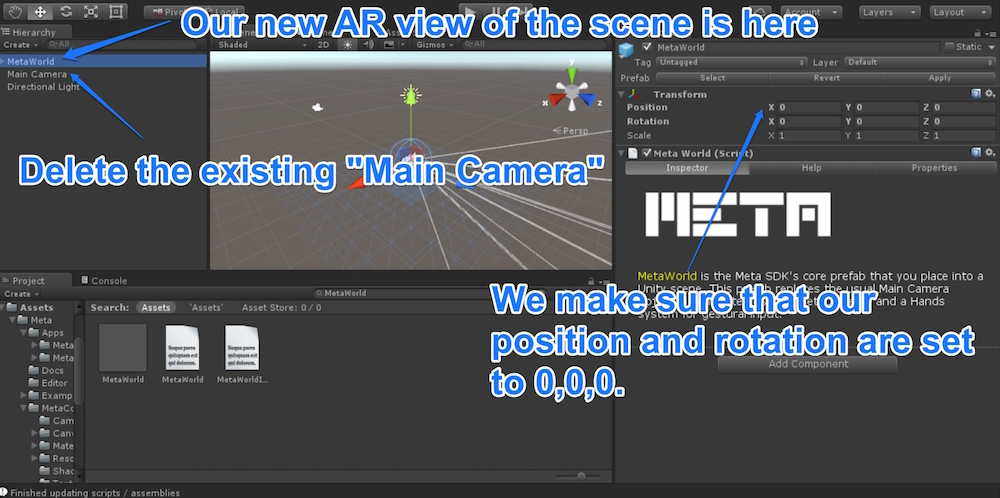
The “MetaWorld” object is our augmented reality view of the scene and represents our Meta headset. Make sure it is positioned at {0, 0, 0} and has no rotation on it. This is our camera view, so we can delete the existing “Main Camera”. We can also delete the “Directional Light”:
Adding Our Butterfly
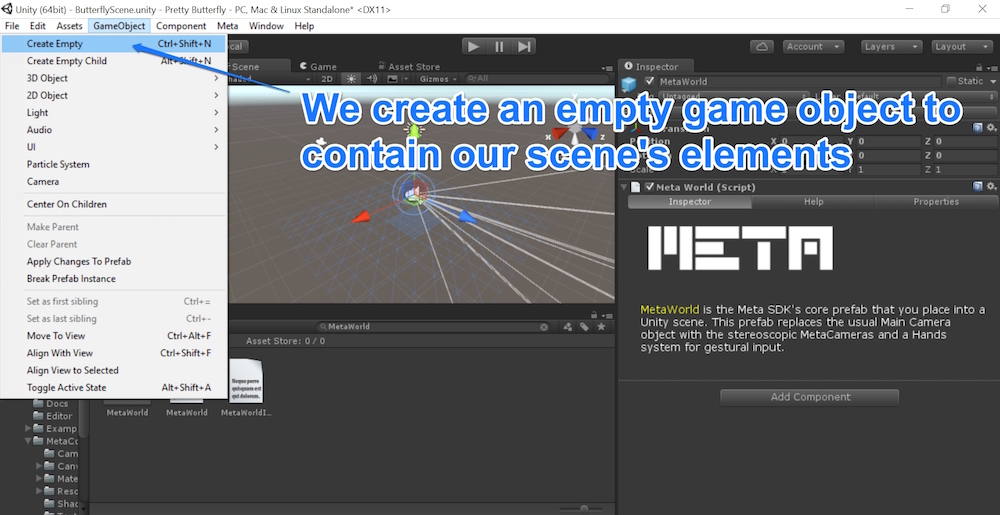
The cleanest way to organise our scene is to create a new empty game object which will include the rest of our elements. For those new to Unity, this creates a nice and simple container for our objects. To do so, go to GameObject > Create Empty.
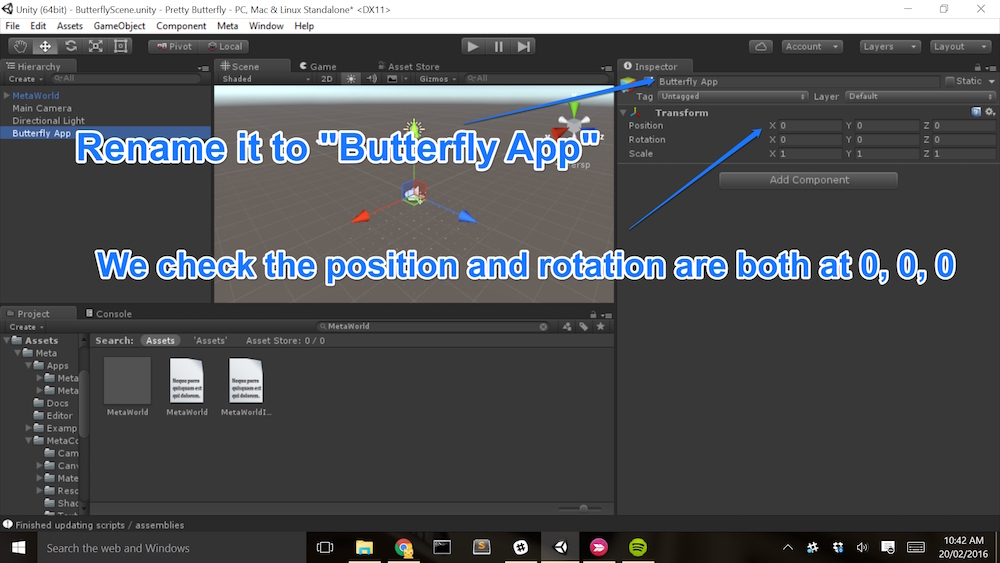
We rename this object to “Butterfly App” and ensure that it is positioned at {0, 0, 0} with no rotation. This is important as all objects placed within this will use the parent object’s position as a base.
To get a pretty butterfly model to use, we will visit the Unity Asset Store. If you’re not a fan of butterflies (unlikely, but you never know!), you could download almost any model for this to work. Experiment away!
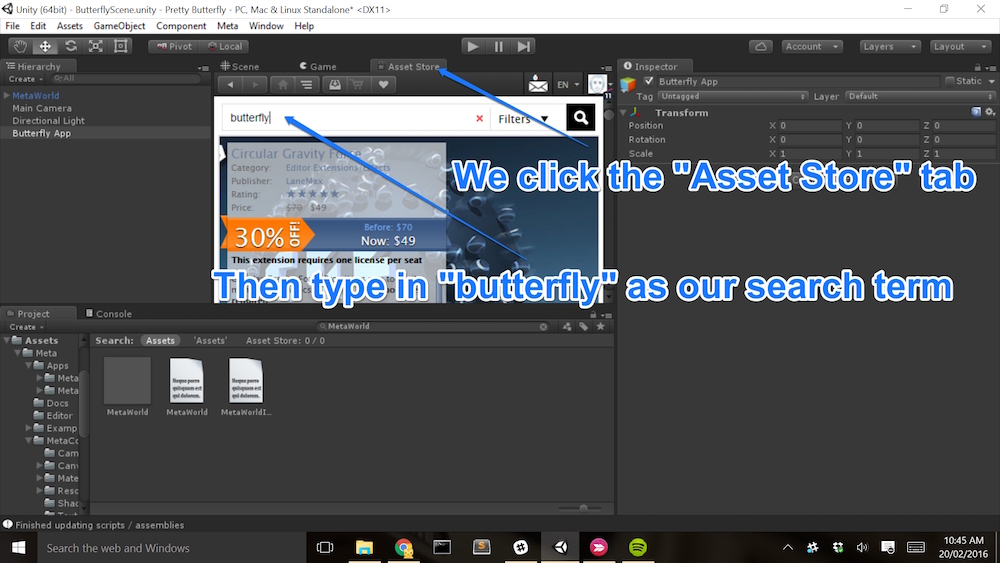
We will click on the “Asset Store” tab, next to our “Scene” and “Game” tabs, then type in “butterfly” in the search box:
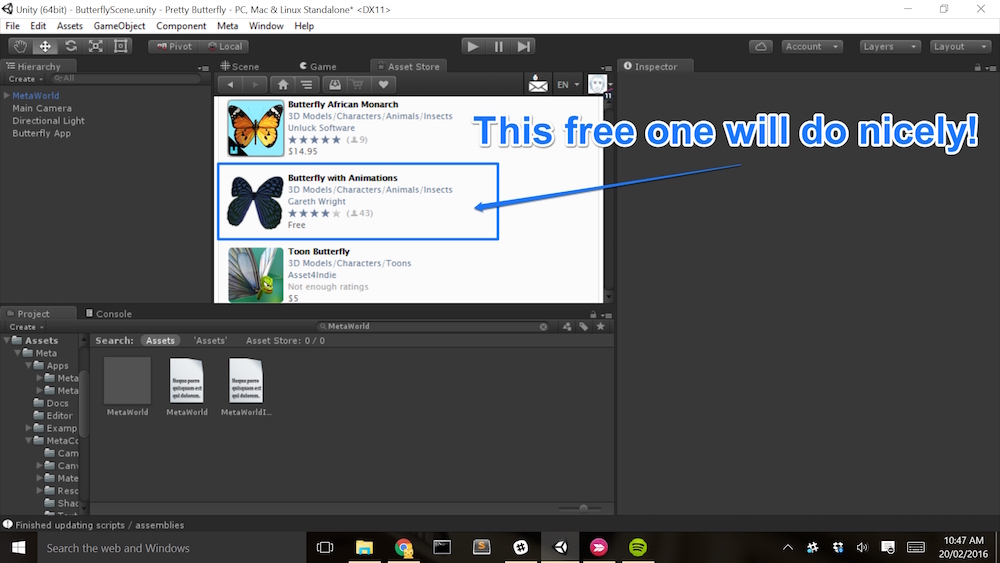
If we scroll a little bit, we will find a nice free one that will work perfectly for our demo:
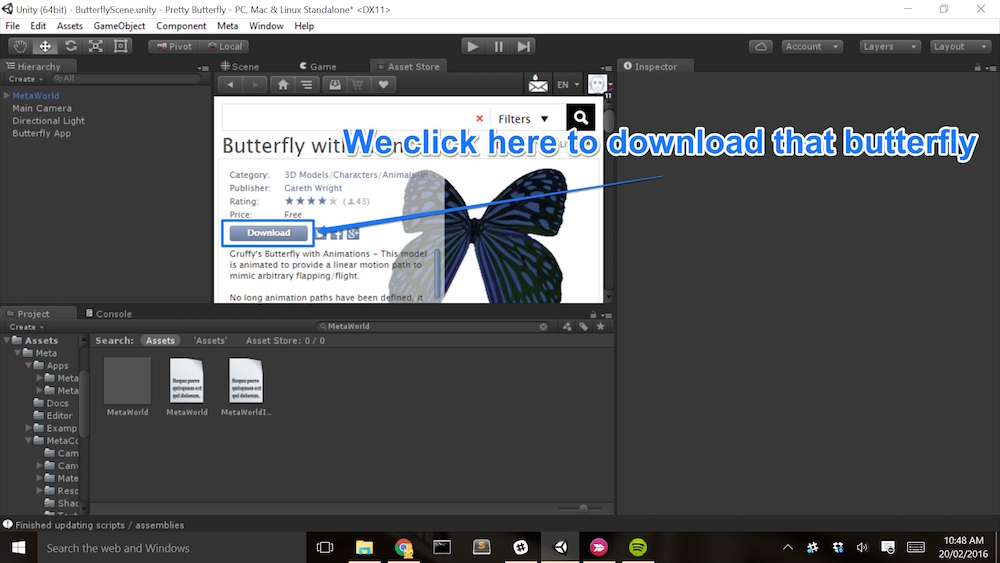
Click “Download” to begin downloading the files for our butterfly:
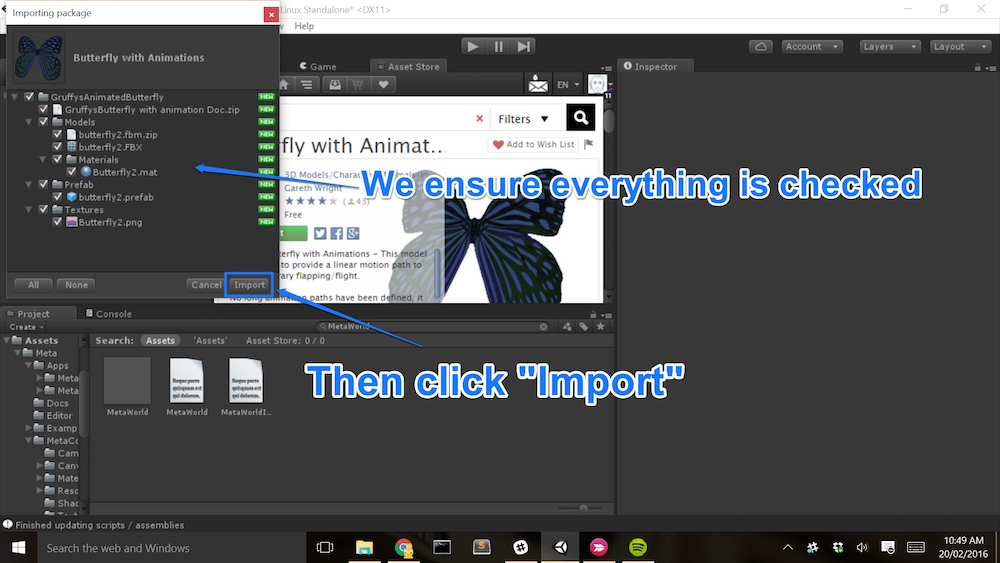
In the import window that appears, ensure everything is checked (just as we did when importing in the Meta SDK) and click “Import”:
If we go back to the root of our “Assets” folder, we can now see a new folder with our new butterfly assets!
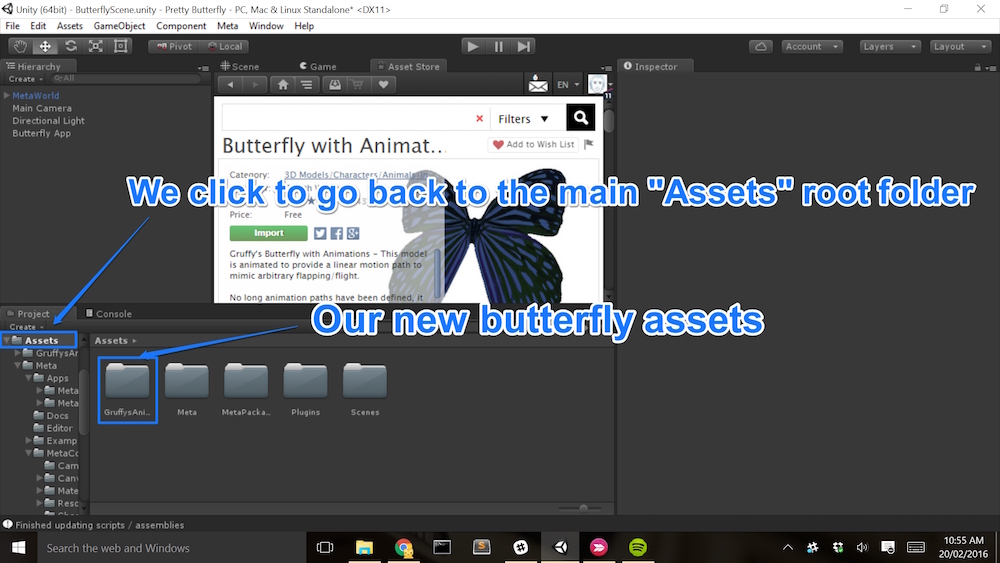
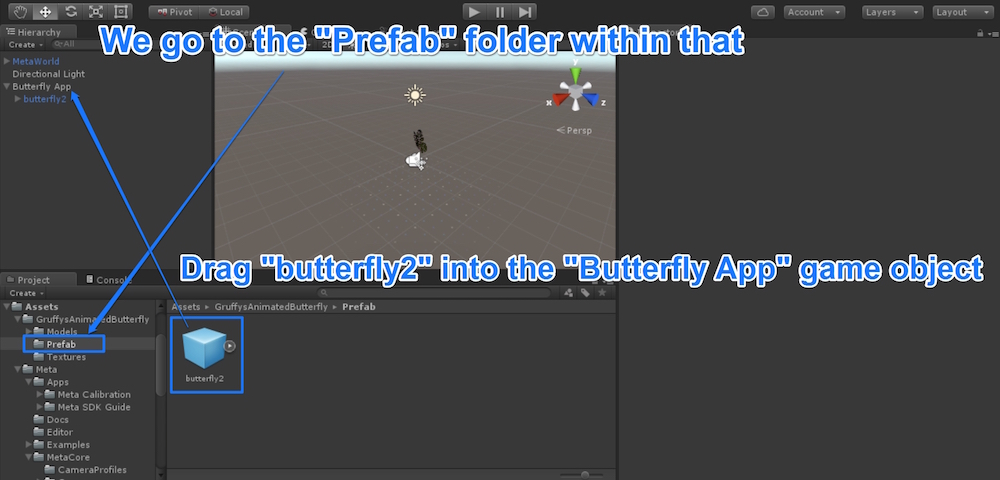
Within this new folder, we navigate to Assets > GruffysAnimatedButterfly > Prefab. We now drag the “butterfly2” prefab into our “Butterfly App” empty game object.
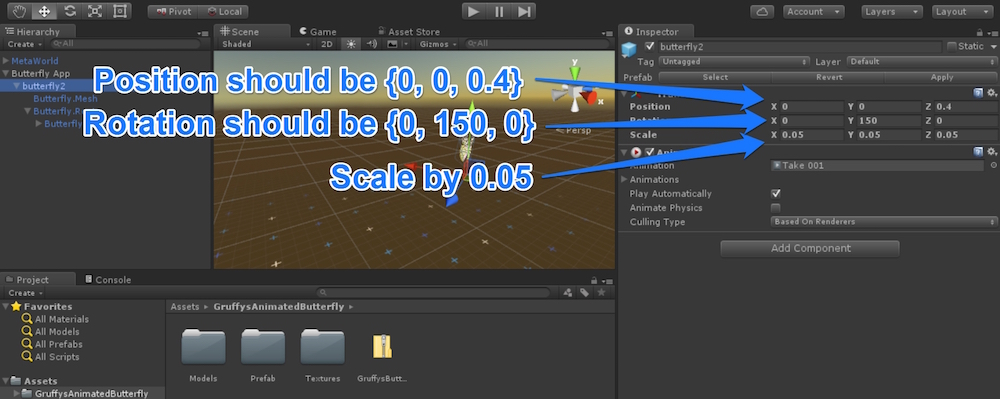
You can play around with the positioning of the butterfly if you’d like. The best position I found was to have position Z moved away from the camera by 0.4, but X and Y remain at 0. I’ve rotated the butterfly on the Y axis by 150 and scaled it on all axes by 0.05. The scale can definitely be whatever you’d like, if you’d like a bigger butterfly, feel free to enlarge it (but you may need to move it back a bit more on the Z axis to see it properly if you go too big!).
If you haven’t already, remove the “Directional Light” that came with the Unity scene — we won’t need it.
Giving Our Butterfly Meta Capabilities
In order to be able to pick up and move our butterfly around the scene, we need the butterfly itself to be a “MetaBody”. This is a component which comes with the Meta SDK and is simple to add to any object in Unity.
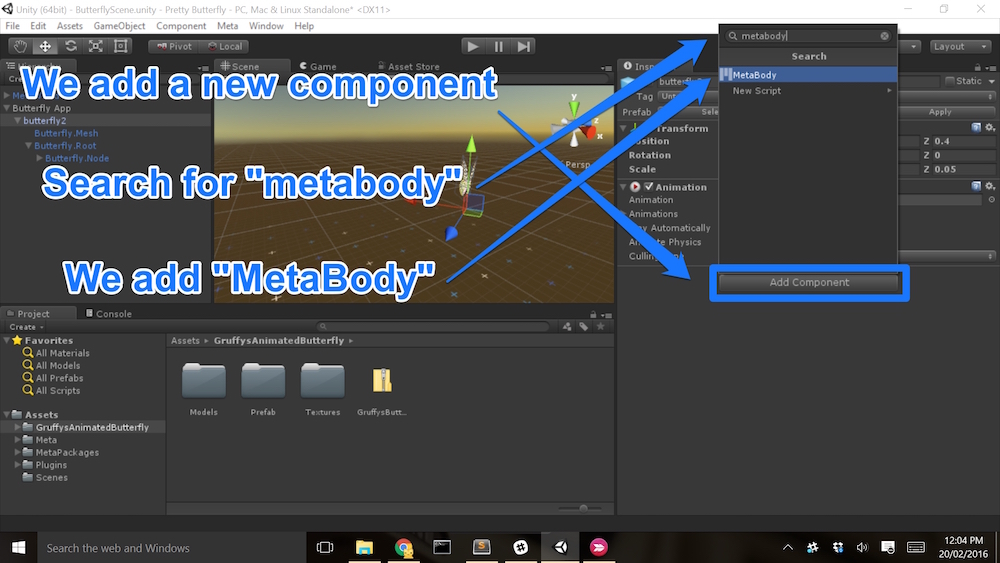
To turn any Unity object into a MetaBody-enabled object, click on the object (e.g. our “butterfly2” in this case), click “Add Component” on the right hand side and search for “metabody”. Click “MetaBody” when it appears:
In the settings which appear now for our object, tick the following:
- Grabbable and Move – This is what allows us to pick up and move our butterfly around the scene.
- Arrow – This provides a directional arrow on the Meta interface pointing at where the object is when it is not on screen. This is really useful for objects which the user can move around the scene – as people tend to drop objects and not see where they’ve gone! The arrow saves a lot of time and confusion!
If we run the app now, we’d struggle to see the butterfly and might be a tad confused (I know I was initially). This isn’t because we have done anything wrong in the Meta SDK or in Unity. If you have been following along step by step, you’ll be in the same situation — it is due to a shader that is on our butterfly by default to make its wings blend in nicely with the scene.
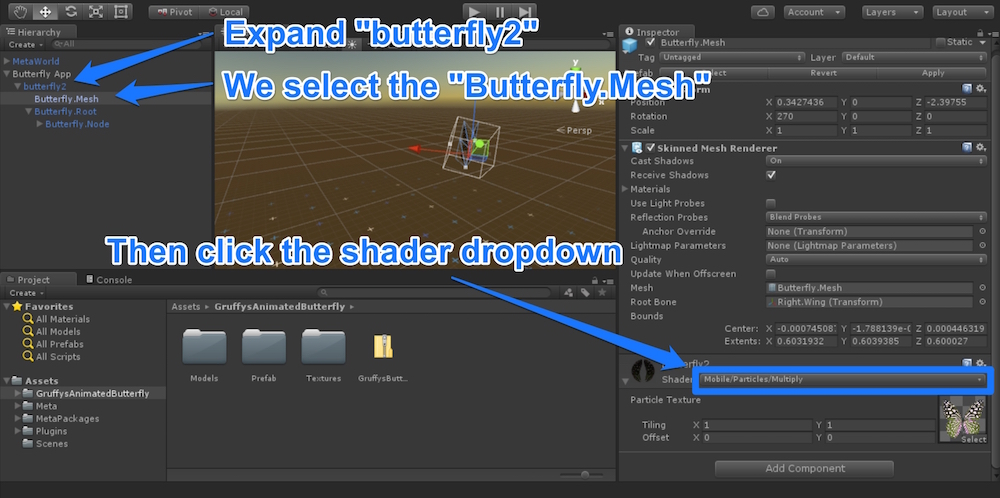
To make it visible for our Meta headset, we will want to change this shader. To do so, click to expand the “butterfly2” game object in the project hierarchy and select “Butterfly Mesh”. With this selected, click the shader dropdown on the right:
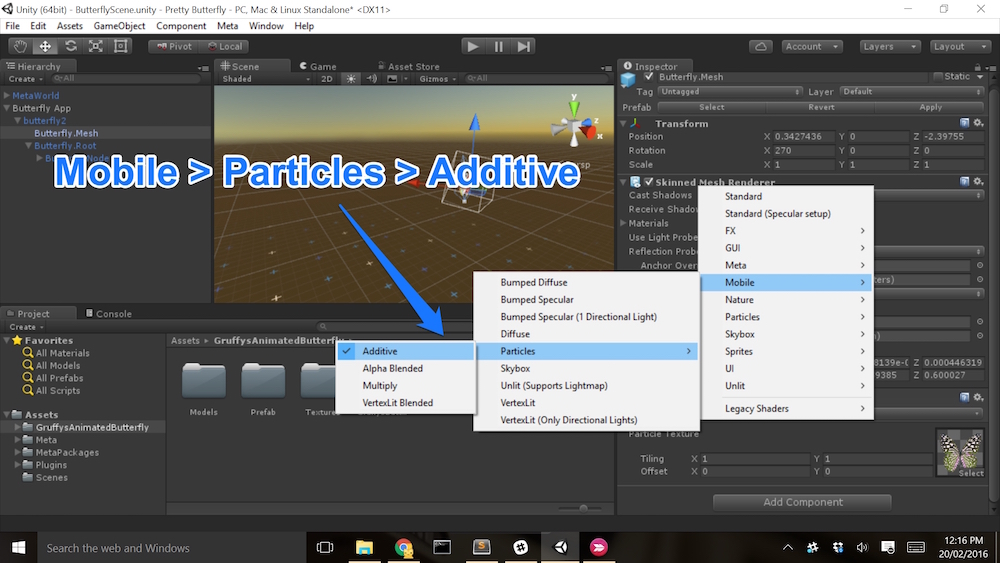
In the menu that appears, go to Mobile > Particles and choose “Additive”. This gives us a different shader that makes our butterfly object shine through our scene! Much nicer, it actually gives it almost a hologram-style feel to it in augmented reality too.
In Action
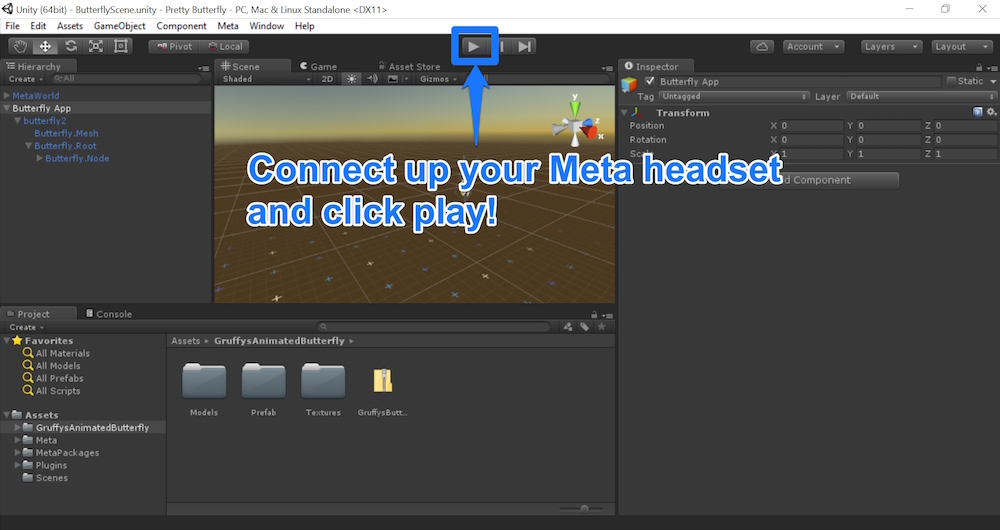
With that, we save our scene and are now ready to test it out! Connect up your Meta headset and press the play button on the scene.
There are a few things that you might need to do if you aren’t seeing a butterfly as you’d hoped:
- Not seeing your butterfly in front of you? You might need to recentre your view by clicking F4 — or follow the arrow!
- Not seeing two images side by side in your headset? Make sure you’ve clicked the 3D button on the bottom left of your Meta developer kit control box.
- Not seeing two images side by side in Unity’s preview? Press F2 to switch to side-by-side mode.
- Seeing a very small image in your headset? Press F3 to switch to the rectified view.
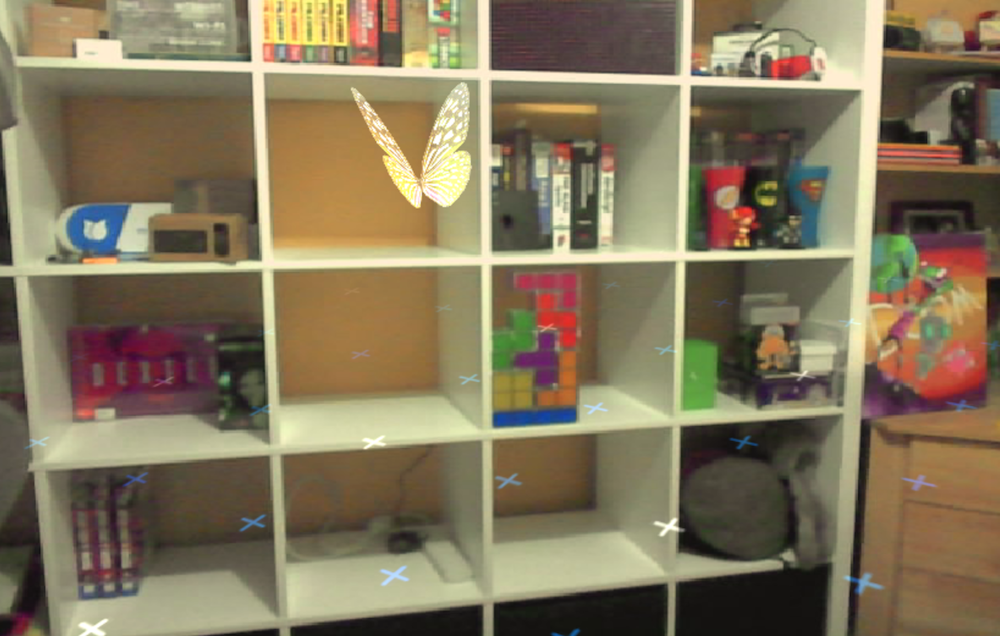
If you have got it displaying successfully, you should be able to see a butterfly floating in your scene! You can grab it and move it around with your own hand. Grabbing objects which don’t really exist in reality is something which can take a bit of getting used to:
- Make sure you have your open hand in front of the glasses until you see a dotted yellow circle.
- Close your hand into a fist and that circle will go green.
- Move your fist around to move the butterfly around the scene.
- Open your fist again to let it free!
Here’s what my butterfly looks like in side by side view (this view looks 3D when viewed through the headset):
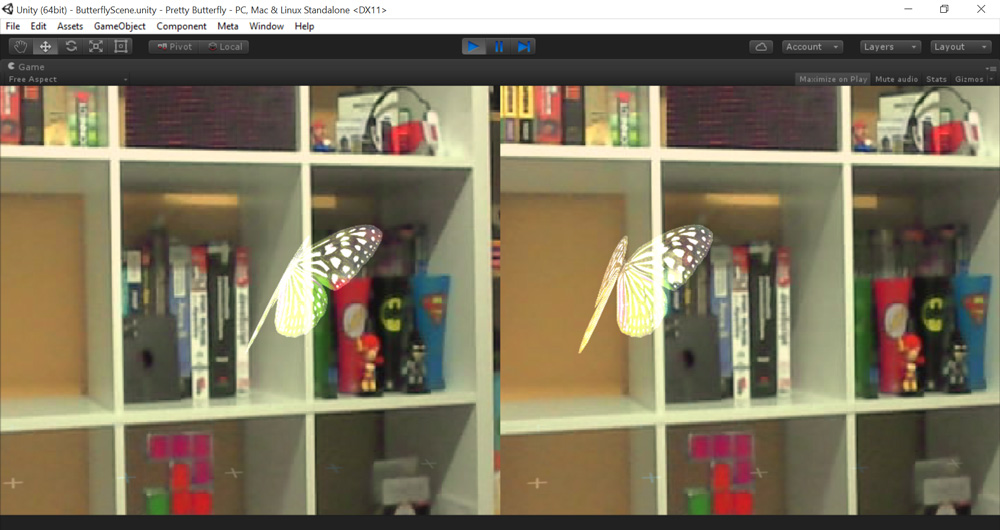
Here is a view of it with just one screen to show what someone wearing the headset will see:
Conclusion
Augmented reality is a really fascinating area that is ripe for so many opportunities! If you don’t have a Meta headset and are keen to get involved, more details on the Meta 2 headset should appear on 2nd March, at 9am PST on the Meta Website. This is my favourite choice right now for AR headset development! Here’s hoping there’ll be plenty of developer kits to go around when they announce more details. The new headsets look like they will have a greater field of view and higher resolution display than the Meta 1. I’m eagerly hoping to get my hands on a pair myself!
Are you a current Meta Pioneer developing on the platform? Or a pioneer who now has a renewed interest in getting their headset out and doing some development? Have you already got a prototype going? Has a new idea sparked in your mind after reading through this? I’d love to hear what you are up to! Let me know in the comments below, or get in touch with me on Twitter at @thatpatrickguy.
