Bundling in ASP.NET
ASP.NET is a technology stack that has earned a reputation in enhancing productivity. With the release of ASP.NET 4.5, the stack has pushed the envelope by adding automated bundling of web resources, making it easy and flexible to work with.
In this article, I would like to take a look at bundling in ASP.NET. I’ll explore how seamless it is to set up bundling in any ASP.NET project.
With ASP.NET 4.5, the framework has gained a new namespace called System.Web.Optimization. Let’s see how this works.
Setup
For this tutorial, I am starting out with an empty ASP.NET MVC project. This way, I can focus on what it takes to get automated bundling set up. The same basic steps also apply to WebForms. I will use Razor and C# for this tutorial.
After clicking through prompts for a new project, add these packages in the NuGet Package Manager Console:
PM> Install-Package Microsoft.AspNet.Mvc
PM> Install-Package jQuery
PM> Install-Package Bootstrap
PM> Install-Package Microsoft.AspNet.Optimization
I would like you to pay attention to the NuGet package called Microsoft.AspNet.Optimization. If you are working off an existing ASP.NET project, this NuGet package makes your job easy. After it gets installed, all you have to do is set up the rest of the plumbing.
With the web optimization framework, you get the tooling to automate managing web resources. You may find the official documentation at MSDN.
Now, add a folder named App_Start in your main solution if you don’t have it already. We need to get bundling set up by adding this static class.
public class BundleConfig
{
    public static void RegisterBundles(BundleCollection bundles)
    {
    }
}
Routing is set up with any existing project so I will not be including it in this tutorial.
To let the ASP.NET framework know about our newly configured bundles, do this in the Global.asax:
public class Global : HttpApplication
{
    protected void Application_Start(object sender, EventArgs e)
    {
        BundleConfig.RegisterBundles(BundleTable.Bundles);
    }
}
ASP.NET is an event-driven framework. If you can imagine, the IIS server sits idle, waiting for events. In this case it would be client browser requests through HTTP. When your application first fires up, ASP.NET calls Application_Start in Global.asax. Inside Application_Start, is where you get to come in and set up the specific bundles you want to use in your application.
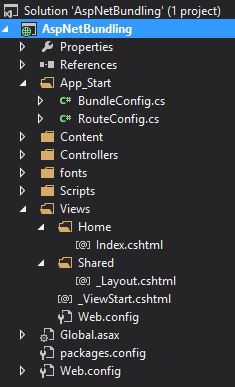
At the end, my solution is set up this way:

Watch the traffic
It is time to add bundles and see how it plays out inside the browser. Add this to BundleConfig which is the static class I specified above:
public class BundleConfig
{
    public static void RegisterBundles(BundleCollection bundles)
    {
        bundles.Add(new StyleBundle("~/bundle/bootstrap-styles")
            .Include("~/Content/bootstrap.css")
            .Include("~/Content/bootstrap-theme.css")
            .Include("~/Content/Site.css"));
        bundles.Add(new StyleBundle("~/bundle/Home/Index-styles")
            .Include("~/Content/StyleSheet1.css")
            .Include("~/Content/StyleSheet2.css")
            .Include("~/Content/StyleSheet3.css"));

        bundles.Add(new ScriptBundle("~/bundle/bootstrap-scripts")
            .Include("~/Scripts/bootstrap.js")
            .Include("~/Scripts/jquery-{version}.js")
            .Include("~/Scripts/modernizr-{version}.js"));
        bundles.Add(new ScriptBundle("~/bundle/Home/Index-scripts")
            .Include("~/Scripts/JavaScript1.js")
            .Include("~/Scripts/JavaScript2.js")
            .Include("~/Scripts/JavaScript3.js"));
    }
}
Your specific needs will be different. The method above takes in a BundleCollection as a parameter. Notice, this is the BundleTable.Bundles coming from Global.asax. Then, I craft both style and script bundles to suit my specific needs.
I use the {version} wildcard to tell the bundling engine to grab any version of jQuery that happens to be in my solution. In the Release configuration jQuery .min.js gets added to the bundle, but not in Debug. This gives me flexibility in my development environment when working with jQuery. I can swap out different versions of jQuery and my bundling setup will not care. This same wildcard technique applies to any other client-side library.
Because I get to make up my own bundles, I can tailor resources I need for specific screens.
I placed the ~/bundle/bootstrap-styles and ~/bundle/bootstrap-scripts bundles inside the _Layout.cshtml master page. Since it is verbose with a lot of bootstrap plumbing, I’ll omit it from this tutorial.
Here is what my Index.cshtml Razor page looks like:
@{
    ViewBag.Title = "Index";
}

@Styles.Render("~/bundle/Home/Index-styles")
<h2>Hello World</h2>
<p>
    Be sure to check out glyphs like these:
    <span class="glyphicon glyphicon-plus"></span>.
</p>
@Scripts.Render("~/bundle/Home/Index-scripts")
Easy. Once bundles get defined, I get to put them anywhere I need in my application. I’m following a simple convention of {Controller}/{Action} to define bundles. You may wish to do the same.
If you find that you get Razor page errors because it can’t find Styles.Render or Scripts.Render. Make sure to include this in your Web.config that’s inside the Views folder.
<system.web.webPages.razor>
  ...
  <pages pageBaseType="System.Web.Mvc.WebViewPage">
    <namespaces>
      ...
      <add namespace="System.Web.Optimization"/>
    </namespaces>
  </pages>
  </system.web.webPages.razor>
</system.web.webPages.razor>
This tells the Razor engine to include the System.Web.Optimization namespace when rendering dynamic HTML. You may also include any other namespace you need for your specific project. This will save you from having to fully-qualify each Razor extension.
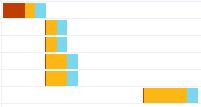
With all this, let’s see the network traffic:

Red means the browser sits idle. Yellow is the time the browser takes to make a request. Blue is the time it takes to get a response from the server. With most modern browsers, you can do about six requests per domain at a time. If you need more than six, the browser gets to wait. The request at the very top is the dynamic HTML I must get from the server.
Why does this matter?
To use an analogy, you can think of your back-end C# programming language as a spaceship. You get speed and time-warping capabilities when you travel. As long as your back-end runs local on your server you can assume high performance. But, when the request pipeline hits HTTP it is a completely different story.
I’d like to think of the HTTP network protocol as a mule cart. No matter how much optimization you do on the back-end, you can always rely on the fact that HTTP is slow. So, just like a mule cart, it is good to load it up with plenty of provisions before sending it across town. Round-tripping the server over and over is a sure way to kill performance.
HTTP requests are expensive. Your primary objective is to reduce the number of round trips you do over HTTP.
Enabling
To turn on bundling in the framework, all you need to do is change the Web.config in your solution folder.
<compilation debug="false" targetFramework="4.5" />
You may also hard code it with:
BundleTable.EnableOptimizations = true;
When you hard code it in C#, this takes precedence over the Web.config. In a typical setup you can use a Web.config transformation to enable it in Release mode. There is no need to attempt to debug minified JavaScript code.
Let’s see the bundled traffic:

Beautiful. Resources start loading as soon as the dynamic HTML gets loaded. Here, I take full advantage of the browser capability since I have exactly six resources. Notice the last resource doesn’t start until all other resources get rendered. This is because it is a web font, and it originates from a CSS bundle.
Caching
When bundling gets turned on, an added bonus is resources get cached in the browser for about one year. If your resources change before that, the query string appended to the end will change. This will, in effect, expire any resources the browser no longer needs. This is often referred to as cache busting.
For example, this is what our bundled resources look like:
/bundle/bootstrap-styles?v=epi1k_G4Tsd0o4dXIOJcBg5gefY7ieCSx0AUDxqm78U1
/bundle/Home/Index-styles?v=uxFDb5XiuKadZOyd2DKyzUU-mh3OUTNuikUDUlL7e_Q1
/bundle/Home/Index-scripts?v=Giv511fvuZRlJKLjJDPqmIxOhmtht9zFlW7lvvTMf0Y1
/bundle/bootstrap-scripts?v=j4YIBwFVDdtvOMWp63GzkWLSoYrcw0ertU_njZLALnk1
The query string appended at the end is a hash from the specific contents of each bundle. When the contents inside the bundle change, the hash appended as a query string will change too.
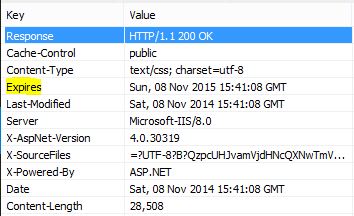
You may inspect the HTTP headers.

The Expires HTTP header is set to expire one year into the future.
Conclusion
ASP.NET is a cool technology designed to make your life easy. What I love the most about this is how the engine renders <link> and <style> tags for you. What I’ve always found most troubling is how these tags end up all over the place. Making it a nightmare to manage web resources.
I hope you can see how seamless it is to add automated bundling into your project. For a simple demo that demonstrates the basic technique, be sure to check out GitHub.
How have you found ASP.NET’s bundling features? Do you have any tips for improving performance?
