How Sketch’s New Symbols Will Improve Your Workflow
Announcement: If you’re a Sketch fan, Daniel has just released his first book for SitePoint. Check out Jump Start Sketch!
Sketch’s nifty Symbols feature turns an ordinary set of layers into a single reusable element. What happens to one instance of a Symbol happens to all of them (with a few exceptions, such as text values), making it much easier to keep certain design components wonderfully consistent across the .sketch document.
Prior to version 3.7, Sketch didn’t support Nested Symbols; that is, Symbols inside Symbols. Let’s say that your website’s header is repeated across multiple Artboards, but your header contains another Symbol (such as a reusable button component). Before Sketch 3.7, this was impossible and massively restrictive because we weren’t able to make some reusable elements, reusable.
Not only can we now create Symbols inside other Symbols, but the feature has been enhanced to the stage where you can store, edit and even create fresh Symbols in a special Symbol-only canvas.
Creating a Reusable Element
Let’s start by creating a reusable element. Buttons are very reusable, and the text is different for every instance of the button, which makes it the ideal candidate for a Symbol.
Press R to create a rectangle; use the following styles:
- Width: 220
- Height: 60
- Fill: #FF3654
- Border (Color): #FF3654
- Border (Thickness): 3
And a new text layer (keyboard letter: T); with these styles:
- Width: 220
- Typeface: Roboto
- Size: 18
- Color: #FFFFFF
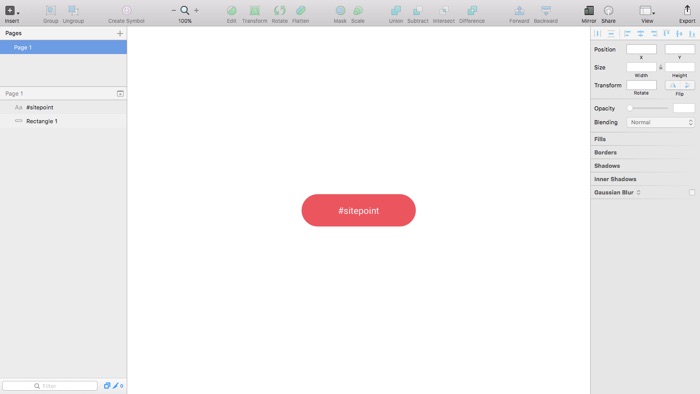
Note: the specific styles don’t really matter so much, feel free to follow along with the tutorial using your own styles.
Attaching a Symbol
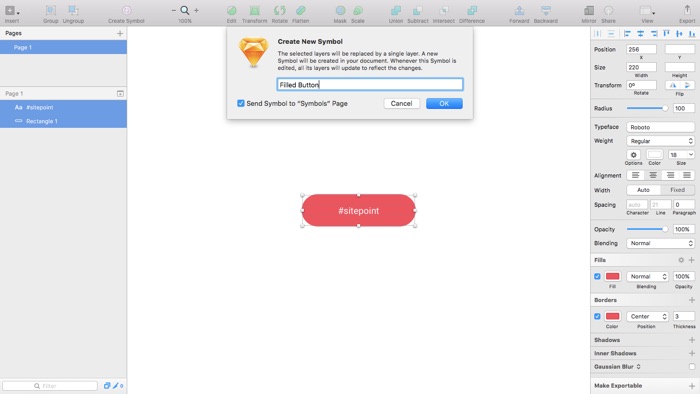
Whenever you’re ready to create and attach a Symbol to these layers, select them both and choose the “Create Symbol” feature in the toolbar. A dialog will appear asking you to name the Symbol – call it “Filled Button” and make sure the “Send Symbol to Symbols Page” option is also checked. You’re most likely thinking how this is very different from Sketch 3.6, so let’s talk about the differences and why this method is so much better.
Managing Symbols and Activating Overrides
Firstly, let’s discuss the Symbols Page and why Symbols are no longer applied specifically to Groups. Grouping is a way of moving several layers at once when they’re dependent on one another; in Sketch 3.7, when you create a Symbol from a series of layers, the layers appear as if they’ve been flattened into one, meaning you can move it around even if it isn’t Grouped.
Instead, the individual (editable) layers are sent to the Symbols Page, an entire canvas that stores only Symbols. Symbols are now edited from within this Symbols Page. If you’re used to working with Smart Guides in Photoshop – well – this is the same thing.
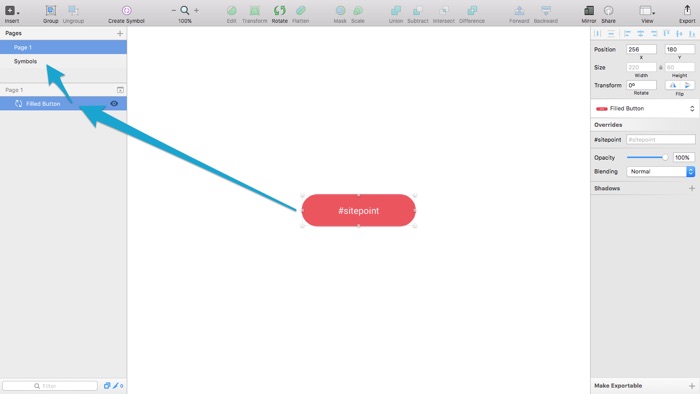
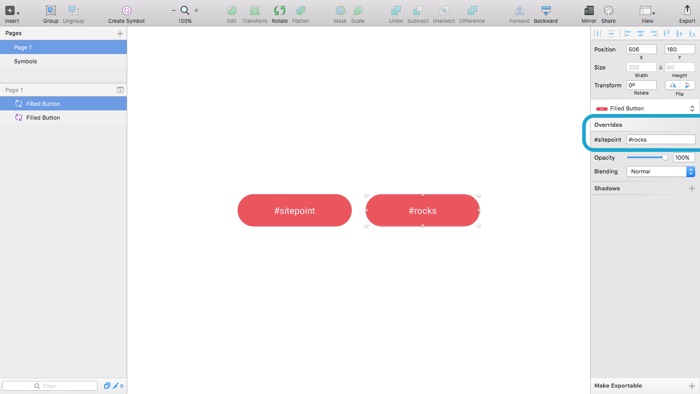
Before we move onto the Symbols Page, let’s see how much flexibility the working canvas offers us. First of all, we can still attach and detach Symbols using the Inspector; however, the Inspector now also offers an enhancement to an older feature, the “Exclude Text Value from Symbol” feature. Rather than excluding text values from Symbols, rather the Symbol has a default text value and we can override each instance using the Inspector.
Press command+D to duplicate the Symbol, and then type in your override using the Inspector. In my example, the Symbol text is “#sitepoint” but I’ve overridden this with “#rocks”. Now, aside from the text, these components will always be identical.
Creating Symbols From the Symbols Page
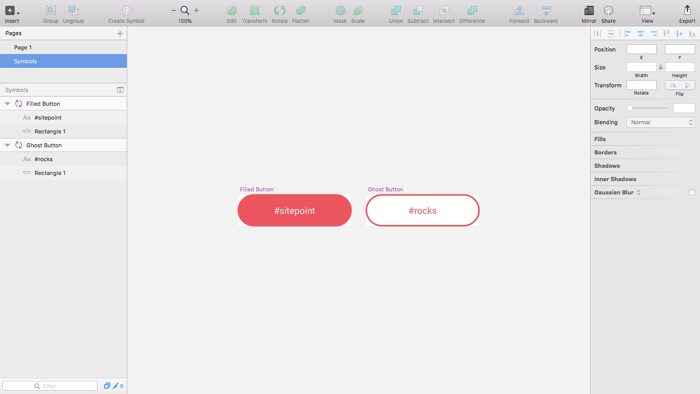
From the Pages tab in the Layer List, select the Symbols Page. As I mentioned before, this is where we edit our Symbols – not in the working canvas. Very different from Sketch 3.6 indeed.
In this Symbols Page (which is kind of like a style guide by the way), each Symbol has its very own Artboard. When we edit the Symbol from the Symbols Page, not only are the changes reflected there, but every instance of this Symbol throughout the document is updated as well. Essentially you’re making changes to the “style guide” and the working canvas updates itself accordingly.
Duplicate the Symbol, rename it to “Ghost Button”, remove the background, and then apply the #FF3654 color to the text. We now have two completely independent Symbols – if you change the text value to “#rocks” then the override is no longer needed as well.
Inserting New Instances Into the Working Canvas
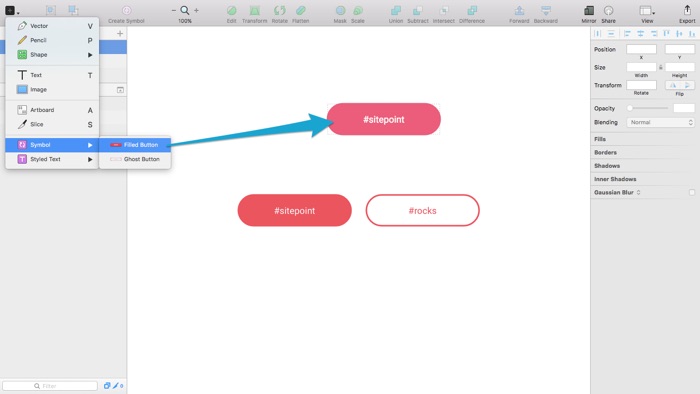
Select “Insert” from the toolbar, then “Symbol”, and then choose a Symbol to insert. Click anywhere on the canvas to insert an instance of this Symbol directly underneath the mouse cursor. As always, this instance will remain identical to its linked Symbol in the Symbols Page, other than what’s been overridden of course.
FYI: Shared Styles and Text Styles
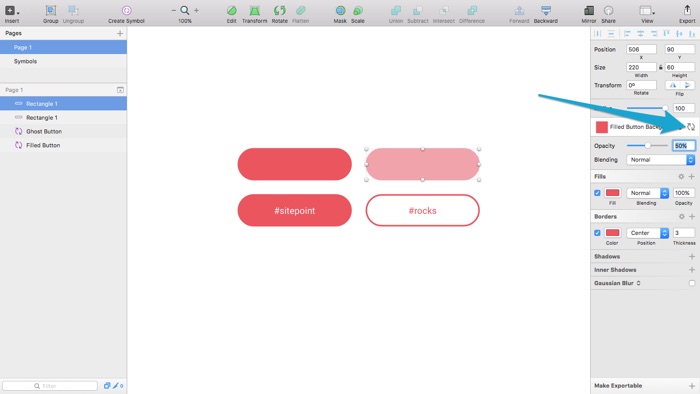
Shared Styles and Text Styles also received a significant, although relatively simple update. Now you can make unique changes to instances of Shared or Text Styles, however these changes will not synchronise with the other instances unless you click the update icon, essentially offering us a huge amount of flexibility in the way we create and manage reusable elements.
Now we can have layers that share only some styles.
Conclusion
According to the Sketch team, this is only the beginning. Symbols are getting a string of enhancements in upcoming versions of Sketch, so I’m very excited to see where this goes. I’m disappointed that there are no keyboard shortcuts for switching to and from the new Symbols Page, or for inserting Symbols into the canvas – hopefully, that will change as version 3.7 develops.
What do you think of Sketch 3.7’s updates? Is this new workflow more efficient, or will you miss the old way of doing things?
Announcement: If you’re a Sketch fan, Daniel has just released his first book for SitePoint. Check out Jump Start Sketch!
