Upcoming WordPress Blog Previews to Increase User Engagement
WordPress started out as a blogging platform and has historically offered a range of tools and features to enhance your site, providing your users with easy ways to access your content.
Your latest posts page (aka your latest articles or blogs page) once set up will let your users easily see all of your most recently published blogs.
Wouldn’t it be great if you could show your users a preview of some of your upcoming articles? Well we can build this in and that is what we’re going to look at today and how it can be used to improve your user engagement.
Creating Future Posts
WordPress already comes with a really great utility for scheduling your posts to go live in the future feature known as the post scheduler. The scheduler lets you choose the date and time that your upcoming blog will go live.
Given that WordPress already provides a way to automatically publish your upcoming articles, what we need to do is output a listing of upcoming scheduled posts that your readers can get a sample of to entice them to come back later.
User Engagement with Upcoming Blog Preview
Creating a post preview might seem simple but the overall point is to provide something different to your viewers experience.
If your readers are able to see that you have an upcoming article and when it will be published they are more likely to engage with you and hopefully become solid regular traffic for your site.
The example that we will be creating today shows an upcoming post preview and a simple action to get in contact, however you could extend this so that users are prompted to sign up to your newsletter or another type of traceable engagement.
What You Will Need to Know
You should have a basic understanding of WordPress, Plugins Development and Object Oriented Design if you want to make the most of this lesson, we won’t be doing anything overly complicated however. If you’re keen on brushing up on your fundamentals, check out Object Orientated Development with WordPress.
Developing This as a Child Theme Function or a Plugin?
Since we want to extend the way in which our site functions the first thought should be “lets make it a plugin!”. However since we are trying to extend the way in which our news feed works we are limited in what we can achieve using just actions and filters alone. That being the case we could define everything in our child theme; however that has it’s own drawbacks also, one of which is if we ever want to change the theme we will lose our functionality.
What we need to do is to use a hybrid approach where we create a plugin that defines all of our functionality using hooks and filters and then use shortcodes, widgets and display functions to handle the output of the upcoming previews in exactly the places we need (i.e on our blog archive page before our main list of articles).
While this is generally frowned upon (you should either add all your functionality to a plugin or to a theme), it’s one the more rare edge cases where we just don’t have the hooks or ability to output our plugin’s functionality in the right location so we need to modify our child theme to make it perfect.
Which Template Will Be Displaying My Blogs?
This can be tricky to determine as WordPress can show your blog archive listing using several templates files.
How your blog listing will be displayed will be dependent on what you have set for your ‘Reading Settings’ and also the design of your theme.
Your website will most likely be displaying your posts archive using one your theme’s templates.
Depending on how you have your Reading Settings set up will determine which template gets used.
- font-page.php
- This template is used to display your blogs when you have set your front page reading settings to be Your latest posts. If you choose to use A static page and set it up that way you will use a different template for your blog listing.
- This template has the highest priority
- home.php
- This template will be shown when you have your reading settings to be either Your latest posts OR when you have selected A static page and are viewing the page assigned to be your Posts page.
- Overall it will be shown only when you are viewing your blog archive page.
- index.php
- This template will be shown when you have your reading settings to either Your latest posts or A static page and are currently viewing your posts page.
- This will only be used when nothing else more applicable such as
front-page.phporhome.phpis available in your theme and is used as the default template
Developing Our Plugin – Let’s Get to It!
The Finished Product
When you’re finished you will have something similar to what you see below.
The post preview shows you a sample of your next upcoming article, displaying the title, quick summary except along with information about when it will be published.
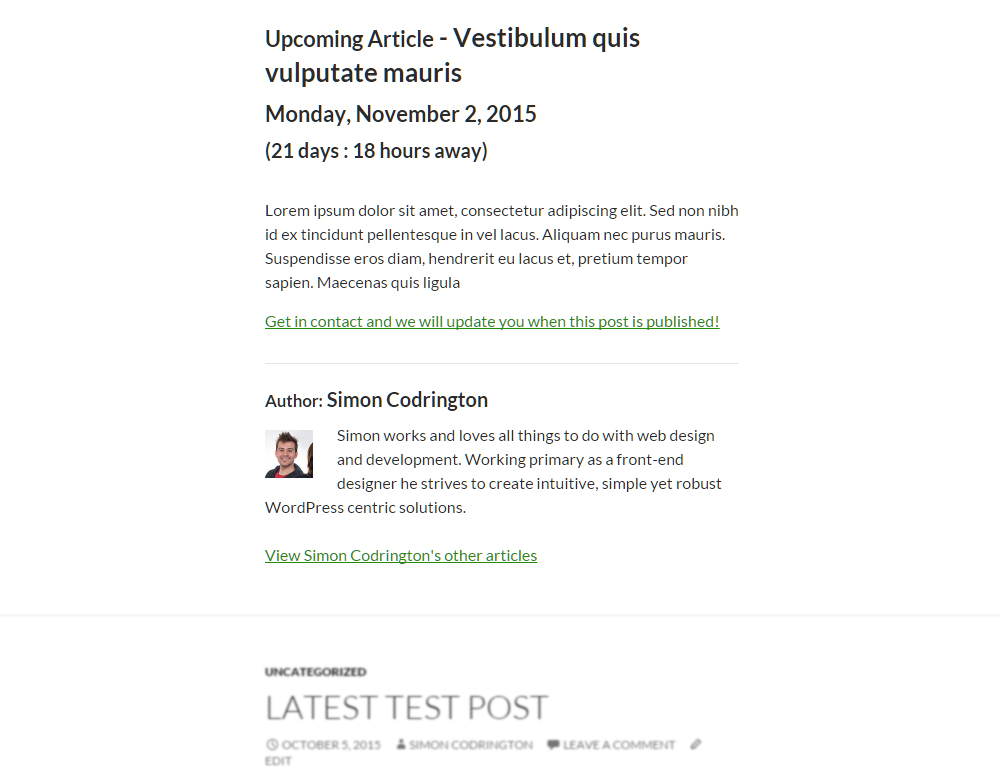
This post contrasts against your other recently published articles, showcasing your upcoming post with preview text and also an interactive author profile (so that users can see who you are and what other posts you have created).
The look and feel will be dependent on your theme, however since everything has its own class you can easily style this to match your needs.
Get the Source Code and Copy It to Your Server
Lets start by downloading the source code for the plugin from the SitePoint GitHub repository.
The code will be contained inside of a single folder with several sub-directories for the CSS and JS elements. It should look similar to below.
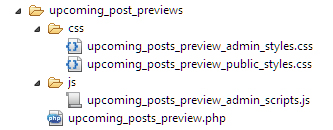
Copy the plugin to your plugins directory and activate it. Once you have this activated you will be ready to go!
Looking at the Highlights
For the sake of simplicity I will outline the most important and interesting elements of the plugin in the next few sections. This should be enough help you understand how it all works.
If you are interested you should look through everything and possibly extend it to suit your own purposes.
Building the Admin Interface
Since we want to extend the way in which blog posts work we will be modifying the add / edit post admin screen to provide additional options.
Your screen should look fairly unchanged except for the ‘Publish’ meta box displayed generally on the far right hand corner of your screen.
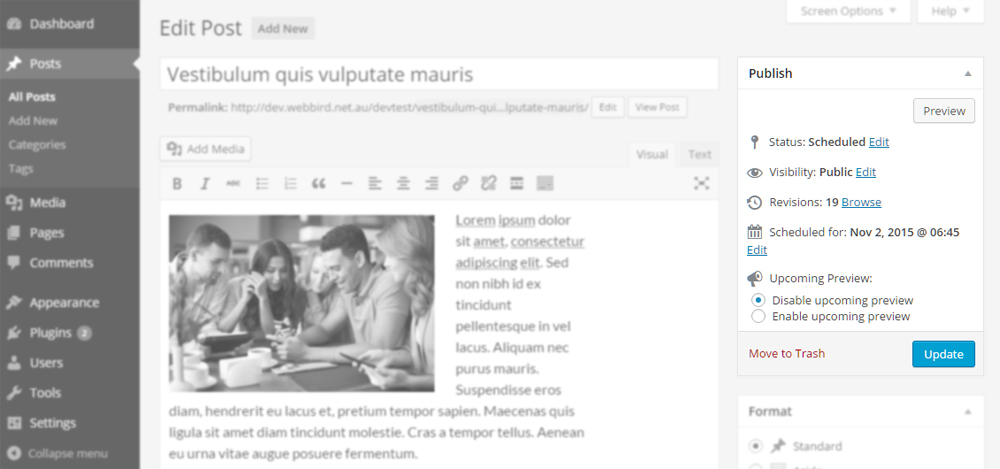
Just below the ‘Schedule For’ options you will see a new section called ‘Upcoming Preview’. This section will let you decide on a post by post basis if your scheduled post will have an upcoming preview.
If you want a post preview you simply select the enable option and you will get two additional options.
Display Content with the ‘More’ Tag
Using this option will mean that when your preview is being displayed on the front-end of your website it will display ALL of your content on the front end up until it finds WordPress’s ‘Read More’ button.
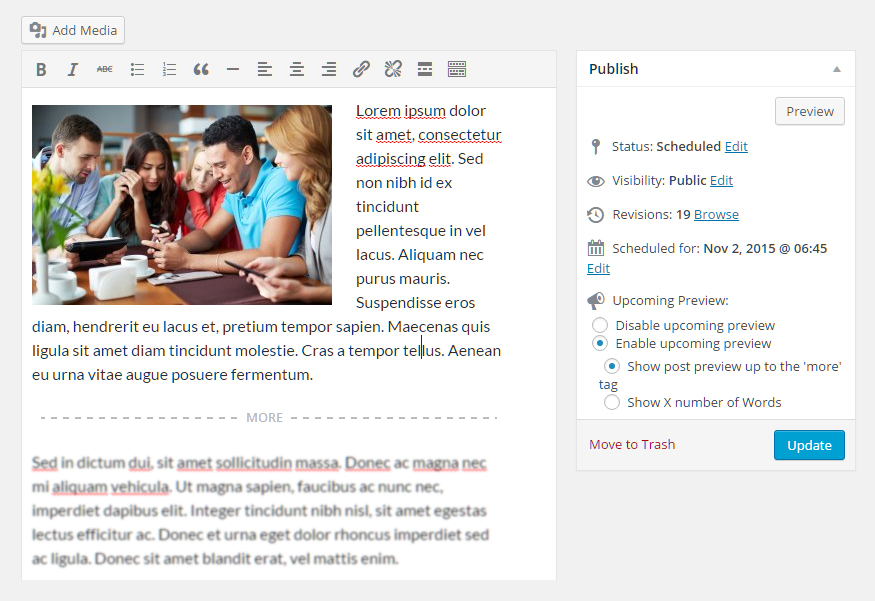
In this example when displayed the post preview will show the image and the text up until the ‘MORE’ tag has been reached.
Displaying Content up to X Number of Words
Using this option you will be able to determine how many ‘words’ are displayed from your posts content area. This means that you can display as many or as few words as you like to be displayed on the front end.
The only real drawback from this approach is that since the content is trimmed to a set length any images or visual content you use will be stripped out (only your content will be pulled through).
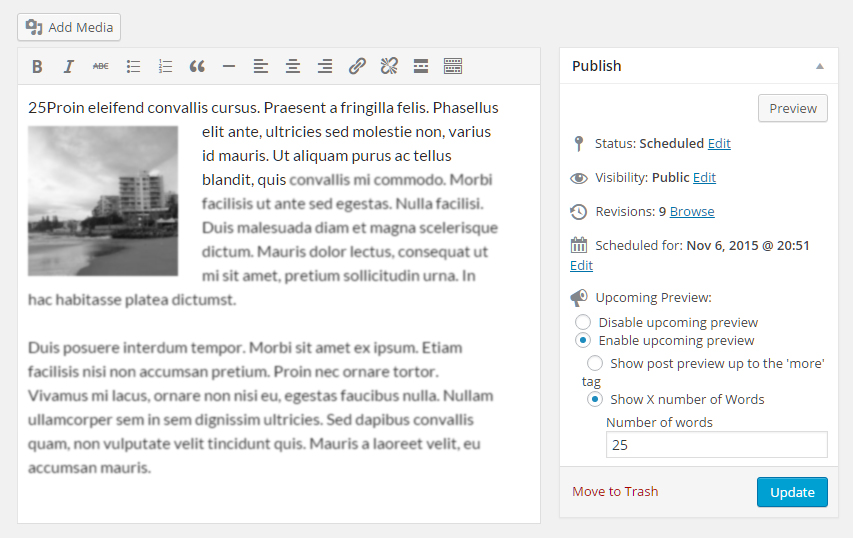
In this example when used as a preview the post will show exactly 25 words and then finish with an ellipses / the call to action for the user.
Inside of the upcoming_posts_preview.php file look for the magic __construct function. Inside here we have hooked onto the post_submitbox_misc_actions hook which is used to output additional code just after the Schedule For options for each post.
We attach our function calledadd_post_preview_meta_options so that we can output our options for enabling / disabling the post previews (and settings such as choosing to display up to the read more link or via trimmed words).
Firstly we only want to execute if we are on the post post type which is why we declare the global $post_type.
global $post, $post_type;

//determine if we are on a post
if('post' == $post_type){

}
When we are on a post we will collect our main options. These variables will be used to determine if this post will have its post preview enabled or disabled. If enabled it also determines the type of method that will be chosen (showing content up to the ‘more’ button or showing X number of words). We use ternary operators so that we can check if our post has any previous set values and if so assign them accordingly (if not we default to false or an empty string).
    //determine if we have enabled / disabled post previews
    $upcoming_preview_status = (
        get_post_meta( $post->ID, 'upcoming_preview_status', true) ?
            get_post_meta( $post->ID, 'upcoming_preview_status', true) :
            'false'
    );

    //determines the type of post preview
    $upcoming_preview_type = (
        get_post_meta( $post->ID, 'upcoming_preview_type', true) ?
            get_post_meta( $post->ID, 'upcoming_preview_type', true) :
            'false'
    );

    //determines the number of words shown per post preview (if we are displaying a trimmed excerpt)
    $upcoming_preview_type_x_words = (
        get_post_meta( $post->ID, 'upcoming_preview_x_words_number', true) ?
            get_post_meta( $post->ID, 'upcoming_preview_x_words_number', true) :
            ''
    );
We define radio buttons for the post that let the user enable or disable the upcoming post preview. We build these like any other form elements by supplying a name and id for these elements and determining which button should be checked (the values we collect before ensure we can default check the correct elements).

After these basic radio buttons are defined we define a secondary set that are only displayed once we select to Enable upcoming preview, this will determine the type of upcoming post preview we will be executing. It will be either:
- Show post preview up to the ‘more’ tag
- Show X number of words
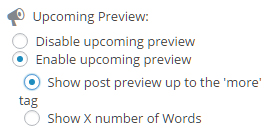
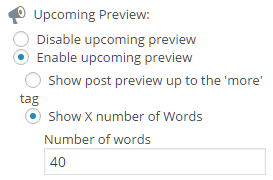
If we select that we want to Show X number of words another set of information is displayed, this time it shows a number field where we can select the number of words we want to display.
Admin Interface Interactivity
To make the plugin easy to use and to mimic how WordPress designs their admin interface, there is a small amount of jQuery used by the plugin.
Our JS script called upcoming_posts_preview_admin_scripts.js is loaded onto on the admin side of WordPress and is used to make interacting with our plugin easier.
Our first main interactivity is one used for the toggling of the ‘enabled’ / ‘disabled’ states for the post preview. We slide the container of secondary options up or down depending on what we have chosen.
//toggles the main enabled / disabled
function upcoming_post_preview_toggle_display(){

    //get current state, if we have enabled it, slide down else slide up
    chosen_preview_status = preview_status.filter(':checked').val();

    //if we have chosen a post preview
    if(chosen_preview_status == 'true'){
        preview_content_settings.slideDown('fast');
    }
    //else we didn't choose a post preview
    else if(chosen_preview_status == 'false'){
        preview_content_settings.slideUp('fast');
        //reset the X number of characters to display
        preview_x_number_of_items.val('');
    }
}
upcoming_post_preview_toggle_display();
We run this function just as we load and also attach it to the radio buttons so when we change our state we can update what happens.
//when we change status, toggle container accordingly
preview_status.on('click', upcoming_post_preview_toggle_display);
Our secondary helper function is used when we have chosen to enable a post preview. If we determine we want to show X number of words then we need to slide down an additional field which is the ‘number of words’ that will be used.
//Toggling the main settings (display up to more tag or X number of words)
function upcoming_post_preview_setting_display(){

    //get the currently chosen option setting
    var chosen_preview_type = preview_types.filter(':checked').val();

    //if we chose to display content up to the 'more' tag
    if(chosen_preview_type == 'upcoming_preview_more_tag'){
        preview_content_sub_settings.slideUp('fast');
        preview_x_number_of_items.removeAttr('required');
    }
    //if we chose to display X number of words
    else if(chosen_preview_type == 'upcoming_preview_x_words'){
        preview_content_sub_settings.slideDown('fast');
        //set the number of words field to have the 'required' attribute
        preview_x_number_of_items.attr('required','required');
    }

}
upcoming_post_preview_setting_display();
This function happens right when we load and also when we change our status type.
//when we choose our type of upcoming preview that will be displayed, toggle additional options if required
preview_types.on('click', upcoming_post_preview_setting_display);
Building Your Upcoming Post Preview HTML
Before your post preview is displayed it first has to be built. We use a function called get_upcoming_post_preview to do this.
This function takes in an optional set of arguments and is used to fetch your most recent upcoming scheduled post.
The function defines its default arguments. These will be used in our main query shortly so that the website knows which posts to pull and how many.
$arguments = array(
        'number_of_previews'    => 1,
        'post_id'               => false
    );
If we passed in any optional arguments we check to see if they exist in our arguments array (our defaults). If they do exists we update them (as we are overriding the default functionality).
//If we passed in arguments, copy new arguments
if($optional_arguments){
    foreach($optional_arguments as $key => $value){
        if(array_key_exists($key, $arguments)){
            $arguments[$key] = $value;
        }
    }
}
Now that we have our basic arguments ready we call the get_posts function and pass in a list of arguments to determine what posts will be collected. Some of our arguments will be able to determine how this function operates.
    //main query to find posts
    $post_args = array(
        'post_type'         => 'post',
        'post_status'       => 'future',
        'orderby'           => 'post_date',
        'order'             => 'ASC',
        'posts_per_page'    => $arguments['number_of_previews'],
        'include'           => $arguments['post_id'],
        'meta_key'          => 'upcoming_preview_status',
        'meta_value'        => 'true'
    );

    $posts = get_posts($post_args);
What important is that we are setting the meta_key value to be upcoming_preview_status and ensuring that its meta_value is true. This will restrict the search to only posts that have been enabled in the back-end of the website.
For each of the upcoming previews we collect a heap of information from our post and also the post author so we can format an interesting design. Many of these elements won’t be displayed if there is no information (for example an author description or additional author posts).
Feel free to modify the plugin directly if you want to output specific information or you can optionally use the sc_upcoming_post_public_display_start and sc_upcoming_post_public_display_end filters to change up your display.
When the output has been completed its returned and eventually displayed to the user.
Displaying on Your Front End (via an Action Hook)
The main way to display your upcoming post previews is to use the get_upcoming_post_preview hook the plugin supplies.
You can call the action using its simple form.
//display our latest upcoming post previews
do_action('display_upcoming_post_previews');
Or you can use a more complex style where you pass in optional arguments to the action (which will let you customise what previews are displayed).
//define arguments to pass to our action
$optional_args = array(
    'number_of_previews'    => 2
);

//display our latest upcoming post previews
do_action('display_upcoming_post_previews', $optional_args);
Options That Can Be Passed to Our Action
Currently there are only two options that can be set:
number_of_previews– Determines the number of previews to be displayed (by default 1)post_id– Gets a single preview by its post id
The way this preview displays will be up to your theme and you are free to style it as you like. Here is what it looks like when used in ‘twentythirteen’, ‘twentyfourteen’ and ‘twentyfifteen’ respectively.

Useful Hooks and Filters
Throughout the plugin I’ve added several helpful actions and filters that can be used to extend the plugin. You can hook into these elements and change default values or output your own code to extend what is possible.
Here are the hooks that you can use
sc_upcoming_post_link_action- Used to change the
linkthat the read more button will go to. By default it will create a mailto: link with the site administrators email address. You can use this to maybe send all actions to a specific page.
- Used to change the
-
sc_upcoming_post_link_text- Used to define the
textthat is displayed on the read more button. By default it says ‘Get in contact and we will update you when this post is published!’. You could set this to be any text you want
- Used to define the
-
sc_upcoming_post_admin_form_start- Displayed after the main ‘enable’ / ‘disable’ options for the post preview. This hook is displayed once you select ‘enable’ and will let you define any other additional options you might want to save.
sc_upcoming_post_admin_form_end- Displayed after the ‘enable’ / ‘disable’ option for the post preview. This hook is displayed at the end of the form once you select to ‘enable’ the post preview. You can use this to save additional information
-
sc_upcoming_post_admin_save- This action is called during our
saveprocess for the post. This is triggered once we have successfully started to save and can be used to receive newly added meta fields added by either thesc_upcoming_post_admin_form_startorsc_upcoming_post_admin_form_endhooks.
- This action is called during our
-
sc_upcoming_post_public_display_start- Defined just after the start of the upcoming post preview output. Used so that additional HTML or data can be outputted at the beginning of each post preview (for example to add some new info or styles)
sc_upcoming_post_public_display_end- defined just at the end of the upcoming preview output. Used so additional HTML or data can be outputted at the end of each post preview.
display_upcoming_post_previews- Our main display hook, used so that when called from the front-end the post previews will be shown. You can pass in a few options to change your output
Displaying on Your Front End (via a Simple Shortcode)
Besides using the action hook, you can also use a handy shortcode that you can use to output your post previews on any page.
You can use its simple form as below
//displays your upcoming post preview
[upcoming_post_preview]
The shortcode is basically a wrapper for our main output function so it supports the same attributes as when calling it from our display_upcoming_post_previews action. You can pass in these options:
number_of_previews– Determines the number of previews to be displayed (by default 1)post_id– Gets a single preview by its post id
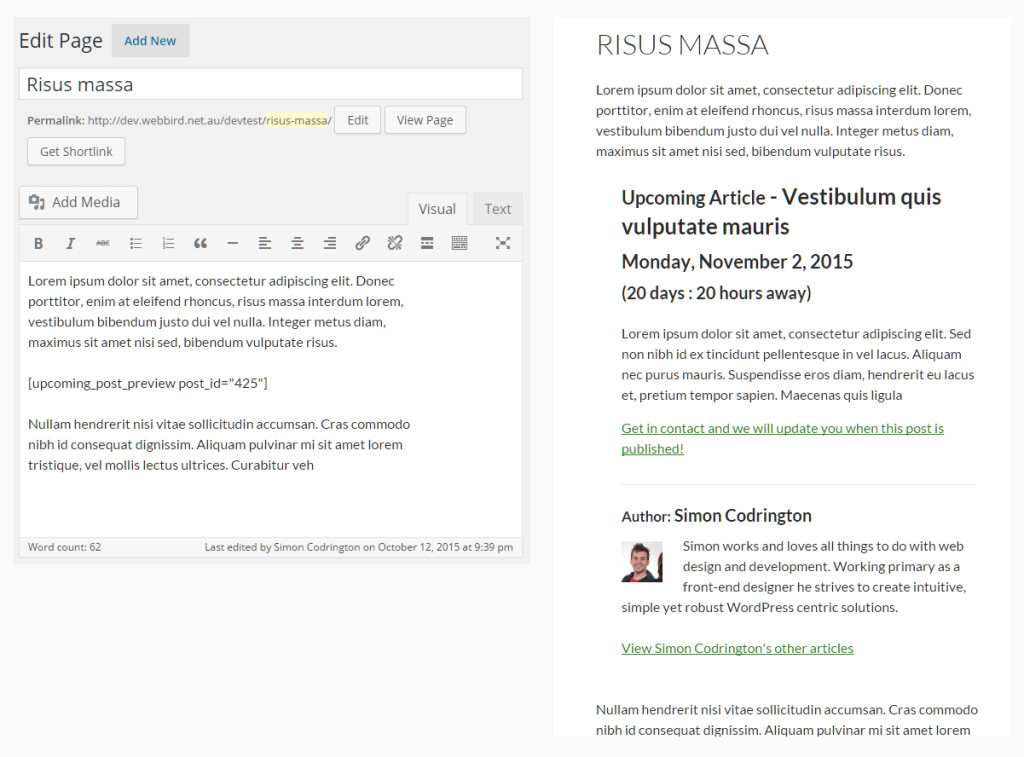
If you wanted to display only a single upcoming post preview and know it’s ID you can output it on your page by using the following.
//displays the upcoming post with the ID of 425
[upcoming_post_preview post_id="425"]
Where to from Here?
Now that you have an overview of how the plugin works and how you can use it to increase your viewers engagement with your site, you could extend this plugin and provide additional awesome features.
It’s up to you what you might like to do but here are a few things you might want to look into.
- Creating a simple
Widgetthat can be used to display your upcoming post previews in your sidebar. - Extend the options that are available when you ‘enable’ the post preview. Maybe determine what exact options will be displayed such as hiding the author bio, gravatar image, links to other posts etc
- Extend the way this plugin works so that it also works with
pagesorcustom post typesetc
Let me know if you end up using this plugin or use it as a base to build your own awesome plugin!
