Photoshop Blending Sliders: Remove Solid Backgrounds

Today I have a fairly quick Photoshop tip on how to remove white or black backgrounds from images in Photoshop to create areas of transparency. There are several ways to do this. You could use the magic eraser, or just make a selection of the white or black background and then delete it, but I want to show you how to use a blending slider to do it. As well as the blending modes available in the Layers palette, you can play around with blending sliders in the Layer Style dialog box. Let’s get started.
For more complex backgrounds, this method won’t work — it’s an easy option when the background in your image is already a solid color. You can find out how to use Photoshop to eliminate more complex imagery in our guide covering five remove background techniques.
1. Open an image in Photoshop with a predominantly white or black background.

Toy photo by levisz
2. Open the Layer Style dialog box by doing one of the following:
- Click the little fx button at the bottom of the Layers panel and choose Blending Options.
- Double-click its layer thumbnail in the Layers panel.
- Choose Layer > Layer Style > Blending Options.
Note: The Blending sliders won’t work on a locked Background layer; you have to double-click the layer first to make it editable.
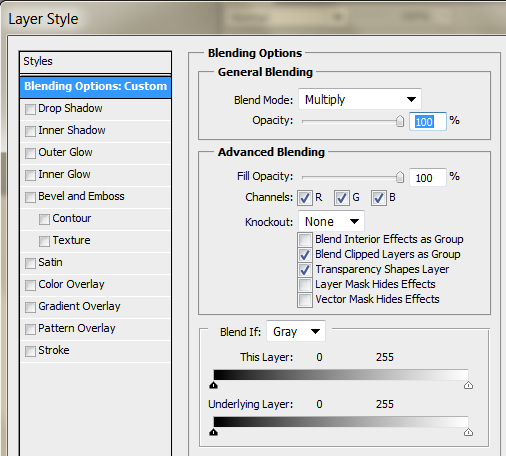
At the bottom of the resulting dialog box, you’ll see two pairs of sliders-one set for the This Layer bar and another for the Underlying Layer bar. Each of these sliders lets you make parts of your image transparent based on the brightness value of the pixels. The left slider represents the shadows (blacks) in your image and the right one represents the highlights (whites). If you want to change the background of the currently active layer, then tweak the This Layer slider.
3. If you want to hide a white background, drag the highlight slider (the one on the right) toward the middle until the white part is transparent.
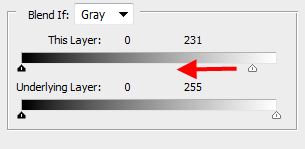

As you drag, you’ll see the white areas of the image disappear and the checkerboard pattern (or underlying layer) will appear. Note that any white area will disappear so you need to be careful how far you drag.
Likewise, if the background of your currently active layer is black and the subject (or object in the foreground) is much brighter, you can hide the black part by dragging the shadow slider (the one on the left) toward the middle until the black part is transparent. Very easy and quick.
If you enjoyed reading this post, you’ll love Learnable; the place to learn fresh skills and techniques from the masters. Members get instant access to all of SitePoint’s ebooks and interactive online courses, like Foundations of Photoshop.
Pick up plenty of Photoshop design skills with our Photoshop for Web Design course, available on SitePoint Premium.
Comments on this article are closed. Have a question about Photoshop? Why not ask it on our forums?