Cleaning Up a CSS Codebase

You have just been onboarded to an existing project to replace a departing developer. Or maybe you just opened that old project of yours from a few years ago. You are faced with dread and horror when looking at the code. You can do only one thing: Clean up this mess! Does that sound familiar to you? Of course it does, we all encounter this at some point or the other.
You know that cleaning up a CSS codebase is going to be a tremendous task. There are so many things to do, yet so little time – especially when the client/boss/colleague advocates the good ol’ “don’t fix what’s not broken” adage. You don’t really know where to start!
Well you’re in luck because I’ve done my share of CSS clean-ups and I’m here to give you some hints to get started with this. It’s all about grabbing the low hanging fruit.
Lint the Hell Out of It
In this section, I will assume your codebase uses Sass. Not only because it’s a reasonable assumption nowadays, but also because I’ve noticed poor usage of Sass is often partially responsible for a messy codebase. Still, this article might be relevant to you even if you don’t use a preprocessor, so bear with me please.
The first thing I like to do when I need to take over a codebase is lint it. Linting is the process of running a program that looks for potential errors and bad practices. I believe making the code clean is the first step towards making the code good. Here is an insightful Stack Overflow thread about the etymology of the word “lint”.
Sass has a Ruby-based linter called SCSS-Lint. You can configure it yourself or grab the recommended configuration file from Sass-Guidelines to get started right away. There is also a Node.js version called Sass-lint, although they are not 100% inter-operable, so your mileage may vary.
Try running SCSS-Lint on your Sass folder to check for errors. Chances are high that you’ll get overwhelmed with a wall of errors. This is usually the time where you’ll be tempted to give up. But bear with me! At this point, you can either try to make your linting file a bit less strict in regard to rules you don’t really care about (like color format) or you can tackle the beast up front and lint the hell out of it!
Fixing Linting Errors Found
It’s time to fix what needs to be fixed. There are two ways of doing this. The first is to go through files one by one and update what seems wrong and/or odd, such as bad naming conventions, overly-deep-nested selectors, poorly formatted code, etc. The second (and my favourite) one is to start with a bit of search and replace. I don’t know about you but I love regular expressions, so it’s always quite fun when I have to do this.
For instance, let’s say you want to add the missing leading zero in front of all the floating-point numbers (i.e. a numeric value between 0 and 1) — the LeadingZero rule from SCSS-lint. You can search for \s+\.(\d+) (all numbers following a space and a dot) and replace it with \ 0.$1 (a space, a zero, a dot, and the found number). Or if you want to honor the BorderZero rule for SCSS-lint, you can replace border: none with border: 0 in your IDE. Simple as pie!
I recently started the scss-lint-regex repository on GitHub to gather these regular expressions in one place. Be sure to have a look if you are struggling with linting a large project. Also beware with search and replace as it sometimes has unexpected side effects. After each replacement, be sure to perform a git diff to check what has been updated so you can make sure that you did not introduce a bug.
Once you’re done with transversal editing, you won’t escape the manual file crawling to clean everything that needs to be cleaned (poor indentation, missing or extra empty lines, missing spaces, etc.). It takes a lot of time, but it will help a lot for the next step, so it’s important to start with that.
Revise the Structure
What I often find disturbing when I get onboarded to an existing project is the absence of proper project architecture. There probably was one at the very beginning, but things usually get out of hand and this brief idea of methodology got lost somewhere along the line. Still, this is incredibly important.
It does not really matter which methodology you choose as long as you feel comfortable with it and stick to it. It could be SMACSS, it could be 7-1, it could ITCSS – take your pick! Then try to restructure things to make the code compliant to the chosen methodology. I mostly use the 7-1 pattern introduced in Sass Guidelines, so I’ll give you a few tips to improve things if you decide to go this way.
Start with the vendor folder as it’s the one asking no questions. Move any non-packaged third-party library into there (that is, any library not treated as a regular dependency through npm or Bundler).
Then, move on to the abstracts folder. Make sure all the variables, mixins, functions and placeholders of the project are defined in there. Feel free to organize it the way you want here as long as you don’t end up with variables and mixins in all the files of the codebase. I also tend to look for unnecessary variables (and mixins) at that time. Indeed I often find countless variables that are used once or twice only (in other words not worth it).
Once you’re done with that, it’s your call. You can either try to make sure that everything in the base folder actually is base stuff and not component related, or you could have a look at the layout folder to check if everything regarding the overall layout lives in there and is correctly documented.
Finally, you will have to tackle the components which is likely to be a colossal task. My advice here would be to try to make components as small and re-usable as possible. It doesn’t matter if you double the number, as long as you can make them context agnostic and easy to read, understand, and update.
For instance, it is not a bad thing to have a component as small as this:
.quote {
  padding: 10px;
}

.quote__attribution {
  font-size: 80%;
}

.quote > :first-child {
  margin-top: 0;
}

.quote > :last-child {
  margin-bottom: 0;
}
Think modular. Small. Simple. Independant.
Remove the Excess
I believe the biggest difference between good and bad CSS is the amount of code needed to Make It Work™. CSS as a language is pretty easy to grasp. Anybody could make pretty much every layout with a bit of trial and error. However being able to build something with the bare minimum of CSS required to make it work, and to keep it that way, is a real challenge.
It’s been over 3 years but this tweet from Nicolas Gallagher remains my favourite quote about CSS:
Within "bad" CSS, it's very hard to write "good" CSS. Within "good" CSS, it's very easy to bolt on "bad" CSS and initiate code rot.
— Nicolas (@necolas) September 26, 2012
Obsolescence is the real plague of CSS. When building something with CSS, we often go back and forth and try a few things – to the point where we usually end up with a few unneeded declarations. For instance an overflow: hidden that became unnecessary, or a font-size that makes no difference. By leaving them, we pile up technical debt. That’s Bad™.
When writing CSS, what I like to do right before committing a piece of CSS work is opening the Developer Tools, and toggling each CSS declaration I’ve written to see if they each have an impact. If they don’t, I ask myself why they are there in the first place. If they turn out to be unnecessary, I remove them. By doing something as simple as this, I make sure only useful junk-free code gets pushed to the repository.
Cleaning up a CSS codebase is no different. Locate a component you would like to clean up, open the DevTools, and try finding useless declarations. Sometimes in order to remove some CSS, we need to move some styles upper in the tree to benefit from the cascade. Consider the following example reduced to its bare minimum:
.parent {
  /* ...stuff here... */
}

.child-A {
  color: red;
}

.child-B {
  color: red;
}
A clean way to optimise this would be to move the color: red declaration to the parent and let the cascade do the rest. Of course, real life examples are usually more complex, but that shows how we sometimes forget to take advantage of the C in *C*SS.
CSS is Clever, You Should Be Too
A thing I come across often is the lack of understanding of the inherit, initial, and currentcolor values. Say you want your links to be the same color as the core text (because the underline is enough). The following is a bad way of doing:
a {
  color: black; /* Nope */
}
The reason why it is a poor solution should be obvious: if you change the color of the body copy, the link color will be de-synchronized. If you are thinking of using a variable, you are making things unnecessarily complex. On top of that, if a link ends up in a grey paragraph (inside a blockquote for instance), it won’t match the color!
CSS has a built-in way of handling this, with the inherit value.
a {
  color: inherit; /* Yay! */
}
It’s as simple as that. Thanks to this, links will always inherit the color of their parent. Which might also be inheriting the color of its ancestors, and so on.
Along the same lines, when reinitialising a property to its default value, it is a poor idea to hard-code said value. CSS has the initial magic value precisely for such a scenario. While it usually doesn’t make a difference, there are cases where it really matters, like with direction-based properties such as text-align. When resetting text-align, setting left could be damaging for RTL languages; initial would be the way to go (or even better, start, but this value doesn’t have support in IE9).
Last but not least, the number of CSS developers not knowing currentcolor is too damn high. If you don’t know about it, don’t feel bad, but ask yourself this: how is it that when not specifying a border color, it automagically matches the color of the element? Well, this happens because the default value for border-color is currentcolor (check the spec). Quite an obvious name, you will concede.
My point is, if you want something to share the color with the font of an element, use currentcolor rather than a hard-coded value or a Sass variable.
.element {
  color: deeppink;
  border: 1px solid; /* Color is implicit with `currentcolor` */
}

.element svg {
  fill: currentcolor; /* Fill color will be same as text */
}
All these things are basic CSS features. They are what makes CSS what it is. Still, they are incredibly under-used. So if you have to improve the code of a component, these are the kinds of improvements you’ll want to make.
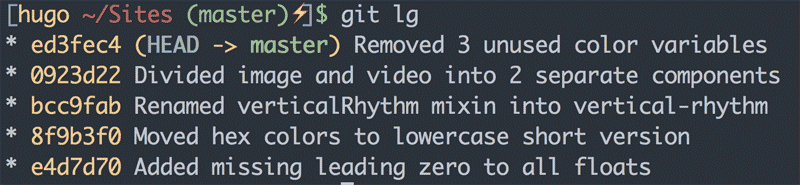
Get Your Git Good
Refactoring a CSS codebase is a lot of work. You are likely to update dozens and dozens of file. You are also likely to break things along the way. Let’s be honest, we all make mistakes, and when dealing with such huge changes, it would be very impressive if you succeeded in cleaning everything without even a tiny misstep.
Because of this, I highly recommend you get very assiduous with your version control (I think it’s fair to assume Git here). That means commits doing one thing and one thing only so that it’s possible to come back to a step containing a bug without struggling like hell with conflicts.
I know for many people Git is hard and obscure, and digging into how to make it simple is way outside of the scope of this article. You have to trust me on this though: make your Git history a poem if you don’t want to get mad.
Wrapping it Up
Let’s sum up and have a little tl;dr for the lazy readers:
Cleaning a CSS/Sass project is difficult because it is hard to evaluate the impact of the update or removal of a line of CSS. This is mostly because CSS is hardly testable. Because of this, you have to be careful.
Start with linting your code so it gets pretty. Start with this to make your life easier later on. This is also a good way to gain a valuable overview of the state of the codebase without risking much (fixing syntactic dirt is unlikely to cause any trouble).
Next, make sure your project embraces a structure methodology. It doesn’t matter which one, as long as it’s done properly. If your project is not really orchestrated into components, this would be a good opportunity to start on this path. Find reusable chunks of interface, and extract their styles into their own partials. Feel free to document them a bit so it becomes easier and you get a feel of progression.
Once you have cleaned up the project and put everything in the right place, it’s time to improve the CSS itself. Check if you can remove things first; we often write way too much code. Then try to optimise the code so it’s less repetitive. Beware not to over-engineer though! You’re supposed to remove complexity, not add it. Also feel free to comment everything you do that might not seem obvious at the first glance.
Finally, commit your work regularly and logically. Bundle your changes in small commits doing a single thing each so it’s simple to go back in history if something goes wrong.
Last, but not least, don’t forget to celebrate when you’re done. Good luck!