Spicing Up the Bootstrap Carousel with CSS3 Animations

Adding a slider or carousel to showcase content on a website is a common client request for developers. The amount of free and premium carousel plugins available is overwhelming, and a good many of them offer plenty of useful configuration options and dynamic effects. There are times, however, when a lightweight carousel with minimal options is all you need. In this case, if your project uses Bootstrap, the popular open-source, front-end framework, you won’t need to look any further than the Bootstrap Carousel component.
In this article, I’m going to show how to add some fun animation effects to the Bootstrap Carousel, while still making sure this handy JavaScript component remains bloat-free and quick to implement.
Introducing Animate.css
As rewarding as crafting my own animation effects can be, I’m going to use a well-known, open-source CSS3 animation library most aptly called Animate.css, by Dan Eden.
This is so that I can focus on the task at hand, rather than on explaining the code for CSS3 animations. However, if you want to delve into that topic, you’ll enjoy the CSS3 Animations series here on SitePoint, by Craig Buckler.
Using Animate.css requires two steps:
- include
animate.min.cssin the<head>section of your HTML document - add the classes of
animated yourchosenanimationto the elements you intend to animate on your web page.
In the latter step, you would replace yourchosenanimation with the class name corresponding to any of the numerous animations you see on the Animate.css website.
Introducing the Bootstrap Carousel
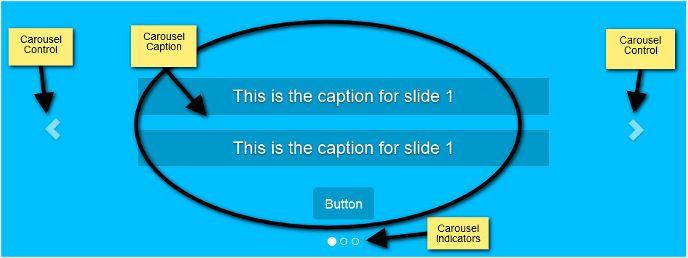
The Bootstrap Carousel component has three main sections:
- The Carousel indicators track the overall number of slides, give users a visual clue of the position the slide currently being viewed occupies, and offer an alternative navigation for the slider.
- The Carousel item, located inside a wrapper container with a class of
.carousel-inner, represents each individual slide. It’s inside each item that you place your images. You can also add captions to your slides. The nice thing is that you can put pretty much any HTML element inside a container with the class ofcarousel-captionand Bootstrap will take care of the styling and formatting. It’s these captions that you’re going to animate. - Finally, the Carousel controls are the navigation arrows that enable users to access the next and previous slides.
To keep this demo simple, I’m not going to add images to the carousel. The focus is all on how to animate the carousel captions.
Building the HTML Structure
If you’re following along, here’s what you need to include in your project:
- jQuery
- Bootstrap’s CSS and JavaScript
- Font Awesome, or any other brand of icons, although you’re free to replace the icons with simple text
- Animate.css
- A stylesheet and JavaScript document where you’ll add your own code.
Here’s the code for the Bootstrap Carousel:
<!-- indicators -->
<div id="carouselExampleIndicators" class="carousel slide">
  <ol class="carousel-indicators">
    <li data-target="#carouselExampleIndicators" data-slide-to="0" class="active"></li>
    <li data-target="#carouselExampleIndicators" data-slide-to="1"></li>
    <li data-target="#carouselExampleIndicators" data-slide-to="2"></li>
  </ol>

  <!-- carousel content -->
  <div class="carousel-inner">

    <!-- first slide -->
    <div class="carousel-item active">
      <div class="carousel-caption d-md-block">
        <h3 data-animation="animated bounceInLeft">
          This is the caption for slide 1
        </h3>
        <h3 data-animation="animated bounceInRight">
          This is the caption for slide 1
        </h3>
        <button class="btn btn-primary btn-lg" data-animation="animated zoomInUp">Button</button>
      </div>
    </div>

    <!-- second slide -->
    <div class="carousel-item">
      <!-- second slide content -->
    </div>

    <!-- third slide -->
    <div class="carousel-item">
      <!-- third slide content -->
    </div>
  </div>

  <!-- controls -->
  <a class="carousel-control-prev" href="#carouselExampleIndicators" role="button" data-slide="prev">
    <span class="carousel-control-prev-icon" aria-hidden="true"></span>
    <span class="sr-only">Previous</span>
  </a>
  <a class="carousel-control-next" href="#carouselExampleIndicators" role="button" data-slide="next">
    <span class="carousel-control-next-icon" aria-hidden="true"></span>
    <span class="sr-only">Next</span>
  </a>

</div>
The elements inside the carousel caption that you’ll be animating have a data-animation attribute added to them with the specific animation class name as their respective value.
If you’d like to experiment with other animations from the Animate.css library, feel free to replace the values in the data-animation attribute with your chosen animation class names.
Adding CSS to the Carousel
Now, give free rein to your creativity and style the carousel captions according to your taste. The style rules that I’m going to focus on here are those relevant to the smooth working of this demo.
More specifically, you’re taking control of the CSS animation-delay property, which defines when each animation starts.
.carousel-caption h3:first-child {
  animation-delay: 1s;
}

.carousel-caption h3:nth-child(2) {
  animation-delay: 2s;
}

.carousel-caption button {
  animation-delay: 3s;
}
The snippet above ensures that the elements start their animation sequentially. There’s room for play here. For instance, you can choose to start animating the first two headings at the same time, followed by the button animation. It’s up to you, so have fun with it!
Writing the jQuery
Let’s start by initializing the carousel. In your custom JavaScript file, add this code snippet:
var $myCarousel = $('#carouselExampleIndicators');

// Initialize carousel
$myCarousel.carousel();
Now the carousel is in motion. Let’s tackle the animation part.
To animate the captions in the first slide, the script has to fire as soon as the page finishes loading in the browser. However, to animate subsequent slides as they come into view, the code will have to fire on the slide.bs.carousel event. This means that the same code will be used twice: on page load and on the slide.bs.carousel event.
To avoid repetition (following the DRY principle), just wrap your code inside a function and attach it to the appropriate events as required.
Here’s the code:
function doAnimations(elems) {
  var animEndEv = 'webkitAnimationEnd animationend';

  elems.each(function () {
    var $this = $(this),
        $animationType = $this.data('animation');

    // Add animate.css classes to
    // the elements to be animated
    // Remove animate.css classes
    // once the animation event has ended
    $this.addClass($animationType).one(animEndEv, function () {
      $this.removeClass($animationType);
    });
  });
}

// Select the elements to be animated
// in the first slide on page load
var $firstAnimatingElems = $myCarousel.find('.carousel-item:first')
  .find('[data-animation ^= "animated"]');

// Apply the animation using the doAnimations()function
doAnimations($firstAnimatingElems);

// Attach the doAnimations() function to the
// carousel's slide.bs.carousel event
$myCarousel.on('slide.bs.carousel', function (e) {
  // Select the elements to be animated inside the active slide
  var $animatingElems = $(e.relatedTarget)
    .find("[data-animation ^= 'animated']");
  doAnimations($animatingElems);
});
There’s quite a lot going on in the chunk of code above, so let’s break it down.
Looking into the doAnimations() Function
The doAnimations() function performs the tasks described below.
It starts by caching a string in a variable containing the name of the animationend event. This event fires, you might have guessed, when each animation ends. You need this bit of information because each time the animation ends, you need to remove the Animate.css classes. Failing to do this, the carousel captions will be animated only once, that is, just the first time the carousel shows a particular slide.
var animEndEv = 'webkitAnimationEnd animationend';Next, the function loops over each element you want to animate and extracts the value of the data-animation attribute. As you recall, this value contains the Animate.css classes that you need to add to the elements inside the carousel in order to animate them.
elems.each(function () {
  var $this = $(this),
    $animationType = $this.data('animation');
  // etc...
});
Finally, the doAnimations() function dynamically adds the Animate.css classes to each element that you want to animate. It also attaches an event listener that fires only once, when the animation ends. After the animation ends, the Animate.css classes that you just added are removed. This ensures that the next time the carousel comes back to the same slide, the animations take place again. (Try removing this bit of code and you’ll see the animations happen only once.)
$this.addClass($animationType).one(animEndEv, function () {
  $this.removeClass($animationType);
});
Animating the First Carousel Caption
As soon as the page loads in the browser, you trigger the animation inside the first slide like so:
var $firstAnimatingElems = $myCarousel.find('.carousel-item:first')
  .find("[data-animation ^= 'animated']");
doAnimations($firstAnimatingElems);
In this code, you begin by finding the first slide. From there, select the content you want to animate inside the caption by using the values of the data-animation attribute starting with animated. You then use the piece of data thus obtained as an argument in the doAnimations() function and let the function do its job.
Animating the Carousel Captions as They Slide
Animating the carousel captions as each slide becomes visible requires the steps described below.
First, attach an event listener to the slide.bs.carousel event. According to the Bootstrap Carousel documentation:
This event fires immediately when the slide instance method is invoked.
$myCarousel.on('slide.bs.carousel', function (e) {
  // do stuff...
});
Next, select the active slide — that is, the slide currently in view — and from there find the elements you intend to animate. The code below uses the .relatedTarget property of the slide.bs.carousel event to get hold of the active slide.
var $animatingElems = $(e.relatedTarget).find("[data-animation ^= 'animated']");Finally, call the doAnimations() function, passing $animatingElements, which contains the list of elements to be animated, as an argument.
doAnimations($animatingElems);The full demo is shown in the CodePen below.
See the Pen Bootstrap Carousel and Animate.css by SitePoint (@SitePoint) on CodePen.
Conclusion
As many of you probably know, Carousels do have issues that developers need to take into consideration.
With the Bootstrap Carousel component, adding a slider or carousel to a web page is just a matter of entering the appropriate HTML markup.
In this article, I’ve shown how to add some extra pizzazz to the basic Bootstrap Carousel component with a few lines of jQuery and the Animate.css library. However, any other similar CSS library, or coding the CSS3 animations from scratch, will do just as well.
Can you suggest other ways of adding some customizations to the Bootstrap Carousel? I look forward to your feedback in the comments.
If you’ve got the basics of Bootstrap under your belt but are wondering how to take your Bootstrap skills to the next level, check out our Building Your First Website with Bootstrap 4 course for a quick and fun introduction to the power of Bootstrap.