How to Use Gulp.js to Automate Your CSS Tasks

In this article, we look at how you can use Gulp.js to automate a range of repetitive CSS development tasks to speed up your workflow.
Web development requires little more than a text editor. However, you’ll quickly become frustrated with repetitive tasks that are essential for a modern website and fast performance, such as:
- converting or transpiling
- concatenating files
- minifying production code
- deploying updates to development, staging and live production servers.
Some tasks must be repeated every time you make a change. The most infallible developer will forget to optimize an image or two and pre-production tasks become increasingly arduous.
Fortunately, computers never complain about mind-numbing work. This article demonstrates how use Gulp.js to automate CSS tasks, including:
- optimizing images
- compiling Sass
.scssfiles - handling and inlining assets
- automatically appending vendor prefixes
- removing unused CSS selectors
- minifying CSS
- reporting file sizes
- outputing sourcemaps for use in browser devtools
- live-reloading in a browser when source files change.
Why Use Gulp?
A variety of task runners are available for web projects including Gulp, Grunt, webpack, Parcel and even npm scripts. Ultimately, the choice is yours and it doesn’t matter what you use, as your site/app visitors will ever know or care.
Gulp is a few years old, but it’s stable, fast, supports many plugins, and is configured using JavaScript code. Writing tasks in code has several advantages, and you can modify output according to conditions — such as removing CSS sourcemaps when building the final files for live deployment.
Demonstration Code
This tutorial’s code is available from GitHub. Ensure Git and Node.js are installed, then enter the following commands in your terminal to install and run the demonstration:
git clone https://github.com/craigbuckler/gulp4-css
cd gulp4-css
npm i gulp-cli -g
npm i
gulp
In your browser, navigate to http://localhost:8000/ or the External URL shown.
Alternatively, you can create your own project following the steps below.
Example Project Overview
This tutorial uses Gulp 4.0. This is the most recent stable version and the current default on npm.
Image file sizes will be minimized with gulp-imagemin, which optimizes JPG, GIF and PNG bitmaps as well as SVG vector graphics.
A CSS file is built using:
- the Sass preprocessor, which compiles
.scsssyntax and partials into a singlemain.cssfile, and - the PostCSS postprocessor, which supplements
main.cssto provide asset management, vendor-prefixing, minification and more via its own plugins.
Using both a preprocessor and a postprocessor provides coding flexibility.
Sass may not be as essential as it once was, but it remains a practical option for file splitting, organization, (static) variables, mixins and nesting. Alternative preprocessors include gulp-less for Less and gulp-stylus for Stylus.
The gulp-sass plugin is used in the example code below. This uses node-sass to call the LibSass C/C++ engine and is currently the fastest option. However, you could consider Dart Sass, which has become the primary implementation and receives language updates first. To use Dart Sass, change all npm installation and require references from gulp-sass to gulp-dart-sass accordingly.
Finally, you could forego a preprocessor and use PostCSS for all CSS transformations. It offers a range of plugins including those which replicate many (but not all) Sass syntax options.
Getting Started with Gulp
If you’ve never used Gulp before, please read “An Introduction to Gulp.js”. These are basic steps from your terminal:
- Ensure a recent edition of Node.js is installed.
- Install the Gulp command-line interface globally with
npm i gulp-cli -g. - Create a new project folder — for example,
mkdir gulpcss— and enter it (cd gulpcss). - Run
npm initand answer each question (the defaults are fine). This will create apackage.jsonproject configuration file. - Create a
srcsubfolder for source files:mkdir src.
The example project uses the following subfolders:
src/images— image filessrc/scss— source Sass filesbuild— the folder where compiled files are generated
Test HTML Page
This tutorial concentrates on CSS-related tasks, but an index.html file in the root folder is useful for testing. Add your own page code with a <link> to the built stylesheet. For example:
<!DOCTYPE html>
<html lang="en">
<head>
  <meta charset="UTF-8">
  <meta name="viewport" content="width=device-width,initial-scale=1.0">
  <title>Using Gulp.js for CSS tasks</title>
  <link rel="stylesheet" media="all" href="build/css/main.css">
</head>
<body>

  <h1>My example page</h1>

</body>
</html>
Module Installation
For this tutorial, most Node.js modules are installed as project dependencies so the CSS can be built on local development or live production servers. Alternatively, you could install them as development dependencies using the npm --save-dev option so they must be built locally prior to deployment.
To install Gulp and all plugins, run the following npm command in your terminal from the project folder:
npm i gulp gulp-imagemin gulp-newer gulp-noop gulp-postcss gulp-sass gulp-size gulp-sourcemaps postcss-assets autoprefixer cssnano usedcss
All modules will be installed and listed in the "dependencies" section of package.json.
The browser-sync test server can now be installed — as a development dependency, since it should never be required on a live production device:
npm i browser-sync --save-dev
The module will be listed in the "devDependencies" section of package.json.
Create a Gulp Task File
Gulp tasks are defined in a JavaScript file named gulpfile.js in your project root. Create it, then open the file in your editor (VS Code is a great option). Add the following code:
(() => {

  'use strict';

  /**************** gulpfile.js configuration ****************/

  const

    // development or production
    devBuild  = ((process.env.NODE_ENV || 'development').trim().toLowerCase() === 'development'),

    // directory locations
    dir = {
      src         : 'src/',
      build       : 'build/'
    },

    // modules
    gulp          = require('gulp'),
    noop          = require('gulp-noop'),
    newer         = require('gulp-newer'),
    size          = require('gulp-size'),
    imagemin      = require('gulp-imagemin'),
    sass          = require('gulp-sass'),
    postcss       = require('gulp-postcss'),
    sourcemaps    = devBuild ? require('gulp-sourcemaps') : null,
    browsersync   = devBuild ? require('browser-sync').create() : null;

  console.log('Gulp', devBuild ? 'development' : 'production', 'build');

})();
This defines a self-executing function and constants for:
devBuild— settruewhenNODE_ENVis blank or set todevelopmentdir.src— thesrc/source file folderdir.build— thebuild/build folder- Gulp and all plugin modules
Note that sourcemaps and browsersync are only configured for development builds.
Gulp Image Task
Create a src/images folder and copy some image files into that or any of its subfolders.
Insert the following code below the console.log in gulpfile.js to define an images processing task:
/**************** images task ****************/
const imgConfig = {
  src           : dir.src + 'images/**/*',
  build         : dir.build + 'images/',
  minOpts: {
    optimizationLevel: 5
  }
};

function images() {

  return gulp.src(imgConfig.src)
    .pipe(newer(imgConfig.build))
    .pipe(imagemin(imgConfig.minOpts))
    .pipe(size({ showFiles:true }))
    .pipe(gulp.dest(imgConfig.build));

}
exports.images = images;
Configuration parameters are defined in imgConfig, which sets:
- the
.srcto any image insidesrc/imagesor a subfolder - the
.buildfolder tobuild/images, and - gulp-imagemin optimization options.
An images function returns a Gulp stream, which pipes data through a series of plugins:
gulp.srcis passed a source folder glob to examine- the gulp-newer plugin removes any newer images already present in the build folder
- the gulp-imagemin plugin optimizes the remaining files
- the gulp-size plugin reports the resulting size of all processed files
- the files are saved to the
gulp.destbuild folder.
Finally, a public Gulp images task is exported that calls the images function.
Save gulpfile.js then run the images task from the command line:
gulp images
The terminal will show a log such as:
Gulp development build
[18:03:38] Using gulpfile /gulp4-css/gulpfile.js
[18:03:38] Starting 'images'...
[18:03:38] cave-0600.jpg 48.6 kB
[18:03:38] icons/alert.svg 308 B
[18:03:38] icons/fast.svg 240 B
[18:03:38] icons/reload.svg 303 B
[18:03:38] cave-1200.jpg 116 kB
[18:03:38] cave-1800.jpg 162 kB
[18:03:38] gulp-imagemin: Minified 3 images (saved 203 B - 19.3%)
[18:03:38] all files 328 kB
[18:03:38] Finished 'images' after 507 ms
Examine the created build/images folder to find optimized versions of your images. If you run gulp images again, nothing will occur because only newer files are processed.
Gulp CSS Task
Create a src/scss folder with a file named main.scss. This is the root Sass file which imports other partials. You can organize these files as you like, but to get started, add:
// main.scss
@import 'base/_base';
Create a src/scss/base folder and add a _base.scss file with the following code:
// base/_base.scss partial
$font-main: sans-serif;
$font-size: 100%;

body {
  font-family: $font-main;
  font-size: $font-size;
  color: #444;
  background-color: #fff;
}
Insert the following code below the images task in gulpfile.js to define a css processing task:
/**************** CSS task ****************/
const cssConfig = {

  src         : dir.src + 'scss/main.scss',
  watch       : dir.src + 'scss/**/*',
  build       : dir.build + 'css/',
  sassOpts: {
    sourceMap       : devBuild,
    imagePath       : '/images/',
    precision       : 3,
    errLogToConsole : true
  },

  postCSS: [
    require('usedcss')({
      html: ['index.html']
    }),
    require('postcss-assets')({
      loadPaths: ['images/'],
      basePath: dir.build
    }),
    require('autoprefixer')({
      browsers: ['> 1%']
    }),
    require('cssnano')
  ]

};

function css() {

  return gulp.src(cssConfig.src)
    .pipe(sourcemaps ? sourcemaps.init() : noop())
    .pipe(sass(cssConfig.sassOpts).on('error', sass.logError))
    .pipe(postcss(cssConfig.postCSS))
    .pipe(sourcemaps ? sourcemaps.write() : noop())
    .pipe(size({ showFiles: true }))
    .pipe(gulp.dest(cssConfig.build))
    .pipe(browsersync ? browsersync.reload({ stream: true }) : noop());

}
exports.css = gulp.series(images, css);
Configuration parameters are defined in cssConfig which sets:
- the
.srcfile tosrc/scss/main.scss - a
.watchfolder to any file withinsrc/scssor its subfolders - the
.buildfolder tobuild/css, and - node-sass options passed by gulp-sass in
.sassOpts.
cssConfig.postCSS defines an array of PostCSS plugins and configuration options. The first is usedcss, which removes unused selectors by examining the example index.html file.
This is followed by postcss-assets, which can resolve image URL paths and information in the CSS files. For example, if myimage.png is a 400×300 PNG bitmap, the following code:
.myimage {
  background-image: resolve('myimage.jpg');
  width: width('myimage.png');
  height: height('myimage.png');
  background-size: size('myimage.png');
}
is translated to:
.myimage {
  background-image: url('/images/myimage.png');
  width: 400px;
  height: 300px;
  background-size: 400px 300px;
}
It’s also possible to inline bitmap and SVG images. For example:
.mysvg {
  background-image: inline('mysvg.svg');
  /* url('data:image/svg+xml;charset=utf-8,... */
}
autoprefixer is the famous PostCSS plugin which adds vendor prefixes according to information from caniuse.com. In the configuration above, any browser with a global market share of 1% or more will have vendor prefixes added. For example:
user-select: none;
becomes:
-webkit-user-select: none;
-moz-user-select: none;
-ms-user-select: none;
user-select: none;
Finally, cssnano minifies the resulting CSS file by rearranging properties, removing unnecessary units, deleting whitespace, and so on. Several alternatives are available, such as post-clean, but cssnano generates a slightly smaller file in the demonstration code.
A css function returns a Gulp stream which pipes data through a series of plugins:
gulp.srcis passed a sourcesrc/scss/main.scssfile to examine.- If
devBuildistrue, the gulp-sourcemaps plugin is initialized. Otherwise, the gulp-noop does nothing. - The gulp-sass plugin preprocesses
main.scssto CSS using thecssConfig.sassOptsconfiguration options. Note theon('error')event handler prevents Gulp terminating when a Sass syntax error is encountered. - The resulting CSS is piped into gulp-postcss, which applies the plugins described above.
- If the sourcemap is enabled, it’s appended as data to the end of the CSS file.
- The gulp-size plugin displays the final size of the CSS file.
- The files are saved to the
gulp.destbuild folder. - If
browsersyncis enabled (devBuildmust betrue), an instruction is sent to browser-sync to refresh the CSS in all connected browsers (see below).
Finally, a public css task is exported which calls the images function followed by the css function in turn using gulp.series(). This is necessary because the CSS relies on images being available in the build/images folder.
Save gulpfile.js, then run the task from the command line:
gulp css
The terminal will show a log such as:
Gulp development build
[14:16:25] Using gulpfile /gulp4-css/gulpfile.js
[14:16:25] Starting 'css'...
[14:16:25] Starting 'images'...
[14:16:25] gulp-imagemin: Minified 0 images
[14:16:25] Finished 'images' after 61 ms
[14:16:25] Starting 'css'...
[14:16:26] main.css 9.78 kB
[14:16:26] Finished 'css' after 900 ms
[14:16:26] Finished 'css' after 967 ms
Examine the created build/css folder to find a development version of the resulting main.css file containing a sourcemap data:
body {
  font-family: sans-serif;
  font-size: 100%;
  color: #444;
  background-color: #fff; }

/*# sourceMappingURL=data:application/json;charset=utf8;base64,...
Automating Your Workflow
Running one task at a time and manually refreshing all browsers is no fun. Fortunately, Browsersync provides a seemingly magical solution:
- It implements a development web server or proxies an existing server.
- Code changes are dynamically applied and CSS can refresh without a full page reload
- Connected browsers can mirror scrolling and form input. For example, you complete a form on your desktop PC and see it happening on a mobile device.
- It’s fully compatible with Gulp and other build tools.
Insert the following code below the css task in gulpfile.js to define a server function to launch Browsersync and a watch function to monitor file changes:
/**************** server task (private) ****************/
const syncConfig = {
  server: {
    baseDir   : './',
    index     : 'index.html'
  },
  port        : 8000,
  open        : false
};

// browser-sync
function server(done) {
  if (browsersync) browsersync.init(syncConfig);
  done();
}

/**************** watch task ****************/
function watch(done) {

  // image changes
  gulp.watch(imgConfig.src, images);

  // CSS changes
  gulp.watch(cssConfig.watch, css);

  done();

}

/**************** default task ****************/
exports.default = gulp.series(exports.css, watch, server);
The browser-sync configuration parameters are defined in syncConfig, which sets options such as the port and default file.
The server function initiates Browsersync and a done() callback is executed so Gulp knows it has completed.
Browsersync is able to watch for file changes itself but, in this case, we want to control it via Gulp to ensure refreshes only occur when a Sass change causes main.css to be rebuilt.
The watch function uses gulp.watch() to monitor files and trigger the appropriate function (optionally within gulp.series() or gulp.parallel() methods). Again, a done() callback is executed once the function has completed.
Finally, a default task is created which can be executed by running gulp without arguments. It calls the css task (which also runs images()) to build all files, runs the watch() function to monitor updates, and launches the Browsersync server.
Save gulpfile.js and run the default task from the command line:
gulp
The terminal will show a log but, unlike before, it will not terminate and remain running:
Gulp development build
[14:32:05] Using gulpfile /gulp4-css/gulpfile.js
[14:32:05] Starting 'default'...
[14:32:05] Starting 'images'...
[14:32:05] gulp-imagemin: Minified 0 images
[14:32:05] Finished 'images' after 64 ms
[14:32:05] Starting 'css'...
[14:32:05] main.css 9.78 kB
[14:32:05] Finished 'css' after 843 ms
[14:32:05] Starting 'watch'...
[14:32:05] Finished 'watch' after 33 ms
[14:32:05] Starting 'server'...
[14:32:06] Finished 'server' after 19 ms
[14:32:06] Finished 'default' after 967 ms
[Browsersync] Access URLs:
 -------------------------------------
       Local: http://localhost:8000
    External: http://192.168.1.234:8000
 -------------------------------------
          UI: http://localhost:3001
 UI External: http://localhost:3001
 -------------------------------------
[Browsersync] Serving files from: ./
Your PC is now running a web server from http://localhost:8000. Other devices on the network can connect to the External URL. Open the URL in a browser or two, then make changes to any .scss file. The results are immediately refreshed.
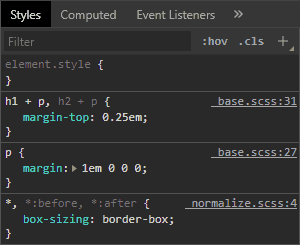
Examine any element in the devtools and the Styles panel will show the location of the pre-compiled Sass code. You can click the filename to view the full source:
Finally, press Ctrl + C to stop the Gulp task running in your terminal.
Live Production Code
The NODE_ENV environment variable must be set to production so Gulp tasks know when to produce final code and disable sourcemap generation. On Linux and macOS terminals:
NODE_ENV=production
Windows Powershell:
$env:NODE_ENV="production"
Windows legacy command line:
set NODE_ENV=production
You can either:
- Install Gulp and run tasks directly on the live server. Ideally,
NODE_ENVshould be permanently set on production machines by modifying the startup script. For example, addexport NODE_ENV=productionto the end of a Linux~/.bashrcfile. - Create production code locally, then upload to live servers.
Run gulp css to generate the final code.
To return to development mode, change NODE_ENV to development or an empty string.
Next Steps
This article demonstrates a possible Gulp CSS workflow, but it can be adapted for any project:
- There are more than 3,700 Gulp plugins. Many help with CSS, but you’ll find others for HTML, templating, image handling, JavaScript, server-side languages, linting and more.
- There are hundreds of PostCSS plugins and it’s simple to write your own.
Whichever tools you choose, I recommend you:
- Automate the most frustrating, time-consuming or performance-improving tasks first. For example, optimizing images could shave hundreds of Kilobytes from your total page weight.
- Don’t over-complicate your build process. A few hours should be adequate to get started.
- Try other task runners but don’t switch on a whim!
The code above is available from GitHub and you can view the whole gulpfile.js configuration. Please use it as you wish.