Windows Subsystem for Linux 2: The Complete Guide for Windows 10 & 11
This tutorial demonstrates how to install, manage, and use a full Linux environment on your Windows 10 or Windows 11 PC with WSL2. You’ll be running a Linux kernel and executing native applications while seamlessly sharing files and services with Windows code editors and browsers.
Why Use Linux?
Your web host almost certainly uses Linux. It’s fast, open source, and runs the majority of web software including:
- servers (Apache, NGINX, LiteSpeed, etc.)
- language runtimes (PHP, Python, Node.js, Ruby, etc.)
- utility libraries (image manipulation, ZIP creation, emailers, etc.)
- databases (MySQL, MongoDB, Redis, etc.)
- other dependencies (Elasticsearch, RabbitMQ, proxies, etc.)
Some of these dependencies may be available on Windows and macOS, but installing and maintaining identical versions is difficult. They’re often slower and you may encounter subtle differences which will not become apparent until you deploy.
Some developers use Linux as their primary desktop OS, but that may not be viable if you require non-Linux software such as Microsoft or Adobe products. Alternative options:
-
Use two PCs or dual boot on a single device. Switching between systems can be cumbersome.
-
Run a Linux virtual machine (VM) using Hyper-V, VirtualBox, Parallels, WMware, or Vagrant. This requires considerable OS resources and reasonable IT knowledge. Sharing files between systems can be awkward.
-
Run web applications in Docker containers. It’s another topic to learn and Docker itself runs natively on Linux. Both the Windows and macOS editions use Linux below the surface and the Windows edition of Docker Desktop requires WSL2.
What is the Windows Subsystem for Linux?
The Windows Subsystem for Linux (WSL) lets developers run a Linux environment directly on Windows. It’s a full Linux OS running inside Windows so you can use the same apps and files seamlessly.
WSL1 was groundbreaking and translated Linux system calls to Windows equivalents. This could be slow and some features weren’t available. WSL2 uses Hyper-V virtual machine technology so Linux compatibility is excellent and file access is up to 20x faster than before.
Windows 10 and Windows 11 Differences
Microsoft introduced WSL2 in 2020, so it was fully integrated into the Windows 11 release in October 2021.
Windows 10 requires a little more configuration effort. If you’re considering an upgrade to Windows 11, do it before installing WSL2. Windows 11 is not an improvement in some respects (I still miss taskbar icon ungrouping and dragging files!) but WSL2 seems more stable and I rarely encounter issues.
PC Requirements
WSL2 uses Hyper-V. This requires hardware virtualization support which you must enable in your BIOS.
WARNING: fiddling with your BIOS settings can trash your PC! Be careful when making changes. Consult your motherboard manufacturer’s help pages or search for online advice about your specific make and model.
Hardware virtualization is available on most modern devices, but you can check by rebooting, and opening the BIOS panels — typically by hitting the DEL, F2, or F10 key as the system starts. Look for Virtualization Technology, VTx, Secure Virtual Machine (SVM) or similar options. Ensure they are enabled, save, and reboot the machine.
Finally, ensure your C: drive has at 1GB of spare disk space — ideally more. You may be able to free up some space in Settings, System, Storage or using the Disk clean-up tool in Windows Administrative Tools.
At the time of writing, WSL2 will install Linux to your C: drive, although it’s possible to move it elsewhere after installation.
Windows Requirements
WSL2 is available with the Home, Pro, or Server editions of Windows but not Windows 10/11 S. S mode only permits apps from the Microsoft Store to “improve” security. You can switch from S mode to Windows Home/Pro using the Switch to Windows Home option in Settings > Update & Security > Activation.
Windows 10 requires the May 2020 update — that’s version 2004 or above. Choose the Settings cog from the Start menu, then select System followed by About. The Windows specifications are shown at the bottom of the panel.
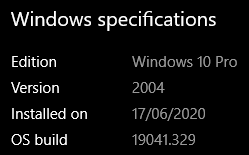
Use the Check for updates button in Settings, then Update & Security if it’s not installed. Some older PCs may never be compatible and it’s unlikely Microsoft will offer a patch.
Disable Fast Start-up (Optional)
Fast start-up saves the Windows session and device drivers to a file so the next boot is faster. This can cause problems for the Linux kernel, which becomes unresponsive on the next boot. If you encounter problems, disable fast start-up from the classic Control Panel > Power Options > Choose what the power buttons do:
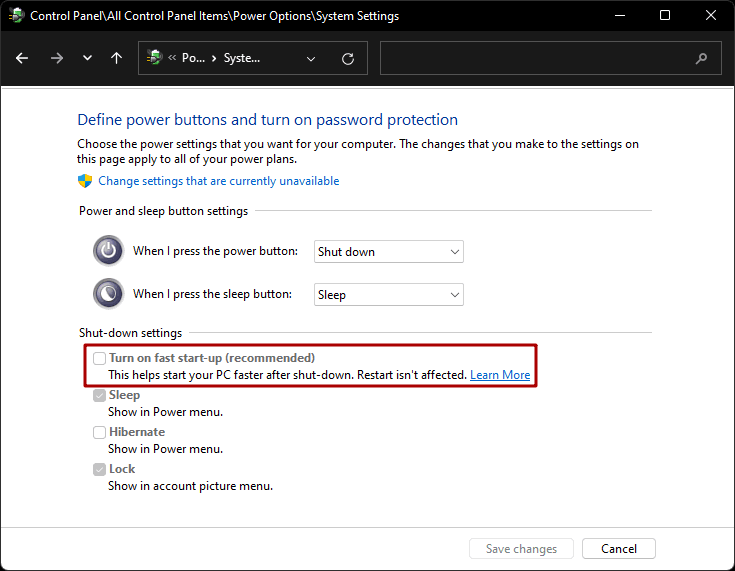
Alternatively, create a wsl.bat file in your Startup folder (C:\Users\<user-name>\AppData\Roaming\Microsoft\Windows\Start Menu\Programs\Startup) with the content:
wsl --shutdown
This will shut down WSL after Windows boots but it will restart as soon as you access a Linux distro.
Install Windows Terminal (Optional but Recommended)
Windows Terminal is a great terminal application available from the Microsoft Store or its repository at github.com/microsoft/terminal/.
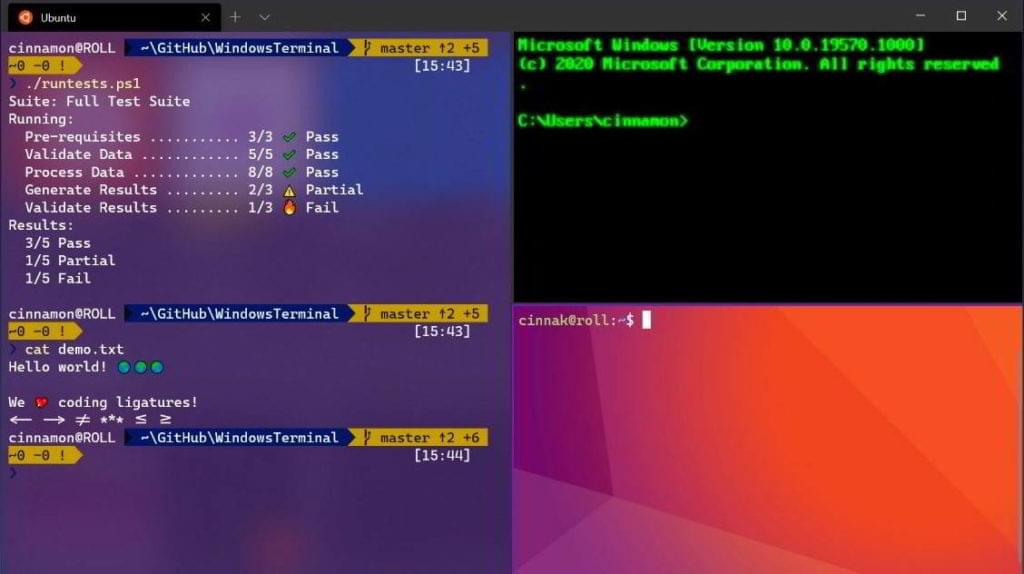
Windows Terminal automatically adds WSL2 Linux distros when they’re installed and offers a configurable range of options including tabs, split views, themes, transparency, and key bindings.
Configuration is available from the Settings menu item (Ctrl + ,), the Command Palette (Ctrl + Shift + P), or the settings.json accessed at the bottom of the Settings panel.
Enable WSL2 (Windows 10)
The following instructions apply to Windows 10. They should not be necessary in Windows 11, although you should double-check if you performed a Windows 10 to 11 upgrade.
The Virtual Machine Platform and Windows Subsystem for Linux features must be enabled in Turn Windows features on or off. The panel is accessed by hitting Start and typing “features” or from the Programs and Features icon in the classic Control Panel.
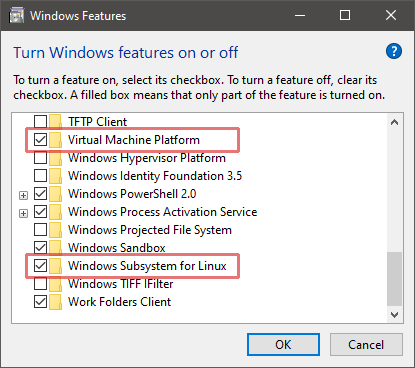
Alternatively, you can execute the following commands in a Windows Powershell terminal run as an Administrator:
dism.exe /online /enable-feature /featurename:Microsoft-Windows-Subsystem-Linux /all /norestart
dism.exe /online /enable-feature /featurename:VirtualMachinePlatform /all /norestart
Reboot Windows, then enable WSL2 as the default by entering the following command in a Windows PowerShell or command prompt:
wsl --set-default-version 2
Download Linux
Search for or locate PowerShell in the Start menu then right-click the icon and choose Run as administrator. Display a list of available Linux distros by entering:
wsl --list --online
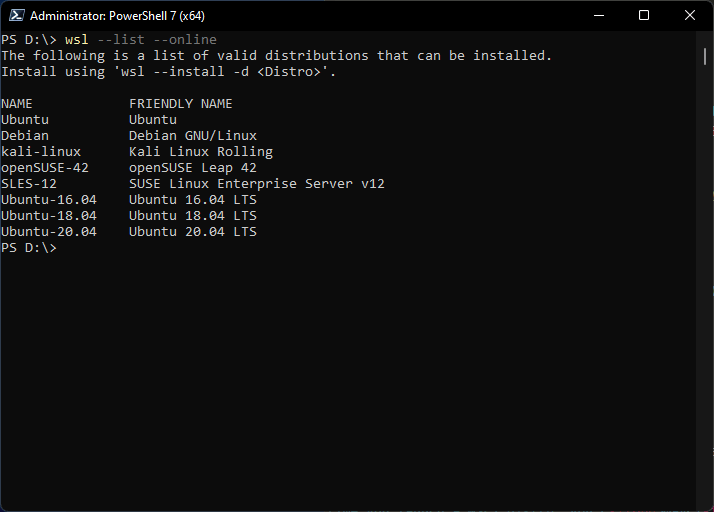
To install the default Ubuntu 20.04 distro, enter:
wsl --install
To install a specific distro by name, such as Debian, enter:
wsl --install -d Debian
Alternatively, you can install Linux distros from the Microsoft Store accessed in the Start menu. Enter “Linux” in the search box (be wary there could be software other than WSL distros).
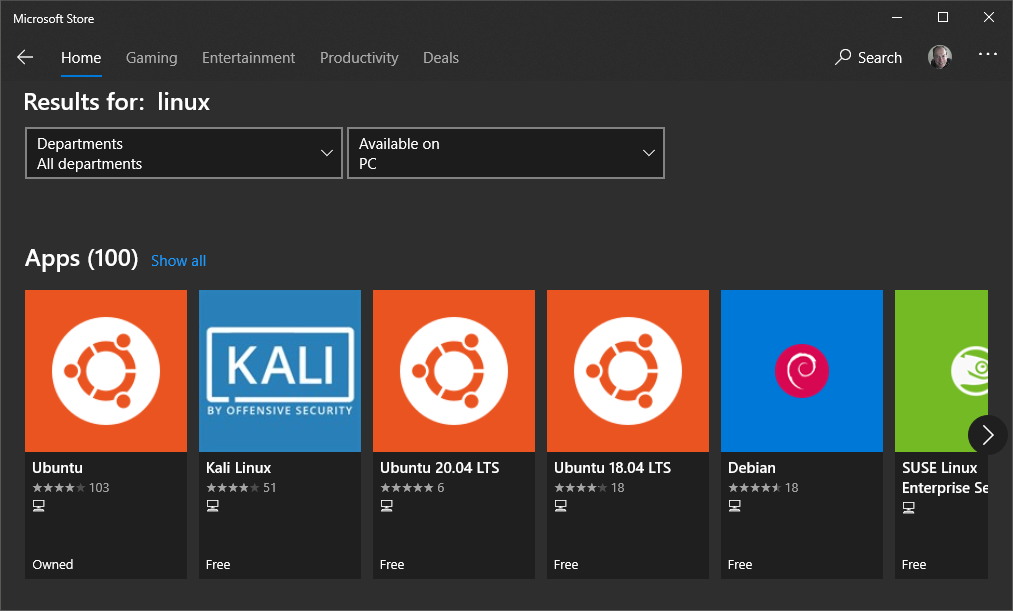
Ubuntu is a good choice unless you have specific Linux requirements. The latest edition is installed if you click the Ubuntu icon followed the Get button.
The download and installation could take some time depending on your network and PC speed. You may be prompted to reboot yet again.
Launch Linux
A new Linux (Ubuntu) option/icon will now be available in:
- the Start menu
- Windows Terminal (if installed)
- Powershell — enter
wslorbashat the prompt
Third-party terminal software such as Cmder, ConEmu, or Hyper can be used by creating profiles which launch %windir%\system32\bash.exe ~.
The installation process will complete the first time you run the WSL2 Linux OS.
Note: you may see a message in the terminal about a kernel update. Copy the link into your browser then download and install the update. You’ll need to launch the Linux distro again to continue with the installation.
You’ll be prompted to enter a username and password. These are the credentials for Linux administration: they’re completely separate from your Windows username and password (although choosing the same ones may be practical).
Linux will eventually be ready and your terminal will show content similar to:
Welcome to Ubuntu 20.04.4 LTS (GNU/Linux 5.10.102.1-microsoft-standard-WSL2 x86_64)

 * Documentation:  https://help.ubuntu.com
 * Management:     https://landscape.canonical.com
 * Support:        https://ubuntu.com/advantage

  System information as of Tue Aug 16 10:19:36 BST 2022

  System load:  0.0                Processes:             8
  Usage of /:   1.6% of 250.98GB   Users logged in:       0
  Memory usage: 1%                 IPv4 address for eth0: 172.21.6.83
  Swap usage:   0%


0 updates can be applied immediately.


The list of available updates is more than a week old.
To check for new updates run: sudo apt update
Update Linux
There are likely to be several Linux updates. To update Ubuntu applications, enter the following commands in the Linux terminal:
sudo apt update
sudo apt upgrade
Other Linux distros will have a similar process — so check the documentation for assistance.
You can also check for Linux kernal updates from Powershell using:
wsl --update
Switch Between WSL1 and WSL2
Existing WSL1 distros can be converted to WSL2. Enter the following command in a Windows Powershell terminal to display the installed Linux distros and their WSL version:
PS C:\> wsl --list --verbose

  NAME    STATE    VERSION
* Ubuntu  Running  1
(The * asterisk highlights the default Linux installation.)
To switch Ubuntu to WSL2, enter:
wsl --set-version Ubuntu 2
Similarly, to switch back to WSL1, enter:
wsl --set-version Ubuntu 1
Set a Default Linux Distribution
One Linux distribution must be set as the default when you have more than one installed. This will be used when wsl is entered in a Windows Powershell terminal.
To set the default distro, list your Linux installations:
wsl --list
and set a default with:
wsl --setdefault <DistributionName>
Ubuntu example: wsl --setdefault Ubuntu.
Run Linux as a Specific User
To run your default distribution as a specific user, enter the following command in a Windows Powershell terminal:
wsl --user <username>
A default user is defined during installation but you can create others. A root user is also created, but you should avoid using it under normal circumstances. It’s too easy to enter a dangerous command!
Move or Clone Your Linux Disk Image
Linux disk images are installed on your C: drive. Optionally, you can either:
-
move it to another drive to free up space on
C:, or -
use the same image to create multiple Linux installations (which can be useful if you need different applications and setups for different projects — although Docker may be more practical)
The following instructions presume you’re moving the Ubuntu Linux distro to D:\wsl.
In a Windows Powershell terminal (not the Ubuntu terminal), enter wsl --list to view your Linux distributions, then export one by name to a backup .tar file — such as D:\backup\ubuntu.tar:
mkdir D:\backup
wsl --export Ubuntu D:\backup\ubuntu.tar
Unregister that distro to remove it from the C: drive:
wsl --unregister Ubuntu
Enter wsl --list to verify the distro has been removed.
Import the backup into a new WSL2 distro at another location, such as D:\wsl:
mkdir D:\wsl
wsl --import Ubuntu D:\wsl\ D:\backup\ubuntu.tar
You can make any number of named clones from the same back-up. For example:
wsl --import Clone01 D:\wsl\ D:\backup\ubuntu.tar
wsl --import Another D:\wsl\ D:\backup\ubuntu.tar
Verify the WSL distro has been successfully created by entering wsl --list and launching Ubuntu from the Start menu or Windows Terminal.
At this point, Ubuntu will use root as the default user. To revert to your own account, enter the following command:
ubuntu config --default-user <yourname>
Here, <yourname> is the username you defined during installation.
For other distros that aren’t the WSL2 default, define a user by logging on to the distro and creating/editing /etc/wsl.conf:
touch /etc/wsl.conf
nano /etc/wsl.conf
Add the following lines to the file:
[user]
default=<yourname>
Save (Ctrl + O) and exit (Ctrl + X), then restart the distro in a Powershell terminal with:
wsl --terminate <distroname>
Presuming all has gone well, you can delete the backup file (D:\backup\ubuntu.tar).
Access Linux Files from Windows
You can access WSL2 Linux files from the network path \\wsl$\. Enter it in the File Explorer address bar or any file open dialog.
Your installed Linux distros are listed, so you can access the Ubuntu root directory at \\wsl$\Ubuntu. Your personal Linux files are typically be stored at:
\\wsl$\Ubuntu\home\<yourname>
Here, <yourname> is the username you defined during installation.
It’s best to set this as the starting folder for the distro in Windows Terminal. Open the Settings, click a profile, then change the Starting directory option.
Map a Network Drive
You can mount a network drive to \\wsl$\Ubuntu\ by opening \\wsl$\ in File Explorer, right-clicking the Ubuntu folder, and choosing Map network drive….
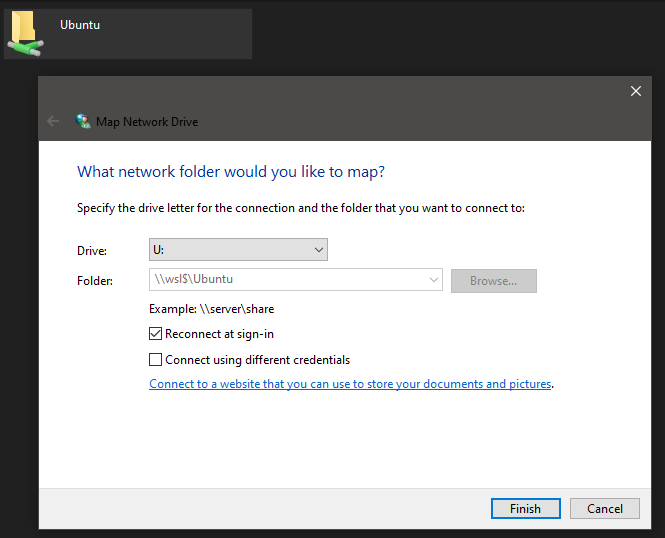
Unfortunately, it’s not currently possible to map deeper subdirectories. You may also encounter mapped-drive issues with some applications.
Accessing Windows Files from Linux
Windows drives are mounted in the Linux /mnt/ directory. For example, your personal Users folder at C:\Users\<yourname> is available at:
/mnt/c/Users/<yourname>
Here, <yourname> is your Windows username.
For ease of access, you can create a Linux symbolic link to any Windows folder from the terminal. For example, for C:\projects\code\:
cd ~
ln -s /mnt/c/projects/code/
A code folder will appear in your Linux home directory. Navigate to it using cd ~/code and you’ll actually be in /mnt/c/projects/code/, which maps directly to C:\projects\code\.
Accessing Windows files from Linux is considerably slower than using the native Linux file system. Where possible, create projects in the Linux file space, typically in your home folder (/home/<yourname>/ or ~).
Run Linux Commands from Windows
Any Linux (bash) shell command can be run from a Windows Powershell or command-line terminal using wsl:
wsl <linux-command>
For example, wsl ls -la lists all files in a Windows folder.
Run Windows Applications from Linux
Any Windows executable can be launched from Linux (it’s normally necessary to specify the .exe extension). For example, to open the current Linux directory in File Explorer, enter:
explorer.exe .
Or edit .bashrc in Notepad:
notepad.exe ~/.bashrc
Or open the a specific project directory in VS Code:
code ~/projects/mywebsite
Install Applications
Always remember you’re running two operating systems. They may be tightly integrated, but there are situations when you want an application installed everywhere.
For example, Git is useful in both Windows and Linux. The Windows edition is installed by downloading an executable. It’s best to ensure it doesn’t convert line endings:
git config --global core.autocrlf input
Git on Ubuntu is installed using:
sudo apt update
sudo apt install git-all
Similarly, you may want to test Node.js applications on both Windows and Linux. Again, Windows has a runtime installer, but the Node.js runtime is installed on Ubuntu using commands such as:
sudo apt-get install build-essential
curl -sL https://deb.nodesource.com/setup_18.x | sudo -E bash -
sudo apt-get install -y nodejs
git, node and npm commands will now work in either OS. Be wary that they may be different versions.
Installing Graphical Linux Applications
WSL2 allows you to run graphical X11 and Wayland Linux applications directly on Windows. You can launch Linux apps from the Start menu, pin them to the task bar, and use features such as cut and paste across applications. There are some downsides:
- not all graphical apps will work as expected
- some offer Linux features — such as file dialogs — that could confuse Windows users
- there’s little benefit installing applications with native Windows editions such as Firefox, VLC, or GIMP
To proceed, install the correct GPU driver for your PC:
Then install any graphical application from the Linux terminal. For example, the GNOME Gedit text editor:
sudo apt install gedit
Launch it with:
gedit
Pin the app to your Start menu or task bar as you would with any other Windows program.
Gedit is a small application less than 2MB in download size. However, it requires GNOME and other Linux libraries, which incur several hundred megabytes of additional code on top of the chunky GPU drivers (1.1GB for Intel). Using graphical Linux apps in WSL2 only makes sense if you need to install several applications or there’s no native Windows alternative.
Installing Docker
One exception to the “install on both OSes” rule is Docker!
Docker runs applications in isolated Linux containers that are conceptually similar to lightweight virtual machines with an OS, single application, and its dependencies. Using Docker for web development provides a consistent environment that’s easy to install and works on any device.
Docker Desktop for Windows is fully WSL2-enabled:
- there’s no need to use Hyper-V, so Docker can be installed on Windows Home
- Docker starts and runs considerably faster when configured to use WSL2
- installing Docker Desktop on Windows enables
dockeranddocker-composein both Windows and Linux
Docker Desktop suggests you use WSL2 when it’s first launched. Alternatively, you can select Settings from the Docker system tray icon menu, then choose the General tab, check Use the WSL 2 based engine, and hit Apply & Restart.
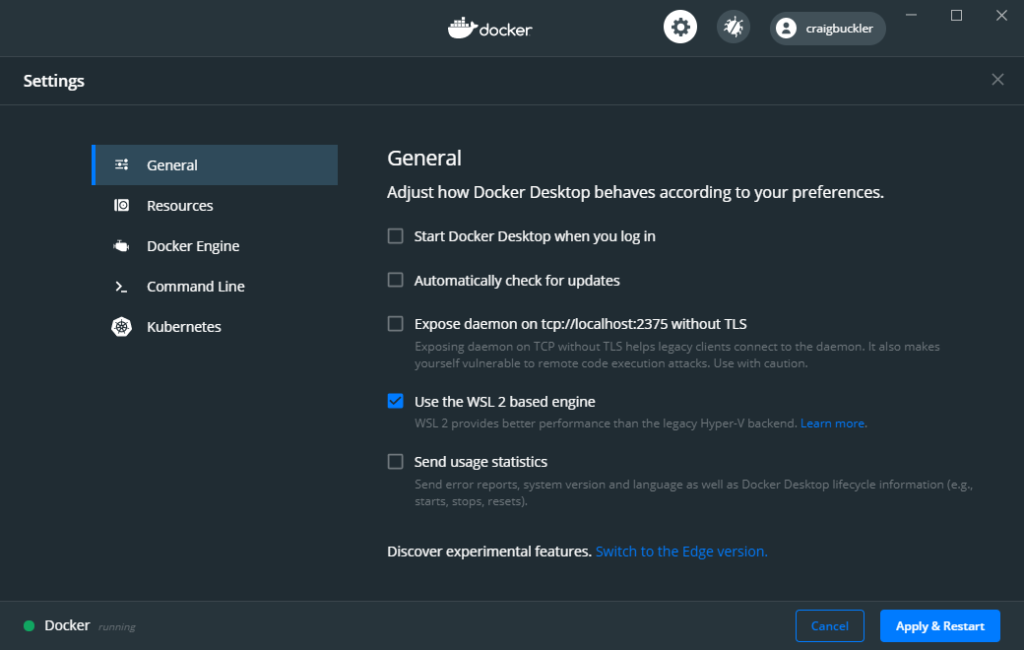
Docker uses the default Linux distro, but you can also enable it in other installed distros from the WSL Integration panel in Settings, then Resources.
Launching Apache and PHP Applications Using Docker
It’s possible to install web dependencies such as Apache and PHP directly in your WSL2 Linux environment. However, Docker is safer, quicker, and more configurable: it allows you to run different versions of PHP on the same device at the same time.
In this example, you’ll create a small PHP file and run it using the latest release of PHP 7.4 in a Docker container. Ensure you’ve installed Docker Desktop for Windows and enabled WSL2 mode, then create a folder in your Linux environment with an index.php file. For example:
mkdir ~/php
cd ~/php
touch index.php
Edit index.php, perhaps using Notepad or VS Code as shown above. Add the following content, which outputs PHP status information:
<?php
phpinfo();
Run the following docker command to start a PHP 8.1-enabled Apache web server in a container which mounts files in the current host directory to /var/www/html in the container:
docker run \
  -it --rm -p 8080:80 --name php \
  -v "$PWD":/var/www/html \
  php:8.1-apache
Note: this command also works in Windows, but the reference to $PWD must be replaced by the full file path in Linux notation — such as /c/php/.
Open https://localhost:8080/ in any Windows web browser to view the output of the phpinfo() command.
To finish, press Ctrl + C in your Docker terminal to stop and delete the container.
WSL2 and localhost
Applications running on Windows, WSL2 Linux, and Docker containers are always accessed from localhost or 127.0.0.1.
The PHP example above exposed port 8080, which was mapped to port 80 in the container. Similarly, if you have Node.js installed in Linux, you can cd to any directory and start a static file server:
npx small-static-server
Open http://localhost:8888/ in a browser to view files in that directory (index.html is returned by default).
Be aware that ports available in one OS may be unavailable in the other. Port numbers less than 1,000 are only available to Linux super users. Port 80 is often reserved by the Windows Store Skype App and it can’t be changed (although the classic Desktop edition does permit it).
SSL certificates that are either self-signed or locally trusted using tools such as mkcert can be used interchangeably in both Windows and Linux environments.
VS Code WSL2 Integration
VS Code permits you to use any Windows or Linux terminal. Open the terminal with View > Terminal or Ctrl + ' then hit the down arrow next to the + icon to launch a specific type. The same menu has a Select Default Profile option where you can select the terminal to use by default.

Like other applications, VS Code can directly access Linux files at \\wsl$\ and debuggers running on localhost. There’s no need for further extensions, but the following options permit easier Linux and Docker file management:
- Remote – WSL: open WSL2 Linux folders
- Remote – Containers: open or attach to a running Docker container
- Remote Development Pack: includes both extensions above as well as Remote – SSH to connect to remote servers
After installing Remote – WSL, you can navigate to any Linux directory and launch a WSL-connected instance of VS Code:
cd ~/myproject
code .
Alternatively, click the remote window icon in the bottom left of the application, then choose a connection option.
![]()
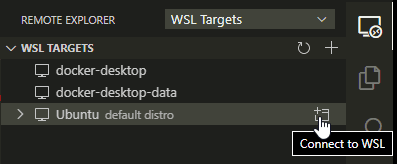
Or use the new Remote Explorer icon in the Activity Bar. This allows you to choose a target type from the drop-down and connect accordingly.
The remote instance of VS Code has a separate set of extensions and settings for Linux use, but some can be globally enabled. The Extensions panel allows you to enable and configure extensions in the remote instance.

Settings are stored in your Linux ~/.vscode-server directory.
Summary
Running Linux applications on Windows used to require virtual machines, complex Samba folder shares, and lots of patience. WSL2 has revolutionized web development. It makes it easy to write code using Windows tools then run it in a production-like Linux environment. The tight integration offers the benefits of both OSes.
Further WSL2 resources:
- Windows Subsystem for Linux Documentation
- Developing in WSL
- VS Code Remote development in WSL
- Run Linux GUI apps on the Windows Subsystem for Linux
If you enjoyed this article, you might also find these resources useful too: