An Introduction to CodeIgniter

The Write Stuff
There’s a well-worn urban legend that goes along these lines: faced with the dilemma that US astronauts could not get ball-point pens to work in zero-gravity, NASA spent a staggering amount of time and money developing a pen that would write perfectly in the conditions experienced during space flight.
The result was the Fisher Space Pen, a complex arrangement of pressurized ink cartridges and leak-free casing that could write upside-down, in extreme temperatures and in zero-gravity without so much as a blot.
Russian cosmonauts, meanwhile, used pencils.
Sadly it’s not true—pencils were used by US astronauts as well—but nonetheless it’s a wonderful little parable on the benefits of a simple approach.
As a web developer, you’ve probably found yourself in the middle of a PHP-based project where you can’t help but feel you’re heading inevitably towards a Fisher Space Pen of your own. You’re bogged in an ocean of code, not all of it bug-free, some of it superfluous, much of it commented out—and large parts of it interwoven with a complexity that would give an orb-weaving spider a migraine. What you’re looking for a is a really good pencil.
Say hello to CodeIgniter.
CodeIgniter is not a PHP substitute. When you dive into the world of CodeIgniter, you’re not leaving PHP behind—and why would you want to? PHP5 is a doozy of a scripting language for building state-of-the-art, dynamic web-based applications; its rapport with HTML is top-notch; plus it’s a great language for honing your OOP skills. It’s tight, secure and intuitive. For many of us, it’s the only server-side language for our needs.
CodeIgniter is a PHP-driven framework, containing a grab-bag of libraries, helpers, plug-ins and other resources, that takes care of many of the more complex procedures and functions for which PHP is famous. CodeIgniter does all the heavy lifting for you while maintaining high performance. It will simplify PHP syntax, streamline the code underlying your web pages, and—best of all—have you churning out dynamic, interactive, professional websites in no time.
Here are some of the principal benefits of coding your next project in CodeIgniter:
- It makes coding in PHP simple, quick and user-friendly.
- It’s an excellent framework for learning more about how PHP works as you code.
- It underpins the Model/View/Controller (MVC) approach to web development—a best practice philosophy all developers should adhere to.
- It’s built on a linear, easy-to-use folder structure.
- It’s open source and simple to configure and customize for your own needs.
- You can construct your own cleaner URI lines in CodeIgniter.
There are more reasons why you should start investigating this framework, and you’ll doubtless discover these for yourself when you visit and download the latest version (at the time of writing, version 2.0.1). Before you unzip and install the file though, head to the User Guide and read a little about CodeIgniter.
This is where you’ll see one of this framework’s best aspects—it has one of the most comprehensive and user-friendly how-to guides of any web development tool. If you can’t find what you need in the table of contents at (click on the tab at top right), head to the forums and join the ever-growing, highly passionate CodeIgniter community.
PHP Made Friendly
Once you start experimenting with CodeIgniter, you’ll find yourself quickly warming to its methodology. Of course, this assumes you’re familiar with PHP. You’ll need to have a good working knowledge of how PHP interacts with a database and its relationship with HTML, not to mention an understanding of basic PHP syntax, before you start working with CodeIgniter.
Functionality that might have taken you large chunks of PHP to get happening can be whittled down to, in some cases, one line of code with CodeIgniter. This might apply to anything from outputting text in a browser to form field validation, adding a Captcha facility or setting up cookies.
To illustrate how simple it is to use CodeIgniter for a project, we’re going to build a very basic website that outputs hard-coded content to a browser. This is ground-level developer stuff—but the aim is to show just how quickly and effectively CodeIgniter can work, as well as provide you with a background to the framework itself.
Once you’ve nailed the basics, you’ll move quickly into using CodeIgniter to build blogs, content management systems, forums, or any highly interactive, hands-on web application you can think of.
Before we get started, however, it’s worth taking a split-second course in MVC architecture—the programming structure CodeIgniter is built around.
Tiers Come Easy
The Model/View/Controller approach to programming aims to keep the business logic of an application separate from the display logic, splitting the presentation aspect of an application (what the user sees in their browser) and the nuts and bolts that drive that application into three interconnected tiers:
- The Model, which represents data structures. Classes contained within the Model tier will contain methods that interact with a database.
- The View, which looks after presentation. A View will normally be a web page, but can also be a page fragment like a header or footer.
- The Controller, which does most of the hard work, and is an intermediary between the Model, the View, and any other resources needed to run your application.
Separating a project in this manner means each tier does its job extremely efficiently, maintaining its relationship with other tiers yet operating within clearly defined boundaries. It also means multiple Views and Controllers can interface with the same Model, and new or different Views and Controllers can interface with a Model without forcing a change in the Model design.
You’ll find plenty of information out there on the web to help you grasp what MVC is about and why it’s worth building your applications around the MVC axiom. Once you start familiarizing yourself with CodeIgniter, MVC will become far less abstract.
It’s a Set Up
Step one is to download and install CodeIgniter. You might want to squirrel this original copy away in a templates folder. Each time you start a new project, you can copy the necessary folders from this template, customizing them as you go along. For example, you’re not going to need to copy the user guide folder or license file every time you start a new project.
What you will need is the index.php file, and the two main folders: system and application. It’s the application folder you’ll be working out of most of the time, but it’s worth taking a peek through the subfolders in the system folder.
It’s in here that the mechanics behind CodeIgniter’s functionality are contained—the libraries, helpers, plug-ins and classes that you’ll be drawing on as you build your application.
Don’t be afraid to study the code —everything is explicitly commented, with explanations laid out neatly and in that dialect so alien to many programmers: plain English.
Clean Up Your URIs
One of the advantages of CodeIgniter is the ability to orientate yourself via the URI line. It’s in here you’ll be typing the names of your controllers, which in turn will launch corresponding view files responsible for output in the browser.
By default, index.php will be included in your URI, such as:
ci.com/index.php/page/my_outputwhere page.php is the name of your controller, with a class containing a method called my_output().
You can easily remove the index.php chunk, and streamline that URI line, by using an .htaccess file with your own custom-built regulations. On this page, you’ll see a dead easy example to include in your project which will tidy up your URI line and allow you to simply access controllers without the need for any mucky index.php nonsense. You can find an in-depth tutorial about .htaccess files here.
We’re Home
Once you have your project blueprint set up, and you’ve included a handy .htaccess file to smarten up that URI line, type the project folder’s location into your browser and see what happens. For the purpose of this tutorial I’m using Xampp as a local testing server. My CodeIgniter project, which I’ve called ci_tute, is in my htdocs folder, so if I type localhost/ci_tute into Firefox’s URI line I get CodeIgniter’s custom welcome screen.
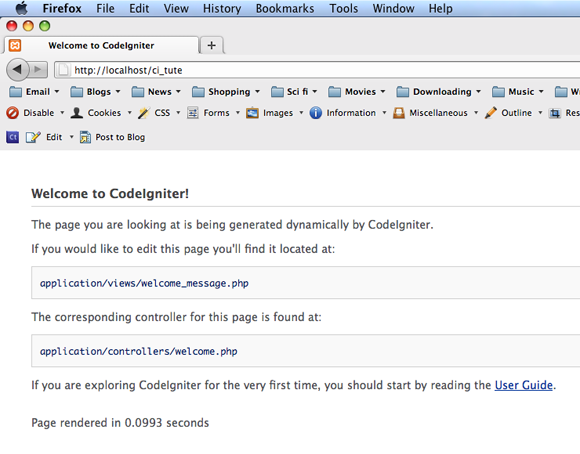
The HTML for this screen is contained in the views subfolder (within the application folder—the main folder you’ll be working out of), in a file called welcome_message.php. This makes perfect MVC sense—what we see in the browser comes from our View tier of programming logic. But the real graft behind the browser presentation is taken care of by a controller (in the controllers subfolder, natch) called welcome.php.
Open this controller up.
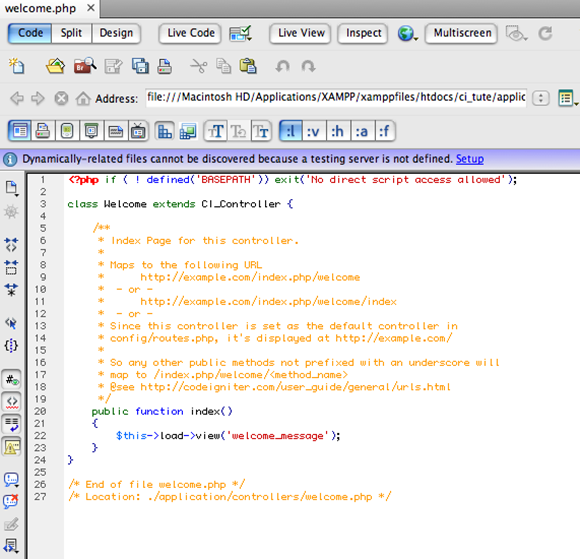
Inside, you’ll see a class with two simple methods:—your garden-variety constructor, and an index method. The index method is the crucial one here. It will get called by default when the welcome controller is called upon—and this occurs when you type the controller name in the URI line.
So why didn’t we need to type localhost/ci_tute/welcome into the URI line? Because the welcome controller is set as the default. You can change this with a few keystrokes but you must understand that a controller is accessed in the URI field of your browser, and that the controller’s index() function is responsible for the default output.
Type localhost/ci_tute/welcome—you should see the same welcome screen. In a CodeIgniter project, you’ll be creating all kinds of controllers linked to their own specific view files, which when typed into the URI line will call up the presentations those views are responsible for.
It’s important you know where among the folder hierarchy this default controller is set. Open up your config subfolder (as always, in application) and take a look at routes.php.

This config folder is where you’ll head to customize the structure of your project, whether it’s creating automatic settings for loading libraries or inputting the access values of the database you’re using. The routes.php file is as simple as they come. You’ll see an array named $routes with a key of default controller, the value of which is welcome. You can change this value from welcome to any controller you create.
Establishing Control
In your application folder, the three subfolders you’ll be getting to know best are your controllers, models and views—there’s that MVC beast we talked about earlier. When you create your application according to the MVC architecture, you’ll be saving the various files associated with each of the three tiers within its corresponding folder.
The other folder you’ll rapidly become friends with is the config folder—and for anyone out there who’s had a configuration-related nightmare, rest easy: CodeIgniter makes configuring your project to whatever specifications you require a doddle. Changing your home page URI, your site’s character set or even the date format you’d like to use is often just a case of typing a single word into a preconfigured array.
Let’s create a controller—the file that will be talking to the view (which will output content to the browser). In your controllers folder, create a new file and simply call it site.php.
Within your controllers you’ll be creating classes, just as you would with everyday object-oriented PHP. And the vital thing you need to know about controllers is the class they contain must have the same name as the controller’s filename. In our case the controller file is site.php, so our class will therefore be called Site (capitalized, following the general naming convention of classes in PHP).
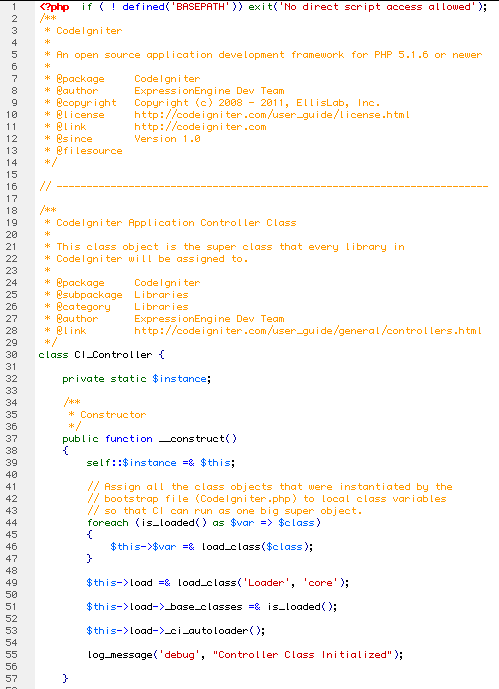
The second thing you should know about your controller is that you’ll need to extend its class to its parent class, which is CI_Controller. This parent class, contained within the core subfolder in your system folder, is a kind of “super class” that all the useful libraries you’ll be calling on in CodeIgniter will be assigned to.
If you become confused, head to the system folder, open up the core subfolder and check out the file Controller.php. You’ll see the CI_Controller super class in there, and the commenting will help walk you through it.
Once you’ve created your Site class, stick an index() function inside it. Remember, this is the method that will automatically be instantiated when you call on your site controller.
Your controller class syntax should look like this:
<?php
class Site extends CI_Controller {
    function index()
    {
    }
}
You can always refer to your already-written welcome controller and use that code as a guide.
Our next move is to set up a view file, containing some content, for our site controller to talk to. But first, let’s test to see if our controller is working nicely by echoing something out onto the screen.
You would never normally do this: presentation directly from a controller is utter heresy in the church of MVC. Still, it’s a good idea to put an echo command into your index() method, see that it works, then comment it out and keep it there as a handy debugging tool. You can always delete it once your project is complete.
<?php
class Site extends CI_Controller {
    function index()
    {
        echo 'Ground controller to Major Tom';
    }
}
Type the site controller into your URI line (in my case, localhost/ci_tute/site). There’s your controller, brazenly bypassing MVC standards by outputting our echo statement, but happy to show you it’s ready to roll.
You could go ahead and write a similar method straight after index(); call it echo_stuff() if you like, and echo out some more content:
    function echo_stuff()
    {
      echo 'Have some more content';
    }
Now if I type localhost/ci_tute/site/echo_stuff into the browser, I see the new content. The hierarchy of controller classes and methods is easily discerned from the URI line.
Moving Home
At the risk of getting slightly sidetracked, now might be a good time to open up routes.php again and change your default controller. How do you do it? Scrap welcome as the value in $routes['default controller'] and insert site. Done. Now you don’t have to type site into your URI line; it’s your default home screen and whatever is in your index() method in the Site class will automatically launch.
Enjoy the View
Let’s create our view file and hook it up to our controller. Remember, our view will contain presentation output, and in this case it’s going to be plain old HTML, so create a new file in the views folder and call it site_view.php.
This naming convention—adding _view after the controller name—is not written in stone. Plenty of web developers simply call their view files the same as their controllers—for example, site.php. There’s no clash of names as they’re contained in separate folders. I like to know at a glance what’s a view, what’s a controller, and what’s a model—which is why, if I was to create a model for our site.php file, I’d name it site_model.php. You can choose whatever convention suits you best.
Here’s what my site_view.php file looks like inside:
<!DOCTYPE HTML>
<html>
<head>
<meta http-equiv="Content-Type" content="text/html; charset="UTF-8">
<title>The Web's Most Basic Site</title>
</head>
<body>
<section id="container">
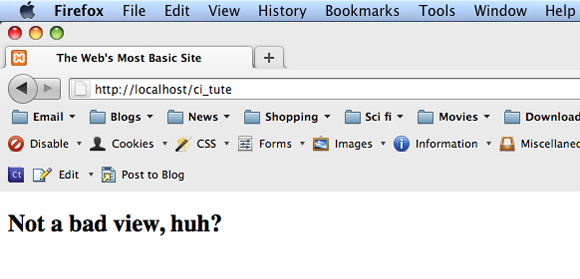
<h1>Not a bad view, huh?</h1>
</section>
</body>
</html>Now we can launch this stunning webpage from our controller. And here’s where the simplicity of CodeIgniter syntax really will make you a happy coder.
Firstly, comment out that echo statement from before and keep it there as a debugging tool for later. Add this line of code into your index() method:
function index()
    {
      // echo 'Ground controller to Major Tom';

    $this->load->view('site_view.php');

    }
Highly readable and concise, isn’t it? Go to your index page now in your browser (localhost/ci_tute/site)—you’ll see the new content generated by site_view.php.
All we’re doing is telling CodeIgniter to load the value of our view file, and with some pretty straight-up syntax. While what we’ve achieved is hardly complex, this is only touching to the tip of the CodeIgniter iceberg. Try creating an array of values to experiment a little further, say:
function index()
    {
      // echo 'Ground controller to Major Tom';

      $arr['value1'] = “First subhead”;
      $arr['value2'] = “Second subhead”;
      $arr['value3'] = “Third subhead”;

      $this->load->view('site_view.php', $arr);

    }
What we’ve done here is create our array of keys and values called $arr, then passed it into our load statement as a second parameter. Not much will happen at this point—we’ve merely informed our view file that it has a second parameter called $arr to do something with. But if you go to your site_view.php file and actually do something with the array, like:
<section id="container">
    <h1>Not a bad view, huh?</h1>
    <h2><?php echo $value1; ?></h2>
</section>
You’ll get a nice little subhead echoed out. You can do the same for the other two values in the array.
We’re only brushing the surface of CodeIgniter’s capabilities, and we haven’t even seen how it can operate with dynamic content. The real beauty of this framework could be illustrated much more clearly with a database, where we could extract content from a table with a simple query statement and pass it to our view. We’d do this with the aid of a model class—something we haven’t broached, but which is incredibly similar in nature to our controller. And our query statement might look something like this:
$this->db->get('tablename');All we’re doing is accessing the database (db) table ('tablename') with a get function—one line which replaces all that wading about with messy SQL syntax. And we haven’t even started on using CodeIgniter to validate forms, or send emails, or buddy up with jQuery.
Hopefully this taster might whet your appetite. If, like me, your first experience with CodeIgniter made you sit up and realize this was the way you wanted all your web applications built, you’ll be pleased to know it will take little time to get started down that road.
You have all the tools you’ll need on the CodeIgniter site, not to mention some cheerful help from the forums, and there is a mountain of tutorials on the web that’ll help you become adept at it.