How to Use Laravel Mix in Non-Laravel Projects

This article was peer reviewed by Younes Rafie, Wern Ancheta, and Christopher Pitt. Thanks to all of SitePoint’s peer reviewers for making SitePoint content the best it can be!
If you, like me, just want to get up and running on a project as quickly as possible, you probably don’t want to spend time configuring build tools like Webpack. Laravel Mix solves this problem, and makes asset compiling incredibly easy, but what if you want to use it on a non-Laravel project? This article shows you how to accomplish that.

What Is Laravel Mix?
Laravel Mix, formerly Elixir, could be defined as an API wrapper for Webpack. It has a fluent syntax and is generally easy to use. Setting up versioning, hot reloading, and asset building/compiling is a breeze, and requires only a single configuration file and a few lines of code.
Backstory
For most of my projects, be it clients or personal, I choose Laravel, but I recently had a client who wanted the ability to edit pages and content on their website, he wanted a CMS. I decided to give OctoberCMS a try, considering that it’s based on Laravel.
I set up File Watchers from PhpStorm, but it didn’t work as well as running Laravel Mix. After a week of using File Watchers, I tried pulling Laravel Mix from a Laravel project, and the result feels exactly like it should.
Requirements
For this tutorial, I assume that you have basic knowledge of managing JSON files and that you have NPM and Node installed on your system.
If you want to use versioning and hot reload, you’re required to use PHP, and Composer.
To verify that you have NPM and Node, you can run the following in your terminal:
node -v
npm -v
You should see versions for both Node and NPM.
Note: You can also use Homestead Improved which comes with all of this installed. If that’s confusing to you, clear things up with our book!
Getting Started
Start by launching your favorite terminal/console application.
If you don’t already have a project and want to start off on an empty one, simply create an empty directory somewhere on your computer, and use it as your project directory. You don’t need any initial files to get started.
Install Laravel Mix and SASS
You’ll now be installing Laravel Mix, but you also need another dependency called “cross-env”, to be able to use environment variables across different platforms. Also, you’ll need “node-sass” to compile SASS files.
To install Laravel Mix, SASS and cross-env, run the following command:
npm install laravel-mix cross-env node-sass --save-dev
If everything works correctly, you will have a new directory named node_modules, and your package.json file will have been updated as well.
Remember to add node_modules to your .gitignore file, if you’re going to version control your work.
Creating a Webpack Mix File
With Laravel Mix, you won’t have to worry about creating a Webpack config file, which is my main reason for using it in almost all web projects. You’ll only have to create a file that defines which assets you want compiled.
Start by creating a new file named webpack.mix.js in your project’s root. Add the following content to it:
const mix = require('laravel-mix');

mix.js('resources/js/app.js', 'public/js')
   .sass('resources/sass/app.scss', 'public/css');
This defines a Javascript file and a SCSS/SASS file that you want to compile using Webpack, and the output directories. You can set the files and output names as you desire. I’ll call the mix.js(..).sass(..) code a “mix chain” for the purpose of this tutorial.
Add Scripts to package.json
To actually use Mix, you’ll have to include some scripts in your package.json file. For the purpose of keeping it as similar to Laravel as possible, I decided to copy them directly from a new Laravel 5.4 project.
If you already have a scripts variable in your file, you can remove its contents.
Open up your package.json file in your code editor, and add the scripts and config variables, with this content:
  "scripts": {
    "dev": "node node_modules/cross-env/dist/bin/cross-env.js NODE_ENV=development node_modules/webpack/bin/webpack.js --progress --hide-modules --config=node_modules/laravel-mix/setup/webpack.config.js",
    "watch": "node node_modules/cross-env/dist/bin/cross-env.js NODE_ENV=development node_modules/webpack/bin/webpack.js --watch --progress --hide-modules --config=node_modules/laravel-mix/setup/webpack.config.js",
    "hot": "node node_modules/cross-env/dist/bin/cross-env.js NODE_ENV=development node_modules/webpack-dev-server/bin/webpack-dev-server.js --inline --hot --config=node_modules/laravel-mix/setup/webpack.config.js",
    "production": "node node_modules/cross-env/dist/bin/cross-env.js NODE_ENV=production node_modules/webpack/bin/webpack.js --progress --hide-modules --config=node_modules/laravel-mix/setup/webpack.config.js"
  },
Your file should look similar to this.
Creating Assets to Be Compiled
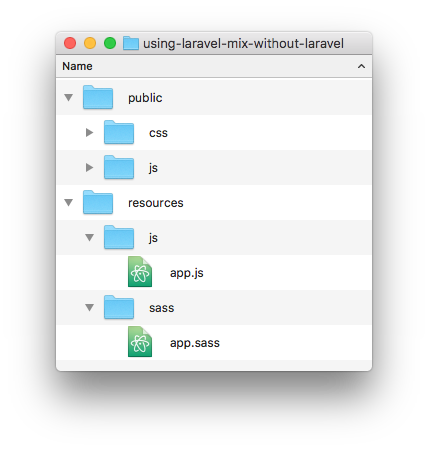
In your webpack.mix.js file, we defined some files to compile, but chances are that these files don’t exist if it’s a new project. You want your folder structure to look similar to this:
You can add some content to your resources/sass/app.sass file for testing:
body {
    background: red;
}
Run Laravel Mix
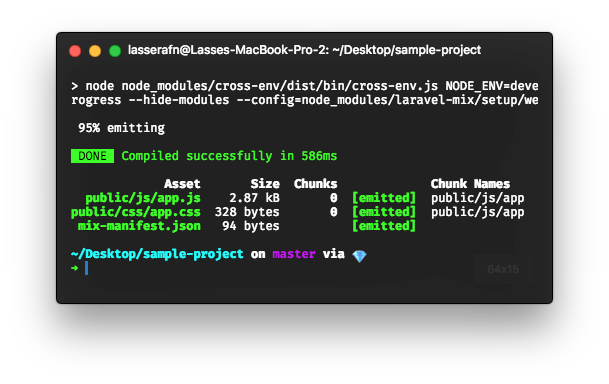
To test if everything works as expected, run the following command:
npm run dev
You should see a screen similar to this:
Set up Cache Busting and Hot Reload
Hot reloading allows you to tweak your assets and have changes instantly appear in your browser, without actually refreshing. This is particularly useful for CSS adjustments. It automatically injects the latest version of your files on each change.
Laravel Mix uses BrowserSync for this, which also comes with a lot of neat features such as the ability to view the content on other devices and synchronize state (input, scroll and more) between devices.
Cache busting is a way to avoid browser cache by adding hashes to compiled assets, so app.js might turn into app.b2328beb0372c051d06d.js. This forces the browser to fetch the file from the server.
To set up cache busting and hot reloading, we will have to include a php file that provides the same mix() method (which you might know from Laravel).
The mix() method is a basic helper which finds the correct version of your assets, and figures out if hot reloading is enabled.
Create a file named mix.php in your project root (or where ever you’d prefer it to be) with the following content:
<?php
 if (! function_exists('mix')) {
    /**
     * Get the path to a versioned Mix file.
     *
     * @param string $path
     * @param string $manifestDirectory
     * @return string
     *
     * @throws \Exception
     */
    function mix($path, $manifestDirectory = '')
    {
        static $manifest;
        $publicFolder = '/public';
        $rootPath = $_SERVER['DOCUMENT_ROOT'];
        $publicPath = $rootPath . $publicFolder;
        if ($manifestDirectory && ! starts_with($manifestDirectory, '/')) {
            $manifestDirectory = "/{$manifestDirectory}";
        }
        if (! $manifest) {
            if (! file_exists($manifestPath = ($rootPath . $manifestDirectory.'/mix-manifest.json') )) {
                throw new Exception('The Mix manifest does not exist.');
            }
            $manifest = json_decode(file_get_contents($manifestPath), true);
        }
        if (! starts_with($path, '/')) {
            $path = "/{$path}";
        }
        $path = $publicFolder . $path;
        if (! array_key_exists($path, $manifest)) {
            throw new Exception(
                "Unable to locate Mix file: {$path}. Please check your ".
                'webpack.mix.js output paths and try again.'
            );
        }
        return file_exists($publicPath . ($manifestDirectory.'/hot'))
                    ? "http://localhost:8080{$manifest[$path]}"
                    : $manifestDirectory.$manifest[$path];
    }
}
Let’s Autoload It with Composer.
Open up your composer.json file, or create a new one in your project’s root.
We want to automatically load mix.php before all PHP requests. Add the following:
{
    ...

    "autoload": {
        "files": ["mix.php"]
    }

    ...
}
Your file should be similar to this one.
Set up an Index File for Testing Your Assets
- To actually test if the versioning works, we’ll have to version our assets (and optionally enable hot reloading), so head over to your
webpack.mix.jsfile and change it to:
const mix = require('laravel-mix');

mix.js('resources/js/app.js', 'public/js')
   .sass('resources/sass/app.scss', 'public/css')
   .version()
   .browserSync(); // Hot reloading
You want it to look something like this.
- Now, create an
index.phpfile for the purpose of testing the assets, and add some demo content:
<?php
  require_once 'vendor/autoload.php';
?>
<!DOCTYPE html>
<html>
  <head>
    <title>Demo</title>
    <link rel="stylesheet" href="<?php echo mix('css/app.css'); ?>" />
  </head>

  <body>
    Hello world.

    <script src="<?php echo mix('js/app.js'); ?>"></script>
  </body>
</html>
- Go to your project root directory in the terminal / command line.
If You Want Hot Reloading
Run npm run hot in your terminal to generate versioned assets and initialize hot reloading. A webpage should now open, showing your site. If you chose this step, you can skip the next sub-section.
If You Don’t Want Hot Reloading
Run the following command:
npm run dev
Now run the following command:
php -S localhost:8080
This starts a PHP server.
Open your browser and navigate to the site’s URL with the port 8080, e.g. homestead.app:8080
Result
You should see a red background (if you decided to keep the body styling in your app.scss file)
That’s it! You now have a very flexible Webpack configuration using Laravel Mix, without Laravel itself. Be sure to check out the Laravel Mix documentation.
Additional commands
In your package.json file, there are actually two more scripts/commands: production and watch. Both could prove to be very useful for your workflow.
The production command
When you’re ready to deploy your project to production, you’ll want to generate minified assets, which is exactly what the production command does. You run it like this:
npm run production
Minified production assets should now have been generated.
The watch command
Running dev for each minor change to your scripts or styling would quickly become a pain. watch helps with this. What this command does is monitor your files for changes and compile the assets again if changes are detected.
npm run watch
Please note that it can be harder to diagnose build errors (especially JS syntax errors) with the watch command running. If you run into problems, run the dev command for clearer output.
Conclusion
If you’re not interested in following the process and simply want to get started right away, you can go to the Github repository, and look at the example project.
To me, this is the optimal way to use Laravel Mix on smaller projects where I’m not using Laravel. After getting used to this flow, setting it up takes only a few minutes, whereas configuring Webpack takes far longer.
Do you agree/disagree? Do you use pure webpack, or another bundler/builder in your PHP projects? Let us know in the comments!