Hello, Laravel? Communicating with PHP through Phone Calls!

Twilio is a SaaS application which enables developers to build telephone applications using web technologies. In this two-part series, we will leverage Twilio to build a weather forecast app that is accessed using the telephone system. The backend will be written with the Laravel framework (an exploratory video course is available for purchase here.
In this part, we will create a simple program that will allow a user to call a phone number that we buy from Twilio, enter a zipcode, and receive the current weather forecast. The user can also get the weather for any day of the week via the voice menu prompts. In the second part of this series, we will leverage what was built in this article to allow the user to interact with the app via SMS (text message).
Prerequisites
Development Environment
This article assumes Homestead Improved is installed. It is not necessary to use it, but the commands might differ slightly if you use a different environment. If you are not familiar with Homestead and want to produce similar results as this article aims to produce, please visit this SitePoint article that shows how to set up Homestead, and if you need a crash course in Vagrant, please see this post. Additionally, if this whets your appetite and you feel like exploring PHP development environments in depth, we have a book about that available for purchase.
Dependencies
We will create a new Laravel project and then add the Twilio PHP SDK and Guzzle HTTP client library to the project:
cd ~/Code
composer create-project --prefer-dist laravel/laravel Laravel 5.4.*
cd Laravel
composer require "twilio/sdk:^5.7"
composer require "guzzlehttp/guzzle:~6.0"
Development
Let’s go through all the steps, one by one.
Routes
Open up the routes/web.php file and add the following ones:
Route::group(['prefix' => 'voice', 'middleware' => 'twilio'], function () {
    Route::post('enterZipcode', 'VoiceController@showEnterZipcode')->name('enter-zip');

    Route::post('zipcodeWeather', 'VoiceController@showZipcodeWeather')->name('zip-weather');

    Route::post('dayWeather', 'VoiceController@showDayWeather')->name('day-weather');

    Route::post('credits', 'VoiceController@showCredits')->name('credits');
});
In this app, all requests will be under the /voice path. When Twilio first connects to the app, it will go to /voice/enterZipcode via HTTP POST. Depending on what happens in the telephone call, Twilio will make requests to other endpoints. This includes /voice/zipcodeWeather for providing today’s forecast, /voice/dayWeather, for providing a particular day’s forecast, and /voice/credits for providing information on where the data came from.
Service Layer
We are going to add a service class. This class will hold a lot of the business logic that will be shared between the voice telephone app and the SMS app.
Create a new sub-folder called Services inside the app folder. Then, create a file called WeatherService.php and put the following content into it:
<?php

namespace App\Services;

use Illuminate\Support\Facades\Cache;
use Twilio\Twiml;

class WeatherService
{
}
This is a large file in the project, so we will build it piece by piece. Put the following pieces of code in this section inside our new service class:
    public $daysOfWeek = [
        'Today',
        'Sunday',
        'Monday',
        'Tuesday',
        'Wednesday',
        'Thursday',
        'Friday',
        'Saturday'
    ];
We will use this array to map a day of the week to a number; Sunday = 1, Monday = 2, etc.
    public function getWeather($zip, $dayName)
    {

        $point = $this->getPoint($zip);
        $tz = $this->getTimeZone($point);
        $forecast = $this->retrieveNwsData($zip);
        $ts = $this->getTimestamp($dayName, $zip);

        $tzObj = new \DateTimeZone($tz->timezoneId);

        $tsObj = new \DateTime(null, $tzObj);
        $tsObj->setTimestamp($ts);

        foreach ($forecast->properties->periods as $k => $period) {
            $startTs = strtotime($period->startTime);
            $endTs = strtotime($period->endTime);

            if ($ts > $startTs and $ts < $endTs) {
                $day = $period;
                break;
            }
        }

        $response = new Twiml();

        $weather = $day->name;
        $weather .= ' the ' . $tsObj->format('jS') . ': ';
        $weather .= $day->detailedForecast;

        $gather = $response->gather(
            [
                'numDigits' => 1,
                'action' => route('day-weather', [], false)
            ]
        );

        $menuText = ' ';
        $menuText .= "Press 1 for Sunday, 2 for Monday, 3 for Tuesday, ";
        $menuText .= "4 for Wednesday, 5 for Thursday, 6 for Friday, ";
        $menuText .= "7 for Saturday. Press 8 for the credits. ";
        $menuText .= "Press 9 to enter in a new zipcode. ";
        $menuText .= "Press 0 to hang up.";

        $gather->say($weather . $menuText);

        return $response;
    }
The getWeather method takes a zipcode with the day of the week and crafts the text of a weather forecast. First, it figures out the reference time for the day requested, and then looks up the weather forecast by doing a foreach over the array of forecast data. After that, it returns a Voice TwiML response. Below is a sample of what is returned:
<?xml version="1.0" encoding="UTF-8"?>
<Response>
  <Gather numDigits="1" action="/voice/dayWeather">
    <Say>
      This Afternoon the 31st: Sunny, with a high near 72. South southwest wind around 8 mph. Press 1 for Sunday, 2 for Monday, 3 for Tuesday, 4 for Wednesday, 5 for Thursday, 6 for Friday, 7 for Saturday. Press 8 for the credits. Press 9 to enter in a new zipcode. Press 0 to hang up.
    </Say>
  </Gather>
</Response>
The <Gather> tag tells Twilio to expect input from the user’s keypad. The numDigits attribute says how many digits to expect. The action attribute says what endpoint to contact next.
    protected function retrieveNwsData($zip)
    {
        return Cache::remember('weather:' . $zip, 60, function () use ($zip) {
            $point = $this->getPoint($zip);

            $point = $point->lat . ',' . $point->lng;
            $url = 'https://api.weather.gov/points/' . $point . '/forecast';

            $client = new \GuzzleHttp\Client();

            $response = $client->request('GET', $url, [
                'headers' => [
                    'Accept' => 'application/geo+json',
                ]
            ]);

            return json_decode((string)$response->getBody());
        });
    }
The retrieveNwsData method gets the weather forecast data. First, the method checks to see if a copy of the zipcode’s weather forecast is in cache. If not, then the Guzzle HTTP client is used to make an HTTP GET request to the National Weather Service’s (NWS) API endpoint https://api.weather.gov/points/{point}/forecast. To get the geographic point of the zipcode, a call is made to the getPoint method before doing the request to the weather API. The response from the API endpoint is the weather forecast in GeoJSON format. The forecast is for every day and night for a week (with some exceptions we will discuss later); 14 entries in all. We cache the API response for an hour because making the request is slow, plus we do not want to hit the government servers too frequently and get banned.
    protected function getPoint($zip)
    {
        return Cache::remember('latLng:' . $zip, 1440, function () use ($zip) {
            $client = new \GuzzleHttp\Client();
            $url = 'http://api.geonames.org/postalCodeSearchJSON';

            $response = $client->request('GET', $url, [
                'query' => [
                    'postalcode' => $zip,
                    'countryBias' => 'US',
                    'username' => env('GEONAMES_USERNAME')
                ]
            ]);

            $json = json_decode((string)$response->getBody());

            return $json->postalCodes[0];
        });
    }
The getPoint method maps a zipcode to a geographic point. This is done by using the GeoNames API. The results are cached for a day because using the API is slow.
    protected function getTimeZone($point)
    {
        $key = 'timezone:' . $point->lat . ',' . $point->lng;

        return Cache::remember($key, 1440, function () use ($point) {
            $client = new \GuzzleHttp\Client();
            $url = 'http://api.geonames.org/timezoneJSON';

            $response = $client->request('GET', $url, [
                'query' => [
                    'lat' => $point->lat,
                    'lng' => $point->lng,
                    'username' => env('GEONAMES_USERNAME')
                ]
            ]);

            return json_decode((string) $response->getBody());
        });
    }
The getTimeZone method is used to get the timezone that a geographic point resides inside. The GeoNames API is also used and the results are cached for a day for the same reasons.
    protected function getTimestamp($day, $zip)
    {
        $point = $this->getPoint($zip);
        $tz = $this->getTimeZone($point);

        $tzObj = new \DateTimeZone($tz->timezoneId);

        $now = new \DateTime(null, $tzObj);

        $hourNow = $now->format('G');
        $dayNow = $now->format('l');

        if ($day == $dayNow and $hourNow >= 18) {
            $time = new \DateTime('next ' . $day . ' noon', $tzObj);
            $ts = $time->getTimestamp();
        } elseif (($day == 'Today' or $day == $dayNow) and $hourNow >= 6) {
            $ts = $now->getTimestamp();
        } else {
            $time = new \DateTime($day . ' noon', $tzObj);
            $ts = $time->getTimestamp();
        }

        return $ts;
    }
The getTimestamp method returns a reference time that is used to look up a forecast for a particular date. Most of the time, the forecast data has a day and night forecast, but sometimes it has an overnight (before 6 am), and an afternoon forecast (the afternoon, before 6 pm) for the current day. Because of this, we have to do some calculations to get a good reference timestamp. In most cases, it returns the zipcode’s noon time for the day requested.
    public function getCredits()
    {
        $credits = "Weather data provided by the National Weather Service. ";
        $credits .= "Zipcode data provided by GeoNames.";

        return $credits;
    }
}
The getCredits method just returns some standard text about where the data came from.
Controller
Create the file VoiceController.php in the app/Http/Controllers folder and put the following code into it:
<?php

namespace App\Http\Controllers;

use App\Services\WeatherService;
use Illuminate\Http\Request;
use Twilio\Twiml;

class VoiceController extends Controller
{
    protected $weather;

    public function __construct(WeatherService $weatherService)
    {
        $this->weather = $weatherService;
    }

    public function showEnterZipcode()
    {
        $response = new Twiml();

        $gather = $response->gather(
            [
                'numDigits' => 5,
                'action' => route('zip-weather', [], false)
            ]
        );

        $gather->say('Enter the zipcode for the weather you want');

        return $response;
    }

    public function showZipcodeWeather(Request $request)
    {
        $zip = $request->input('Digits');

        $request->session()->put('zipcode', $zip);

        return $this->weather->getWeather($zip, 'Today');
    }

    public function showDayWeather(Request $request)
    {
        $digit = $request->input('Digits', '0');

        switch ($digit) {
            case '8':
                $response = new Twiml();
                $response->redirect(route('credits', [], false));
                break;
            case '9':
                $response = new Twiml();
                $response->redirect(route('enter-zip', [], false));
                break;
            case '0':
                $response = new Twiml();
                $response->hangup();
                break;
            default:
                $zip = $request->session()->get('zipcode');
                $day = $this->weather->daysOfWeek[$digit];
                $response = $this->weather->getWeather($zip, $day);
                break;
        }

        return $response;
    }

    public function showCredits()
    {
        $response = new Twiml();
        $credits = $this->weather->getCredits();

        $response->say($credits);
        $response->hangup();

        return $response;
    }
}
The showEnterZipcode method is executed when a request is made to the /voice/enterZipcode endpoint. This method returns TwiML that asks the caller to enter a zipcode. The TwiML also says a request to /voice/zipcodeWeather should be made when the caller has entered 5 digits. Here is a sample response:
<?xml version="1.0" encoding="UTF-8"?>
<Response>
  <Gather numDigits="5" action="/voice/zipcodeWeather">
    <Say>
      Enter the zipcode for the weather you want
    </Say>
  </Gather>
</Response>
The showZipcodeWeather method is executed when a request is made to the /voice/zipcodeWeather endpoint. This method returns the text of today’s forecast and a voice menu to navigate the app in TwiML format. Below is what a response looks like:
<?xml version="1.0" encoding="UTF-8"?>
<Response>
  <Gather numDigits="1" action="/voice/dayWeather">
    <Say>
      This Afternoon the 31st: Sunny, with a high near 72. South southwest wind around 8 mph. Press 1 for Sunday, 2 for Monday, 3 for Tuesday, 4 for Wednesday, 5 for Thursday, 6 for Friday, 7 for Saturday. Press 8 for the credits. Press 9 to enter in a new zipcode. Press 0 to hang up.
    </Say>
  </Gather>
</Response>
When the /voice/dayWeather endpoint is requested, the showDayWeather method is executed. This returns the forecast for the day requested and a voice menu to navigate the app in TwiML format. The response for a Monday might look like this:
<?xml version="1.0" encoding="UTF-8"?>
<Response>
  <Gather numDigits="1" action="/voice/dayWeather">
    <Say>
      Monday the 3rd: Sunny, with a high near 70. Press 1 for Sunday, 2 for Monday, 3 for Tuesday, 4 for Wednesday, 5 for Thursday, 6 for Friday, 7 for Saturday. Press 8 for the credits. Press 9 to enter in a new zipcode. Press 0 to hang up.
    </Say>
  </Gather>
</Response>
The last method, showCredits, is executed when the /voice/credits endpoint is requested. The TwiML response has the credits and an instruction to hang up. A response would look like this:
<?xml version="1.0" encoding="UTF-8"?>
<Response>
  <Say>
    Weather data provided by the National Weather Service. Zipcode data provided by GeoNames.
  </Say>
  <Hangup/>
</Response>
Middleware
By default, Twilio makes requests to webhooks using HTTP POST. Because of this, Laravel requires that the POST submission have a CSRF token. In our case, we will not be using the CSRF token, so we must disable the middleware that checks for one. In the app/Http/Kernel.php file, remove or comment the line \App\Http\Middleware\VerifyCsrfToken::class,.
In another section, we will setup ngrok – an application that will allow the internet to connect to our local environment. Because the app does not have CSRF protection any more, anyone on the internet will able to hit our endpoints. To make sure requests are coming from either Twilio, or from the unit tests, we have to create a custom middleware. We will use a middleware suggested in the Twilio docs, but modified to work with our setup.
In the app/Http/Kernel.php file, add the following line to the end of the $routeMiddleware array:
'twilio' => \App\Http\Middleware\TwilioRequestValidator::class,
Create a file called TwilioRequestValidator.php in the app/Http/Middleware folder and paste the following code into it:
<?php

namespace App\Http\Middleware;

use Closure;
use Illuminate\Http\Response;
use Twilio\Security\RequestValidator;

class TwilioRequestValidator
{
    /**
     * Handle an incoming request.
     *
     * @param  \Illuminate\Http\Request  $request
     * @param  \Closure  $next
     * @return mixed
     */
    public function handle($request, Closure $next)
    {
        if (env('APP_ENV') === 'test') {
            return $next($request);
        }

        $host = $request->header('host');
        $originalHost = $request->header('X-Original-Host', $host);

        $fullUrl = $request->fullUrl();

        $fullUrl = str_replace($host, $originalHost, $fullUrl);

        $requestValidator = new RequestValidator(env('TWILIO_APP_TOKEN'));

        $isValid = $requestValidator->validate(
            $request->header('X-Twilio-Signature'),
            $fullUrl,
            $request->toArray()
        );

        if ($isValid) {
            return $next($request);
        } else {
            return new Response('You are not Twilio :(', 403);
        }
    }
}
With each request that Twilio makes, it sends an HMAC computed with the URL and request variables as the data and the Twilio Auth Token as the secret key. This HMAC is sent in the X-Twilio-Signature request header. We can compare the X-Twilio-Signature sent in the request with an HMAC that we generate on the web server. This is done using the validate() method on the $requestValidator object.
Go to the Twilio Console Dashboard at https://www.twilio.com/console. Once there, unhide the AUTH TOKEN and take note of it.
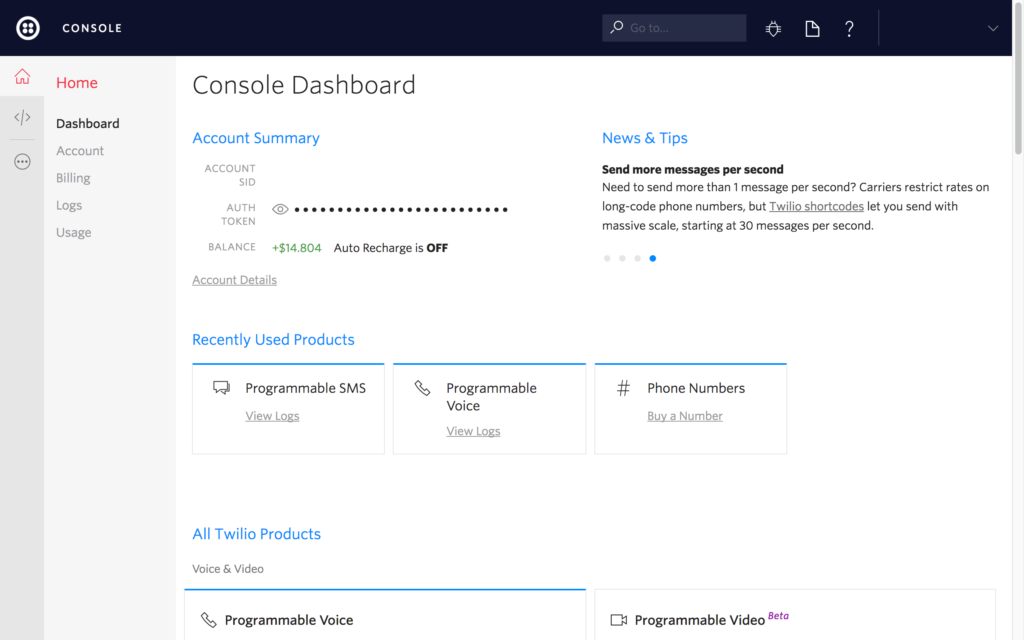
Then, open up the .env file and then append the following code to the end of the file.
TWILIO_APP_TOKEN=YOUR_AUTH_TOKEN_HERE
Don’t forget to replace YOUR_AUTH_TOKEN_HERE with the value you took note of on the dashboard.
Because of how Ngrok works, it changes the host request header from what the original client defined (something like abc123.ngrok.io) to the host which we specified. In this case it will be homestead.app. We need to change the URL to take this into consideration to compute the correct HMAC. The middleware is skipped if it is determined that there are unit tests being run.
GeoNames
To be able to use the GeoNames API to do the zipcode and timezone queries, we must create a free account. After that, we must enable the ability to use the API by visiting the manage account page.
Once registered, open your .env file and add the variable GEONAMES_USERNAME with the value being your GeoNames username.
Ngrok
Twilio requires your app to be accessible from the internet because Twilio calls the webhooks you implement. With the default design of Homestead, the web server is only available to your local machine. To get around this limitation, we use Ngrok. This program allows you to get an FQDN that works on the internet and forwards the traffic for that address to your Homestead instance, using a tunnel.
To use Ngrok, you must first sign up for a free account. After that, download and install Ngrok. Once the app is installed, be sure to install the authtoken as per the Get Started documentation. Next, we will start up the tunnel:
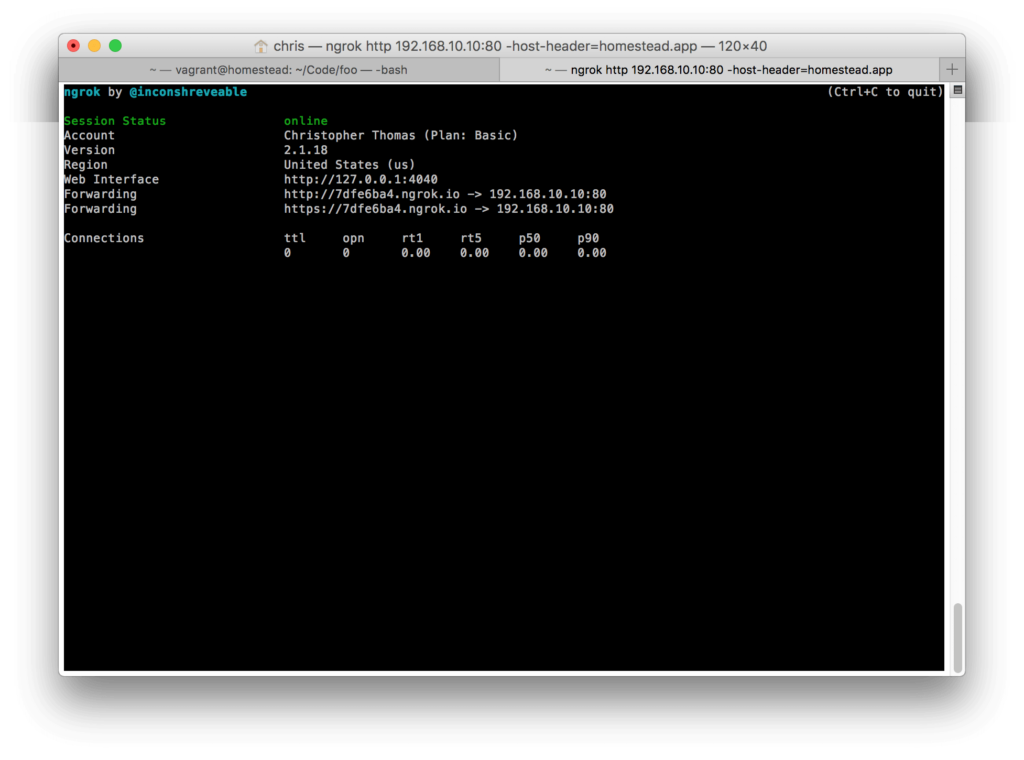
./ngrok http 192.168.10.10:80 -host-header=homestead.app
This tunnel will allow incoming requests from the internet to be received by our local server. Homestead expects the host HTTP header to be homestead.app. The Ngrok command we used will copy the HTTP request’s original host header to the X-Original-Host header and then overwrites host with the value homestead.app.
Please make note of the HTTP URL given by the program as we will need the hostname in it later on when setting up the Twilio phone number to call.
Twilio
Create an account with Twilio and add money to your account. Adding ten dollars is more than enough to implement and test the app. The money is needed to procure a telephone number and to pay for the incoming calls. Go to the Find a Number page and purchase a number that has voice and SMS capability. I picked a toll-free number.

In the search page, click the “Advanced Search” link and make sure the “Voice” and “SMS” capabilities checkboxes are marked. Then click the “Search” button. After the list of results appears, pick a phone number.
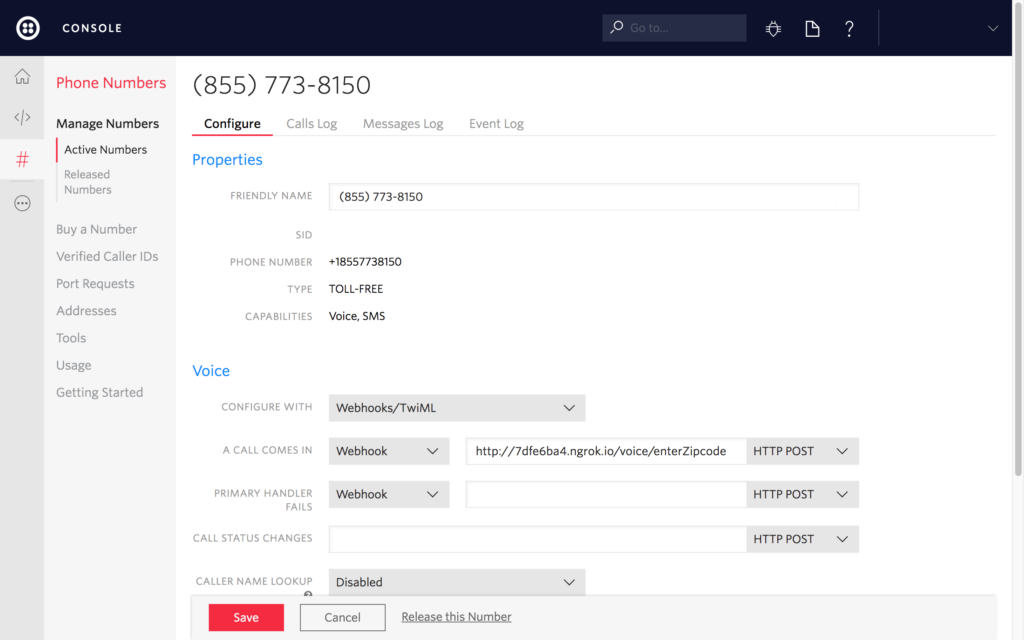
After you have procured your number, go to the settings page for the phone number and replace the voice “a call comes in” webhook, https://demo.twilio.com/welcome/voice/ with a webhook that will go to your app, i.e. http://YOUR_NGROK_HOSTNAME/voice/enterZipcode, and save the change.
Using the App
With your app and the Ngrok program running, call your toll-free number. You should be asked to enter a zipcode. After entering a zipcode, you should get the current forecast and a voice menu to navigate the app.
Production Considerations
One thing not covered in this article but which can be done to improve this app is to make Twilio use HTTPS endpoints instead of HTTP. If you’d like to see how this is done, please request it in the comments below!
Conclusion
In this article, we built a web app that a user could call and interact with using Twilio. This app allowed a user to get the weather forecast for a particular zipcode. Please remember that there might be a date discrepancy between where a user calls from and the zipcode they enter, if the two are in different timezones.
You can find the code for the app in this article series on Github.
In the next part of this two-part series, we will leverage what we built here to make this app work over SMS.