Clean Architecture: Theming with Tailwind and CSS Variables

In this article, we’ll explore the impact of clean architecture principles in theming — including how it influences and impacts web applications. We’ll focus on using CSS variables in Tailwind CSS to make theming easy to maintain.
Theming directly impacts how users perceive and interact with an application — thus making it a crucial aspect of delivering positive and memorable user experiences. Theming doesn’t just help to reinforce brand identity, but also plays a crucial role in forming user perceptions.
Tailwind utilizes CSS variables to enhance theming abilities in web development significantly. It also equips developers with the tools to handle themes. This facilitates flexible and dynamic styling. The combination allows for efficient theme management and adaptable styling options.
By the conclusion of this article, you’ll have gained practical skills in using CSS variables. This is within React and Tailwind CSS to create dynamic theming. Additionally, readers will grasp insights into dual and multi-theming variations.
Understanding Clean Architecture in Theming
When developing applications, foundational principles like SOLID and DRY coding principles prove crucial. These principles not only shape the code structure but also influence themes and UI design integration.
SOLID principles enable developers to ensure that each component has a specific role. This facilitates easier theming and UI design implementations. Similarly, the DRY principle emphasizes reusability, leading to clean architecture in theming.
Understanding how these principles relate to theming involves examining their roles. This includes roles in crafting adaptable applications with well-structured theming strategies. These principles serve as guiding pillars for developers, enabling the creation of robust applications that efficiently address evolving theming requirements.
Leveraging CSS Variables for Theming in Tailwind
CSS variables play a pivotal role in Tailwind. They offer a dynamic approach to managing themes efficiently. Their flexibility allows quick modifications without extensive code changes, thereby enhancing Tailwind’s capacity to handle diverse themes.
Using CSS variables within Tailwind offers inherent advantages. Particularly, it aids in organizing theme values like colors, fonts, and spacing. This centralized approach streamlines theme management, ensuring systematic and organized updates.
The benefits of CSS variables for dynamic theming are diverse, including these:
- swift theme adjustments for dual and multi-theming
- efficient creation and management of multiple themes within projects
- a streamlined theming process for easy customization and adaptation
- facilitation of diverse design requirements without extensive code changes
In an upcoming sample project, we’ll show the convergence of these elements. This demonstration incorporates clean architecture principles and their application to theming applications.
Practical Implementation: Project Setup
We start by creating a React application using Vite, and adding TypeScript. You can choose to use Create React App if you prefer. We install Tailwind CSS for styling and theming.
To begin the project, we’ll set up React Vite, an ultra-fast tool for React applications. If you haven’t already, globally install it using either npm or yarn.
yarn install
yarn global add create-vite
Use React Vite to create a new project with TypeScript support. You can rename variables-theme-app with your preferred project name. You can also select the features you need when prompted by Vite in the command line:
create-vite variables-theme-app .
Afterward, access the project directory using this command:
cd variables-theme-app
You can start the development server now to preview your app:
yarn run dev
Access the local development URL in your browser. Follow Tailwind CSS installation from its official guide.
Building the UI
Let’s now build a sample user landing page. This is where we would be implementing theming with Tailwind CSS and CSS variables.
Tailwind CSS and stylesheet configuration
Firstly, we configure our Tailwind variables on tailwind.config.js. Then we update our index.css stylesheet:
//tailwind.config.js
/** @type {import('tailwindcss').Config} */
export default {
  content: [
    "./src/**/*.{js,jsx,ts,tsx}",
  ],
  theme: {
    extend: {

      //We define our color variable here to be assigned a value on the stylesheet

      colors: {
        accent: {
          1: "var(--accent1)",
        },
        baseOne: "var(--baseOne)",
        baseTwo: "var(--baseTwo)",
        baseThree: "var(--baseThree)",
        baseFour: "var(--baseFour)",
      },
    },
  },
  plugins: [],
}
From the tailwind.config.js colors object, we define custom color variables. Associated with each variable is a specific name and value. For example, accent is a color group with a shade denoted by 1, assigned a value from a CSS variable --accent1.
Other color variables are directly assigned values from respective CSS variables. These are --baseOne, --baseTwo, and so on, for use within the stylesheet.
We define these color variables using CSS custom properties (variables) to enable flexible theming. This also gives access to easy color adjustments throughout the stylesheet. They act as placeholders referring to specific color values. Thus, allowing for consistent color usage across the entire application. They also apply changes to these colors from the central location which is index.css.
These variables are then defined on the index.css stylesheet:
//index.css

@layer base {
  :root {
    --baseOne: hsl(0, 0%, 100%);
    --baseTwo: hsl(252, 2%, 51%);
    --baseThree: hsl(0, 0%, 96%);
    --baseFour: hsl(0, 0%, 100%);
    --accent1: hsl(6, 100%, 80%);
  }

  @media (prefers-color-scheme: dark) {
    :root {
      --baseOne: hsl(229, 57%, 11%);
      --baseTwo: hsl(243, 100%, 93%);
      --baseThree: hsl(228, 56%, 26%);
      --baseFour: hsl(229, 57%, 11%);
      --accent1: hsl(6, 100%, 80%);
    }
  }

  :root[data-theme="dark"] {
    --baseOne: hsl(229, 57%, 11%);
    --baseTwo: hsl(243, 100%, 93%);
    --baseThree: hsl(228, 56%, 26%);
    --baseFour: hsl(229, 57%, 11%);
    --accent1: hsl(6, 100%, 80%);
  }

  :root[data-theme="light"] {
    --baseOne: hsl(0, 0%, 100%);
    --baseTwo: hsl(252, 2%, 51%);
    --baseThree: hsl(0, 0%, 96%);
    --baseFour: hsl(0, 0%, 100%);
    --accent1: hsl(6, 100%, 80%);
  }

  :root[data-theme="third"] {
    --baseOne: hsl(167, 56%, 22%);
    --baseTwo: hsl(140, 69%, 40%);
    --baseThree: hsl(0, 0%, 0%);
    --baseFour: hsl(0, 3%, 13%);
    --accent1: hsl(6, 100%, 80%);
  }
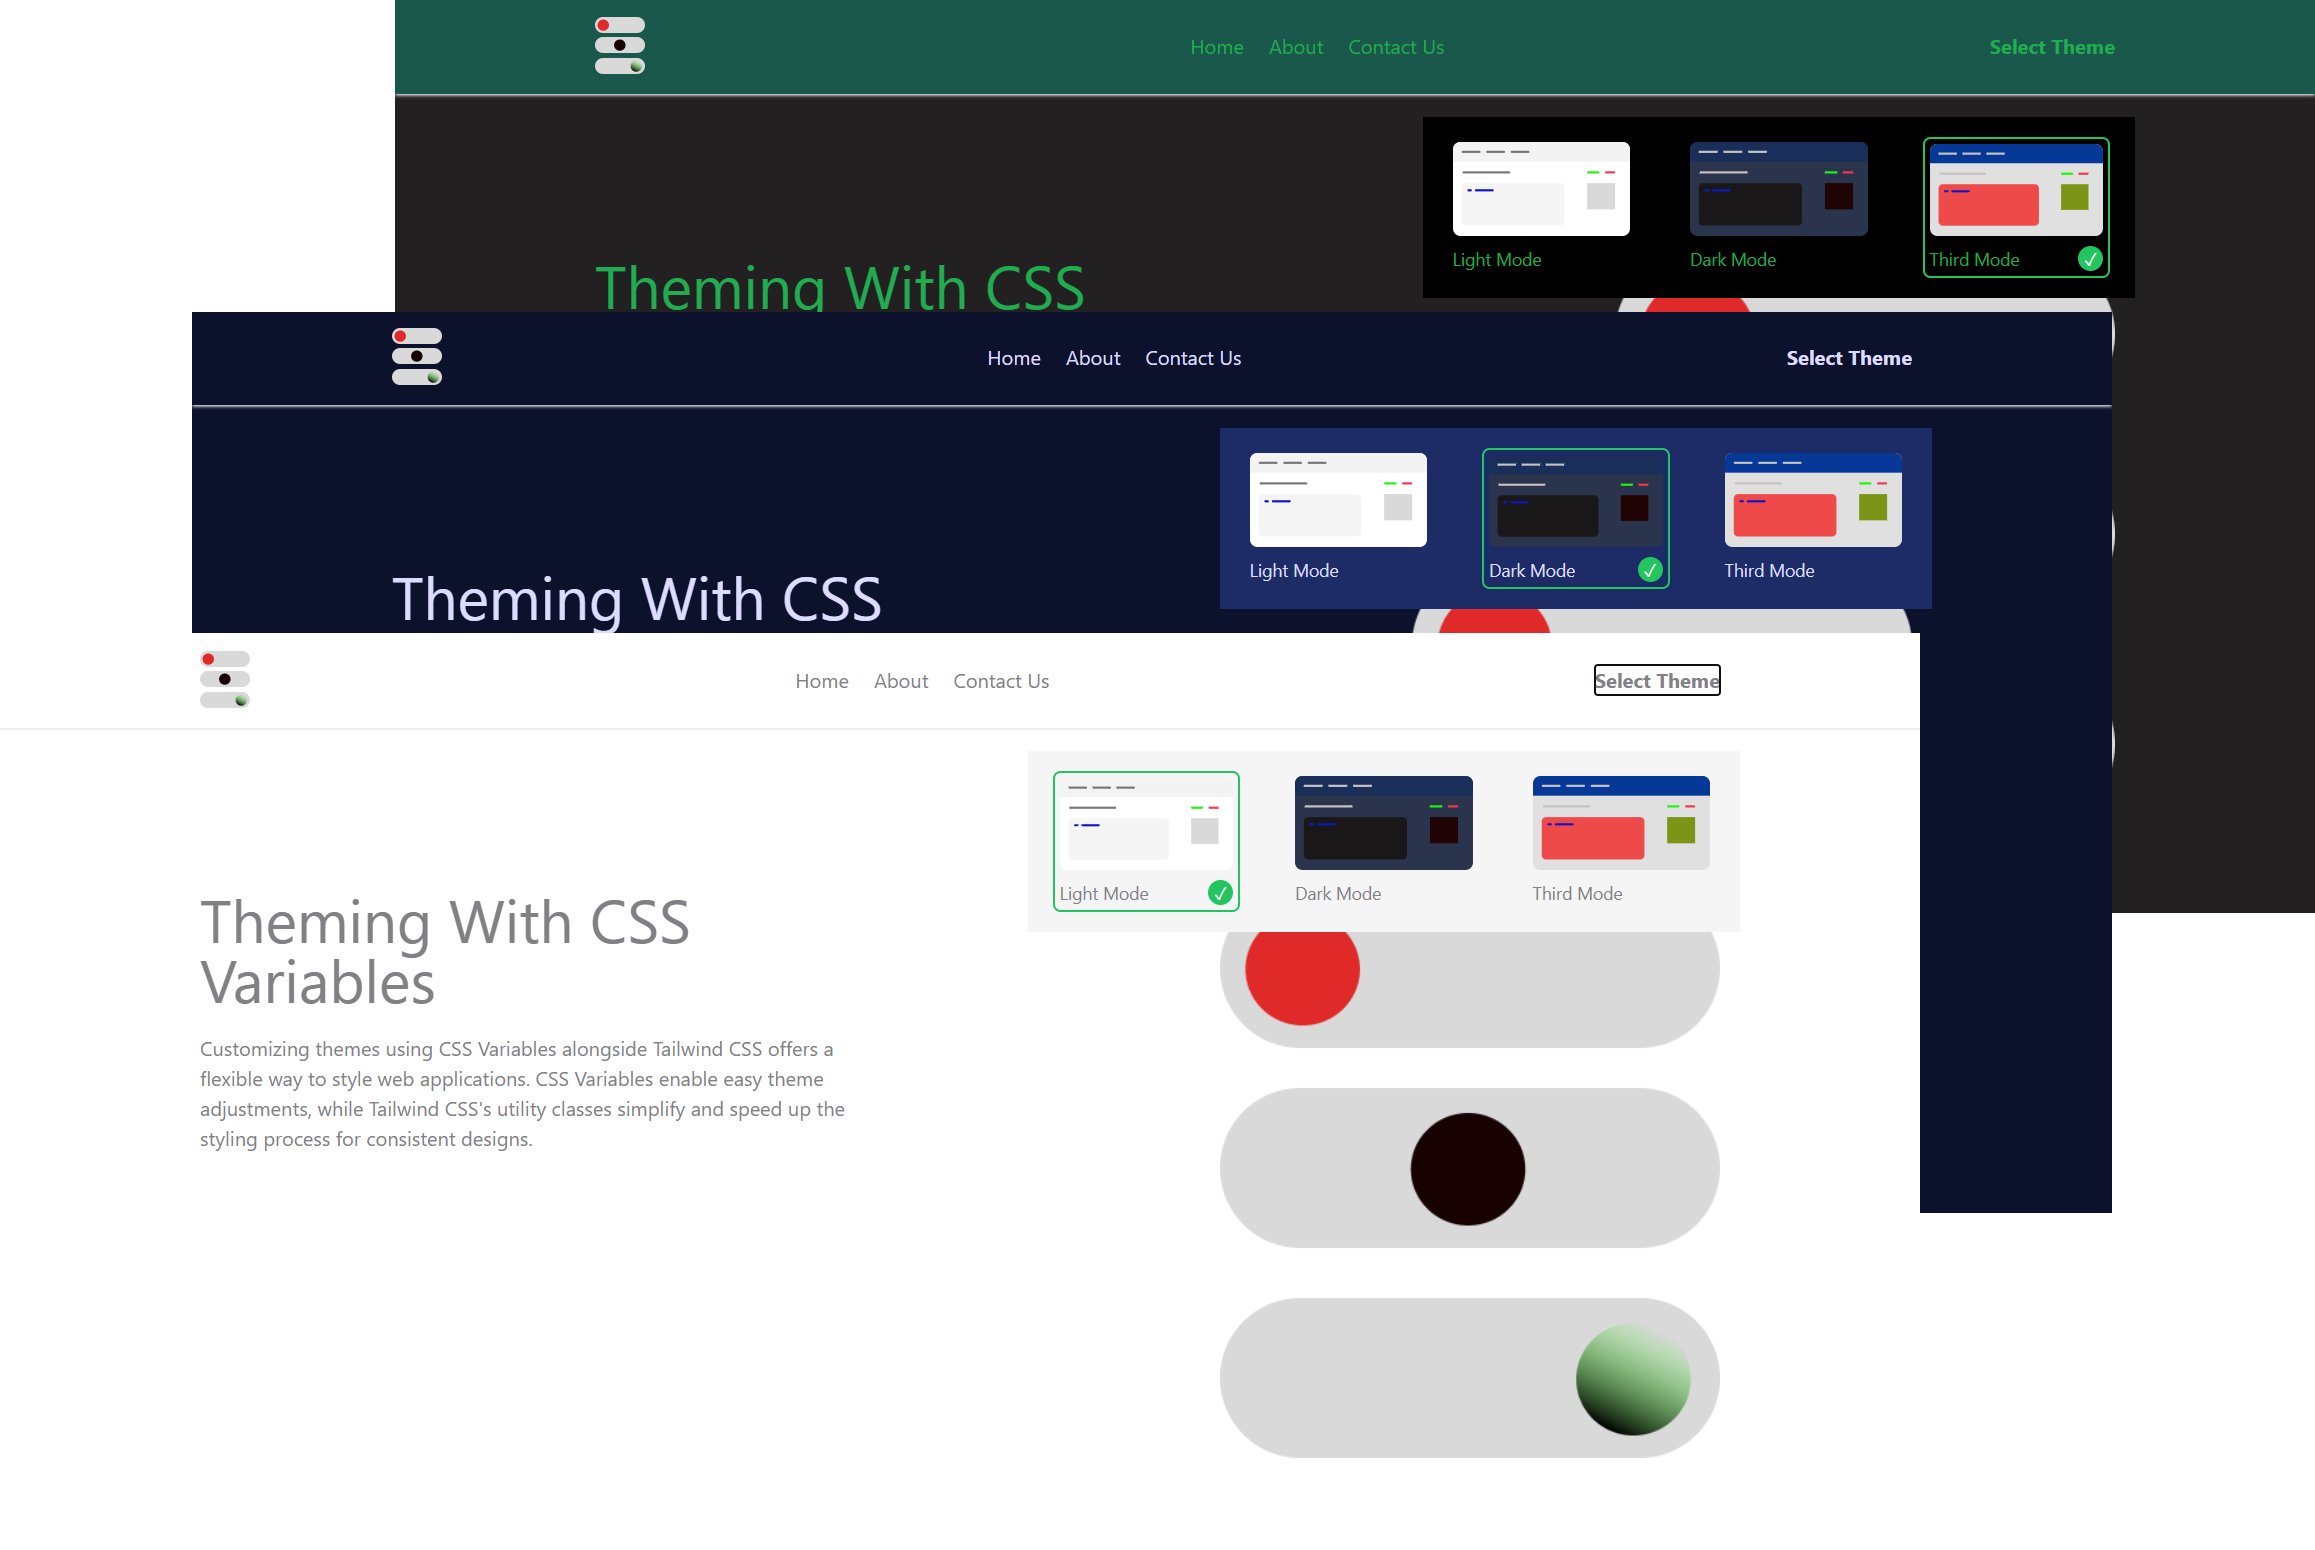
This CSS code defines color variables for different themes: default, dark, light, and third. It uses CSS custom properties (--baseOne, --baseTwo, and so on) to assign specific color values. The themes change based on device color scheme preference or data attribute (data-theme). They are also applied to the document element.
Landing page UI
Next, we create the necessary components needed to make up the landing page UI. These are the Header.tsx and Hero.tsx components:
//Header.tsx
const Header = () => {
    return (
        <header className='flex items-center justify-between py-4 shadow shadow-gray-200 bg-baseOne transition-colors duration-300 lg:px-[160px] sm:px-[40px] px-[16px]'>
            <div>
                <img className="w-[40px]" src={heroIcon} alt="icon" />
            </div>
            <nav className="sm:block hidden">
                <ul className='flex items-center space-x-5'>
                    <li><a href="#">Home</a></li>
                    <li><a href="#">About</a></li>
                    <li><a href="#">Contact Us</a></li>
                </ul>
            </nav>
            <div>
                <button><strong>Select Theme</strong></button>
            </div>
        </header>
    );
};

export default Header;
From Header.tsx above, we create the header section of the landing page. This is populated with dummy links and a trigger to show or hide theme templates.
Next is the Hero.tsx section. We style it with Tailwind and provide a little information on what the article is all about:
//Hero.tsx
import heroIcon from '../assets/png/hero.png'
const Hero = () => {
return (
<section className="lg:px-[160px] sm:px-[40px] px-[16px]">
<div className='flex sm:flex-row flex-col items-start justify-between sm:pt-32 pt-12 sm:text-left text-center'>
<aside className='max-w-[550px]'>
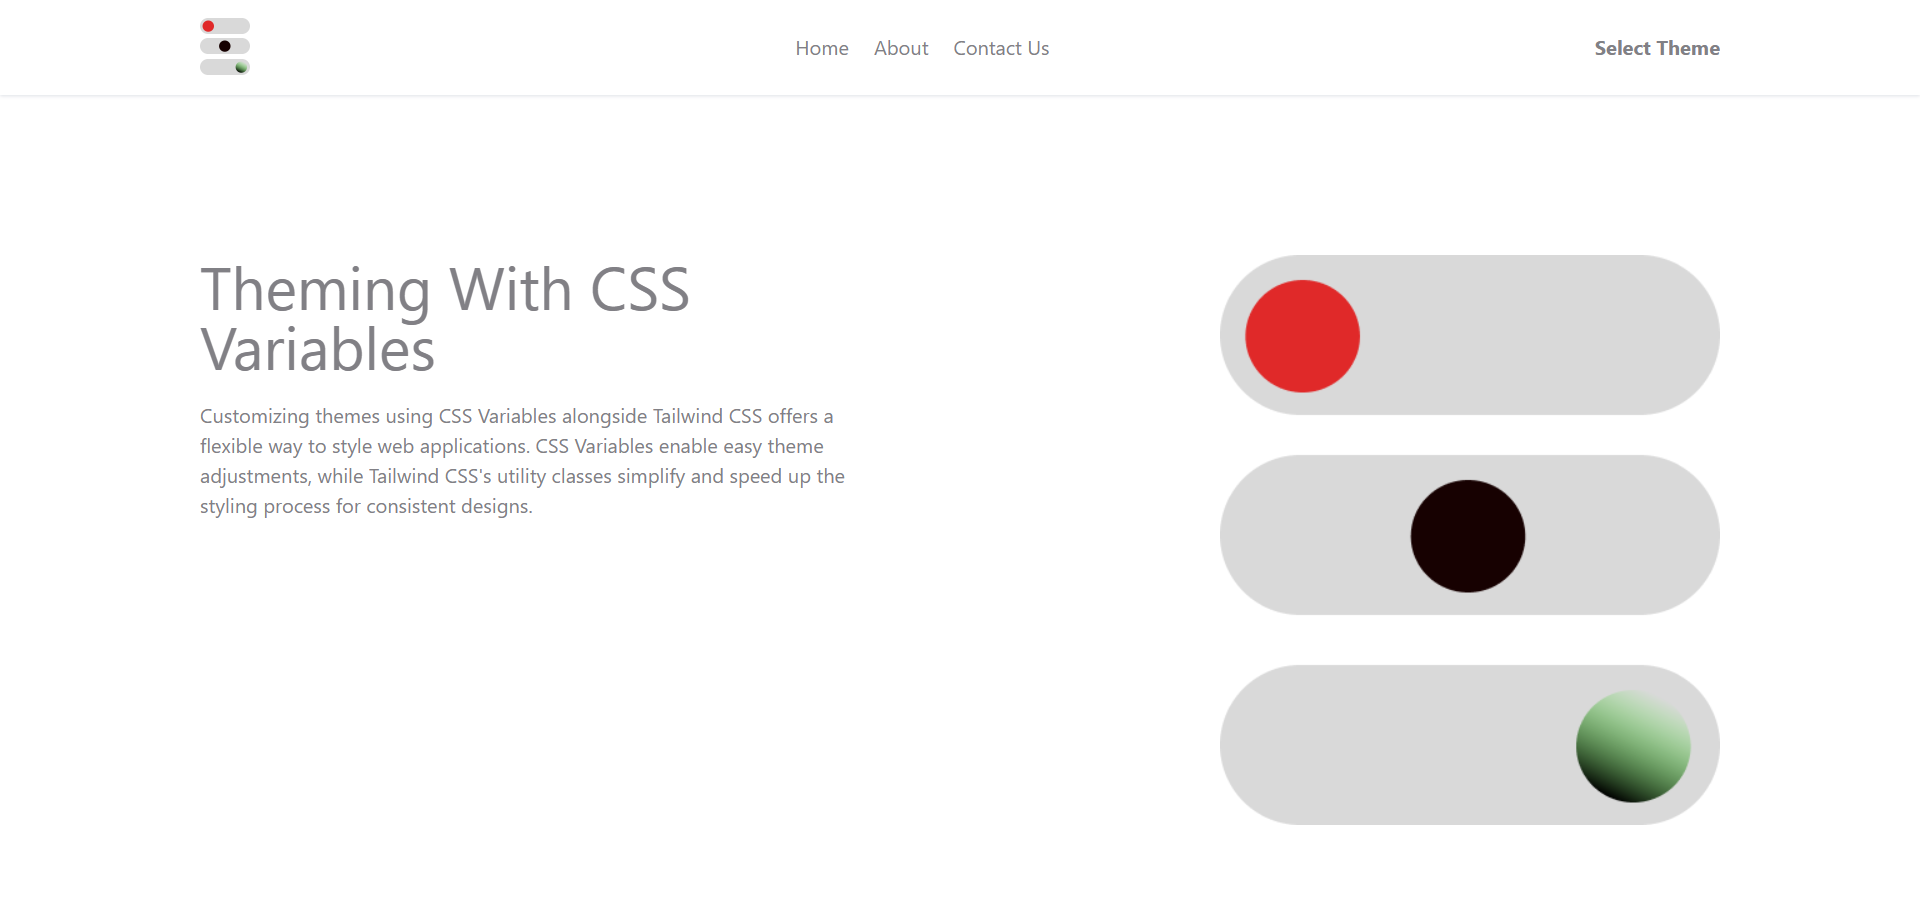
<h2 className='sm:text-5xl text-3xl'>Theming With CSS Variables</h2>
<p className='pt-5'>Customizing themes using CSS Variables alongside Tailwind CSS offers a flexible way to style web applications. CSS Variables enable easy theme adjustments, while Tailwind CSS's utility classes simplify and speed up the styling process for consistent designs.</p>
</aside>
<aside className='sm:w-auto w-full sm:block flex items-center justify-center sm:pt-0 pt-10'>
<img className='min-w-[300px]' src={heroIcon} alt="icon" />
</aside>
</div>
</section>
)
}
export default Hero
Next, we import these components to our base file App.tsx. So, our static landing page stands as a basic layout without any added functions or themes:
import Header from "./components/Header"
import Hero from "./components/Hero"

function App() {
  return (
    <main>
      <Header />
      <Hero />
    </main>
  )
}
export default App
Theme switcher template UI and functions
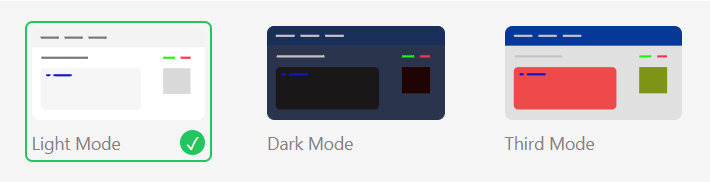
Here, we build theme templates UI and add their respective functions. The goal of this component is to give users access to select themes of choice.
Firstly, we create the ThemeSwitcher.tsx UI component:
//ThemeSwitcher.tsx
import { useState } from 'react';
import light from '../assets/svg/light.svg';
import dark from '../assets/svg/dark.svg';
import third from '../assets/svg/third.svg';
type Theme = {
src: string;
alt: string;
name: string;
};
const themes: Theme[] = [
{ src: light, alt: 'Light', name: 'light' },
{ src: dark, alt: 'Dark', name: 'dark' },
{ src: third, alt: 'Third', name: 'third' },
];
const ThemeSwitcher = () => {
const [selectedTheme, setSelectedTheme] = useState('');
const handleThemeChange = (themeName: string) => {
setSelectedTheme(themeName);
};
return (
<section className='bg-baseThree px-5 py-4 absolute lg:right-36 sm:right-12 right-4 top-24'>
<div className='grid sm:grid-cols-3 grid-cols-1 gap-10'>
{themes.map((theme, index) => (
<div className={`max-w-[150px] p-1 ${selectedTheme === theme.name && 'border-2 border-green-500 rounded-md'}`} key={index}>
<label>
<input
type='radio'
name='theme'
value={theme.name}
checked={selectedTheme === theme.name}
onChange={() => handleThemeChange(theme.name)}
className='hidden'
/>
<img className='rounded-md cursor-pointer' src={theme.src} alt={theme.alt} />
<div className='flex items-center justify-between mt-2'>
<h5 className='capitalize text-sm text-baseTwo'>{theme.name} Mode</h5>
<div className='bg-green-500 rounded-full w-[20px] flex items-center justify-center text-white text-sm'>{selectedTheme === theme.name && <span>✓</span>}</div>
</div>
</label>
</div>
))}
</div>
</section>
);
};
export default ThemeSwitcher;
In the code snippet above, caption ThemeSwitcher.tsx defines a structure called Theme. This structure has three parts: src, alt, and name. This type aims for type safety, specifying the object structure for themes:
src: stringalt: stringname: string
These properties ensure a consistent format for theme objects in the codebase.
After defining this structure for type safety, we have the themes array initialized. This contains objects conforming to this defined Theme type structure. This ensures that each theme object follows the specified format within the application:
src: the location of the image or resource related to that themealt: a description for the image used in the themename: a distinct name for each theme
When we iterate this themes array, we get the following result on the DOM.
Next, we add the theme update functions. This is still within ThemeSwitcher.tsx:
//ThemeSwitcher.tsx
 useEffect(() => {
    const prefersDark = window.matchMedia('(prefers-color-scheme: dark)');
    const prefersLight = window.matchMedia('(prefers-color-scheme: light)');

    const updateTheme = () => {
      const storedTheme = localStorage.getItem('selectedTheme');
      const setTheme = (theme: string) => {
        document.documentElement.setAttribute('data-theme', theme);
        setSelectedTheme(theme);
      };

      if (storedTheme !== null) {
        setTheme(storedTheme);
      } else {
        switch (true) {
          case prefersDark.matches:
            setTheme('dark');
            break;
          case prefersLight.matches:
            setTheme('light');
            break;
          default:
            break;
        }
      }
    };

    updateTheme();

    prefersDark.addEventListener('change', updateTheme);
    prefersLight.addEventListener('change', updateTheme);

    return () => {
      prefersDark.removeEventListener('change', updateTheme);
      prefersLight.removeEventListener('change', updateTheme);
    };
  }, []);
This is where the magic happens. This useEffect function handles the theme logic based on the preferred color scheme. It initializes two MediaQueryList objects — prefersDark and prefersLight. These target dark and light color schemes.
The crucial part is the invocation of setTheme(). This sets the data-theme attribute on the document.documentElement. This attribute changes the app’s theme to match user preferences.
We call updateTheme() to set the theme. Event listeners are then added to prefersDark and prefersLight. The purpose of this is to track changes in color scheme preferences. When these preferences change, the updateTheme() function triggers accordingly.
Lastly, the cleanup function removes the event listeners when the component unmounts. This ensures clean handling of theme updates based on color scheme preferences.
This component is imported to the Header.tsx, where its display toggle lies. On selection of any theme, the respective color themes update. So we can choose to make only dual themes or multiple themes selections.
Comparison
This is what happens when we don’t follow the clean architecture principles we’ve discussed. Looking at the code snippet below, it’s clear that the first option is much better.
Now, think about applying the second option to a large project:
//With clean architecture
<div className="bg-baseOne text-baseThree">
    Comparison
</div>

//Without
<div className="bg-gray-100 dark:bg-gray-600 third:bg-yellow-500 text-gray-800 dark:text-gray-200 third:text-red-500">
    Comparison
</div>
Best Practices
Here are some helpful guidelines to make work easier and more effective. These suggestions can improve how we create and manage projects, making it simpler to maintain and ensuring better performance:
- Clear naming. Enhance readability with consistent naming conventions.
- Modularization. Divide code into reusable modules for scalability.
- Optimized assets. Speed up loading times with optimized media.
- Accessibility standards. Ensure design aligns with accessibility needs.
- Cross-browser testing. Confirm consistency across browsers and devices.
- Regular code reviews. Ensure quality through routine code assessments.
Conclusion
To sum up, blending clean architecture principles with Tailwind CSS creates flexible apps. It makes applications easy to manage with CSS variables. This method ensures a smooth user experience and simplifies the theming development process.
To see this project in action, check out the live demonstration on Vercel. You can also find useful guidance for the code on the GitHub repository.