How to Perform User Authentication with Flask-Login

In this article, we’ll look at the various features that Flask-Login offers and how to use them to create a secure user login functionality for your web application. By the end of this article, you’ll have a good understanding of how to use Flask-Login to implement secure user authentication in your Flask applications.
Authentication is an important part of any web application that allows users to access data or resources as it ensures that only the right people get access to sensitive information. This can also be achieved in Flask using Flask-Login.
Flask-Login is an extension in Flask with functions that handle the logging in and logging out of users and keep track of the current user(s) throughout the application. This makes it easy to implement authentication and authorization in your Flask applications.
Why Use Flask-Login?
Flask-Login has a number of features and functions that make it easy to seamlessly perform authentication in Flask applications. Here are some of the benefits of using Flask-Login:
-
User session management. Flask-Login handles the creation and destruction of user sessions. It can also store the current user’s ID in the session so that you can easily check if a user is logged in.
-
Login and logout functionality. Flask-Login provides built-in login and logout functions. These functions take care of all the important processes, such as creating and destroying sessions and redirecting the user to the appropriate page.
-
User loader callback. Flask-Login allows you to define a user loader callback. This callback is used to load the user object for the current session. This is useful if you’re using a database to store user information.
-
Authentication and authorization. Flask-Login makes it easy to implement authentication and authorization in your applications. You can use Flask-Login to protect specific pages or routes and to grant users different levels of access to your application.
Prerequisites
To follow long with this article, you need the following:
- a knowledge of Python and Flask syntax
- a basic knowledge of HTML and CSS
- Python version 3 and Flask installed
Obviously you also need access to a web browser.
Getting Started
To fully make use of the Flask login module, we need to have Flask-Login and other necessary dependencies installed. These libraries provide the necessary functions and tools needed to improve the functionality of your app. To install them, open your command prompt or terminal and execute the following pip command:
pip install flask-login flask_sqlalchemy flask_bcryptHere’s a breakdown of what each of these libraries is used for:
- Flask-SQLAlchemy: integrates SQLAlchemy with Flask for database operations
- Flask-Bcrypt: adds Bcrypt hashing for password security in Flask
Once the installation is completed, it will automatically have the Flask login downloaded in the directory you used.
Note: at the time of writing, there’s a slight issue in resolving the dependencies in the latest version of Flask and Werkzeug. To resolve this, you have to force install version 2.3.0 of Werkzeug, as it’s the only known version working right now.
Once your dependencies have been installed, you’ll need to initialize them with your Flask app:
from flask_sqlalchemy import SQLAlchemy

from flask_login import UserMixin, LoginManager, login_user, logout_user, login_required

from flask_bcrypt import Bcrypt

from flask_login import LoginManager
 app = Flask(__name__)

login_manager = LoginManager()

login_manager.init_app(app)
In the code snippet above, we’ve also initialized the LoginManager object in our application. LoginManager is an extension of Flask-Login that’s used to set up the necessary configurations for handling user sessions.
Creating a User Model
A model is a representation of the data structure you want to use in your application. It defines how data is organized, stored, and manipulated within the system. Models are usually used with a database that follows the structure defined beforehand. For our app, we have the following data:
- a unique ID
- a username
- a password (hashed)
class User(UserMixin):

id = db.Column(db.Integer, primary_key=True)
username = db.Column(db.String(64), unique=True)
password_hash = db.Column(db.String(128))

def __repr__(self):
  return f'<User {self.username}>'
You can also add additional properties to your user model, such as an email address or profile picture, depending on the scope of your project.
Creating a Database
Once you’ve defined your user model, you need to create a database that will store the data structure we created in the previous model.
For this article, we’ll be using an SQLite database. This is because SQLite is a lightweight and serverless database engine. This makes it easy to set up and use, as it doesn’t require a separate installation. It’s also a good choice for small- to medium-sized applications.
Here’s a breakdown of the steps for using an SQLite database in our application:
-
To make use of the SQLite database, you have to set a URI in your Flask app configuration. This is usually done at the top, alongside other configurations. Here’s a snippet you can use:
app.config['SQLALCHEMY_DATABASE_URI'] = 'sqlite:///site.db' # Using SQLite as the databaseIn this snippet, the
///...indicates the relative path to your file —site.db— which is the name we used for our SQLite database file. This name can be changed to anything you prefer. -
Next, you have to initialize the Flask-SQLAlchemy ORM using this snippet:
db = SQLAlchemy(app)SQLAlchemy is an object-relational mapper that provides a set of tools for working with databases using Python. The line
db = SQLAlchemy(app)creates an instance of the SQLAlchemy class and binds it to your Flask application (app). -
To create this database, we have to initialize the database, using the
create_allmethod:if __name__ == '__main__': db.create_all() app.run(debug=True)This code is typically placed at the end of your Python script or in a separate script dedicated to initializing the database. Once you run your script, the database file will be created with corresponding tables based on the models we defined previously.
In this case, the code will create a
site.dbfile with aUsertable if it doesn’t already exist. Thesite.dbfile usually comes in a folder called/instance/.
Next, we need to create a user_loader that takes a user ID and returns the corresponding User object. Here’s an example:
@login_manager.user_loader
def load_user(user_id):
  return User.query.get(user_id)
Password Hashing
Password hashing is a security measure that stores the cryptographic representation of the user’s password before it’s stored in a database. This way, it becomes more difficult to get the actual password even when the security of the application has been compromised.
Usually, the password is first hashed in the registration process and stored in a database. Then, each time a user logs in, their password is hashed again and compared to the hashed password stored in the database. If the two passwords match, the user is authenticated and given access to the application.
How to hash and verify passwords using Flask-Bcrypt
Flask has an extension called Flask-Bcrypt that helps to achieve this functionality. It has two major functions: generate_password_hash() and check_password_hash().
Thegenerate_password_hash() function takes the user’s password as an argument and returns a hashed password. This is usually used in the registration logic.
The check_password_hash() function takes a password and a hashed password as arguments and returns true if the two passwords match, or false if they don’t match. This is called before granting access to the login view
Creating a Register View
Views are a part of the Flask framework used to generate HTML, JSON, or other data that’s sent to the user’s browser. In this code snippet, we’re going to create a view that accepts the user’s input and adds the details to the database:
@app.route('/register', methods=['GET', 'POST'])

def  register():

if request.method == 'POST':
  username = request.form['username']
  password = request.form['password']
  hashed_password = bcrypt.generate_password_hash(password).decode('utf-8')

  new_user = User(username=username,password=hashed_password)
    db.session.add(new_user)
    db.session.commit()
    return redirect(url_for('welcome '))
  return render_template('registeration.html')
Here’s a breakdown of the code:
-
In the first line, we define a route for the URL path
/login. This route accepts both GET and POST requests. Thelogin()function, which is associated with the route, will be executed when a request is made. -
Next, we confirm if the request method is a POST method:
if request.method == 'POST':Once it’s confirmed, the function retrieves the values entered by the user in the login form:
username = request.form['username'] password = request.form['password'] -
It then queries the database for a user with the provided username. If a user with the provided username is found and the password matches, the code inside this block will be executed.
Creating a Login View
In the login view, we create a logic that accepts input from a page and then checks if the input matches any row in the database:
@app.route('/login', methods=['GET', 'POST'])

def  login():
  if request.method == 'POST':
    username = request.form['username']
    password = request.form['password']
    user = User.query.filter_by(username=username).first()

    if user and bcrypt.check_password_hash(user.password, password):
    login_user(user)
      return redirect(url_for('welcome'))
  return render_template('login.html')
Here’s a breakdown of how the code works:
-
In the first line —
@app.route('/login', methods=['GET', 'POST']):— we’re making use of a decorator that defines a route for the URL path/login. The route accepts both GET and POST requests. The associated function,login(), will be executed when a request is made to this route. -
The
login()function begins by checking if the request method is POST:if request.method == 'POST':Once, it’s confirmed that it is a POST request, it retrieves the values entered by the user in the login form:
username = request.form['username'] password = request.form['password'] -
It then queries the database for a user with the provided username:
user = User.query.filter_by(username=username).first() if user and bcrypt.check_password_hash(user.password, password): -
If both the username and the password are validated, the user is granted access using Flask-Login’s
login_userandredirectfunctions:login_user(user) redirect(url_for('welcome')) -
However, if the
requestmethod isn’t POST or the details are incorrect, it renders thelogin.htmltemplate:return render_template('login.html')In essence, it checks if the entered credentials are valid, logs the user in, and redirects them to the welcome page if successful. If the login is unsuccessful or it’s a GET request, it renders the login template for the user to enter their credentials.
Creating Logout Logic Using a Protected View
In most applications, some pages are inaccessible if the user isn’t logged in. This includes pages like transaction history, drafts, and logout pages. Flask-Login provides a convenient way to protect these pages/routes and restrict access to authenticated users using the login_required decorator. Here’s a breakdown of how it works.
To make use of this functionality, you have to import the login_required decorator from Flask-Login:
from flask_login import login_requiredNext, you have to add the login_required decorator to any route that you want to protect. For instance, let’s create a logout page that can only be accessed when the user is logged in:
@app.route('/logout')
  @login_required
  def  logout():
    logout_user()
    return redirect(url_for('login'))
Here’s a breakdown of how it works:
-
Just like in the login view,
@app.route('/logout')defines a route for the URL path/logout. -
Next, we add a
login_requireddecorator that ensures that the user must be logged in to access thelogoutroute. If a user isn’t logged in and tries to access this route, they’ll be redirected to the login page. -
Inside the
logoutfunction,logout_user()is called. This function is provided by Flask-Login and is used to log the current user out. -
After logging out the user, the function redirects them to the
loginroute usingredirect(url_for('login')).
So, when a user accesses the /logout route, Flask-Login ensures they’re logged in (@login_required), logs them out, and redirects them to the login page. This helps to securely handle user logout in your Flask application. The login_required decorator is applied to the /protected route, indicating that only authenticated users can access it. And if a user tries to access a protected page without being logged in, Flask-Login will redirect them to the login page.
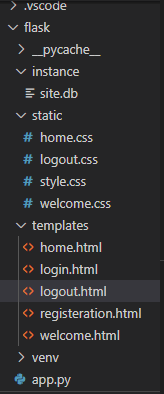
Adding Templates
Templates in Flask allow you to make use of HTML pages to define how your site will look. To fully implement the logic in our app.py file, we’re going to create the HTML pages pictured below.
The animation below shows how the templates render the different pages of our site.
You can see the full code for this tutorial and learn more about its implementation in this article’s GitHub repository.
How Flask-Login Manages User Sessions with User Session Cookies
A user session is a system used to track and update user information while the user is logged in. Flask-Login manages these sessions by storing a session cookie on the user’s browser. The session cookie is a small piece of data that contains a unique identifier for the user’s session.
When a user logs in to a website using Flask-Login, the server generates a session cookie and sends it to the user’s browser. The browser stores the session cookie and includes it in all requests to the server. The server uses the session cookie to identify the user and their session state.
For example, if the user is logged in and visits a page protected by Flask-Login, Flask-Login will check the session cookie to see if the user is authenticated. If the user is authenticated, Flask-Login will load the user’s profile information from the database and make it available to the view. If the user isn’t authenticated, Flask-Login will redirect the user to the login page.
When the user logs out of the website, the server deletes the session cookie from the user’s browser, which terminates the user session.
Conclusion
Flask offers a variety of functions that address different aspects of authentication, ranging from user session management to authorization. By making use of these functions, you can implement a robust and secure authentication system tailored to the specific needs of your application.